Working With a Bubble Balancer, Pt. 1
We Recently Talked About Balancing With Wheel-Spinning Machines. Now We’ll Continue the Discussion With Bubble Balancers.
HERE IS AN interesting fact: “A weight of one ounce on the tread of a tire 30 inches in diameter will exert a force of about three pounds at a speed of 30 miles per hour. Double the speed to 60 mph and the force becomes quadrupled, amounting to about 12 pounds.” Dare you go 90 mph and that number jumps to 27 pounds.
These facts come from a mid-1950s publication, “Motor Services New Automotive Encyclopedia,” published by Goodheart-Willcox Co. Those are pretty impressive numbers, and it makes the importance of proper wheel balancing very clear.
In the July-September issues I shared my thoughts on tire balancing with equipment that spins the wheels while they remain on the vehicle. I briefly mentioned using a bubble-type tire balancer and this drew reader questions on why that approach wasn’t covered in more detail. The reason was it simply didn’t fit with the direction of that particular article.
So if you were wondering, can a good-quality bubble tire balancer yield excellent results, the answer is yes, most of the time. Several things will determine how successful you will be: tire quality, condition of the tire, wheel, brake drum or rotor, the quality of the bubble balancer and, of course, your determination.
Check the Runout
Before removing any wheels, the radial and lateral tire runout (wobble out of the plane of rotation) must be checked to make certain all is within specifications. This has been covered in previous articles, but for newcomers let’s go over it again.
The maximum allowable runout is usually .060" ( 1 ⁄16") for most of today’s passenger tires. Obviously the less you have, the better. (If your vehicle’s manual indicates otherwise, go with their recommendations.)
Drive the vehicle a few miles to warm up and round out the tires. Immediately raise the vehicle so that tires in question are 2" off the ground. By positioning something like a cinder block or a 4 x 4 block of wood next to the tire, you will be able to judge the degree of tire/ wheel runout.
Place the block very close to the tire’s tread and slowly rotate the wheel by hand.
Once you locate the high spot of the tire, push the block up to the tread so that it is just touching, and continue to rotate until the largest air gap is visible. This will be your radial runout. You can even use a set of drill bits to gauge the gap in between the tread and the block. If it is within specifications, move to the sidewall and repeat the procedure in the same manner. If either exceeds the limit, there are still options. The tire can be dismounted and repositioned on the rim, sometimes yielding improvement. The idea is to position the high spot of the tire with the low spot of the rim. Tire truing is another option, although you may have to approach a commercial truck tire center to locate someone with a machine. Truing the tire will make the tread run concentric with the rim, and though rubber is trimmed off, it’s claimed that the process will extend the mileage life of the tires. This, however, only deals with the radial runout of the tire. If lateral runout is excessive, you will need to determine if the tire or wheel is at fault. Replacing the defective tire or rim is, of course, another option. You could also take the approach that I often do. If the runout isn’t too far beyond the maximum limit; the tire and rim all seems safe and in good condition (no cracks, bubbles or bumps in the tire; no obvious rim damage, etc.) then balance it as best you can, and give it a test drive to see how it feels. In other words, see what you can get away with, as long as there is no safety risk.
Excessive runout isn’t just an issue for bubble balancing tires; it’s unacceptable with any type of tire balancer. Naturally your steering linkage and suspension components must be in good condition. The best balancing in the world won’t correct the feeling your steering wheel will transfer to you due to worn-out tie rod ends.
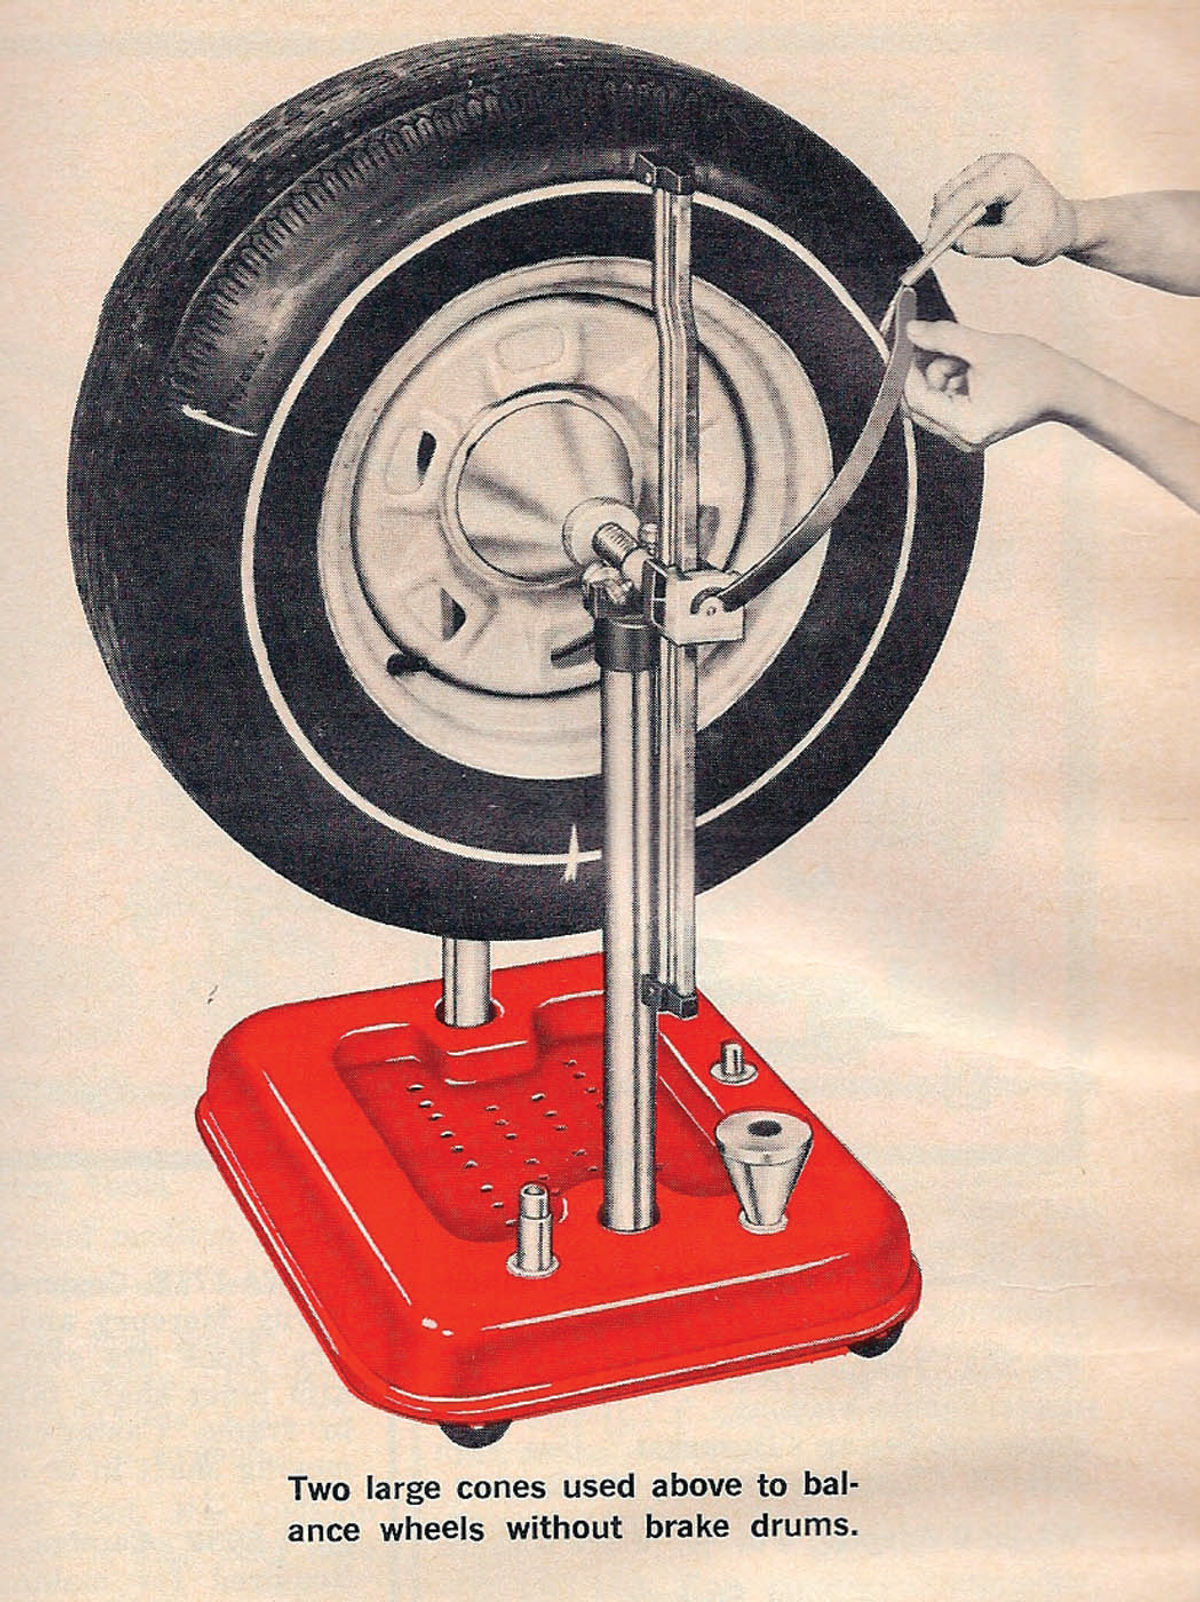
The drums and rotors must be properly balanced as well. If they aren’t, vibration will persist. Some balancing equipment, for example the old Snap On model WBK-2C shown in Photo 1 (a scan from their 1977 catalog) was designed to balance wheels with or without the drum/rotor. The choice is yours. It was designed with rim sizes up to 17" in mind, and uses gravity to roll the heavy spot to the six o’clock location. I have never owned one of these, but it looks like it could be a fun addition.
Keep in mind that this Snap-on, as well as bubble-type balancers, are designed for static balancing, where the tire and wheel are balanced stationary. If you encounter a tire with an “extreme dynamic condition” (as one balancing manufacturer put it), where the heavy spot is significantly on one side of the tire as shown in Illustration A on the next page, you will most likely never be able to completely correct the situation using a bubble balancer, and will feel a vibration as the wheel speed increases.

Better Tires Balance Better
Tire quality will also have a great deal to do with the outcome. I run Michelin tires on most vehicles, and find them to require less weight for balancing compared to other manufacturers, and haven’t encountered the above-mentioned extreme dynamic condition. On the other hand, while balancing my neighbor’s “lower quality” trailer tires, one required over a half-pound to balance. I would be willing to bet there remains an extreme dynamic condition when the wheel speed increases, but the fact that the tires are on a trailer, and mounted to a solid axle where there is no steering and linkage that would allow for side to side movement, it’s acceptable.
All of that being said, my tires presently are all bubble balanced, and unless there is a vibration that persists, the spin balancing equipment remains unplugged.
Choosing a Bubble Tire Balancer
New bubble balancers can be purchased from companies like JC Whitney, Northern Tools and Harbor Freight. There also certainly are many new and used ones to be found online at Craigslist and eBay. The prices on these new bubble balancers seem to run around $70 and up.
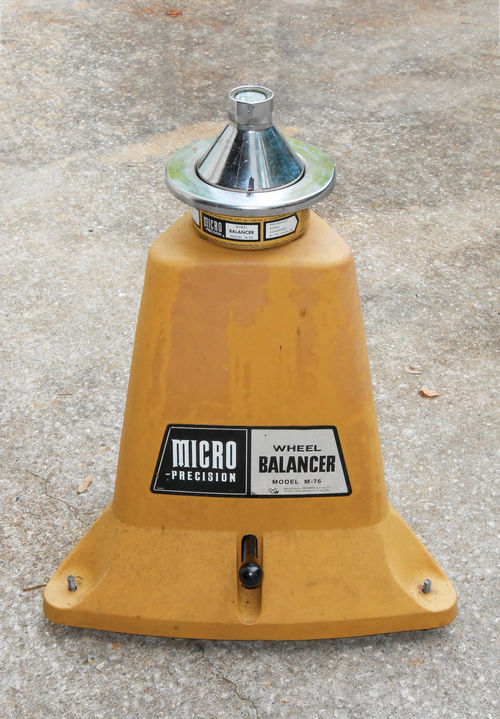
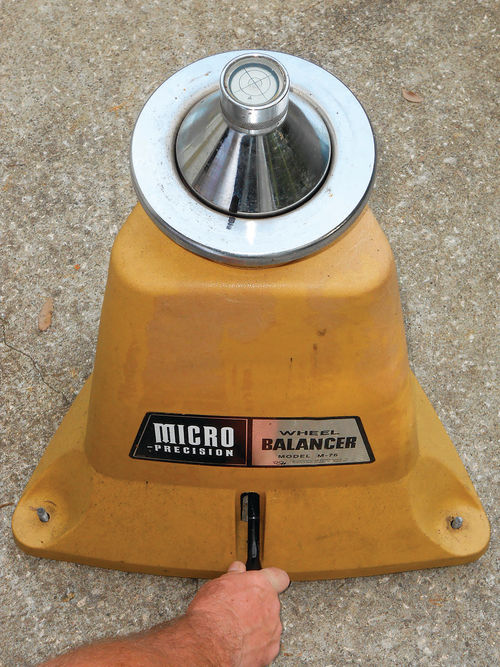
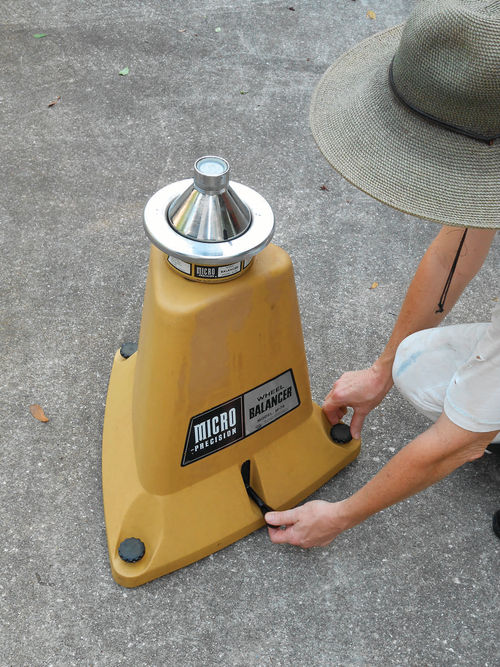
Personally, I would recommend taking your time and searching for a quality, older bubble balancer to purchase; one that actually was built for use decades ago in a gas station or auto repair garage. Photo 2 is the Micro Precision model M-76 made by Coats. I was fortunate enough to find it probably 10 years ago at a local swap meet for $40. The foundation of this unit is made of strong plastic, or possibly it’s some kind of composite. Of the several I have encountered over the years, I haven’t seen one that was cracked, although certainly they can be. They also made an earlier model, the M-60, with a steel foundation. The only downside to that model is the release lever for the balancing head is located up higher, closer to the tire. When dealing with wider rims and tires, this lever could very possibly make contact with the tire.
Even so, if the price is right, latch on to it. You can modify the release lever if that’s needed.
Coats isn’t the only manufacturer out there, but their equipment seems to show up more frequently.
When Shopping, Check the Bubble Carefully
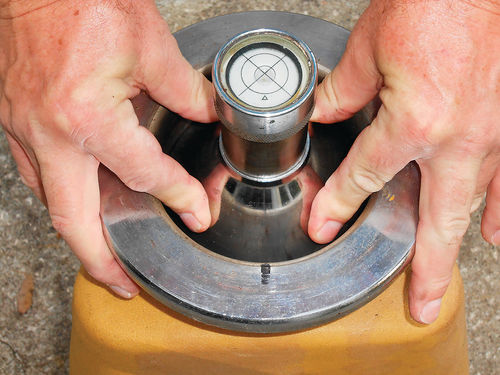
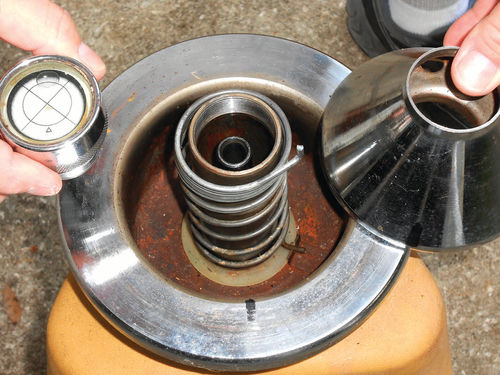
There isn’t too much to be on the lookout for. Probably the biggest concern would be the level bubble itself. The bubble for this unit should be 1 ⁄4" - 5 ⁄16" in diameter as shown in Photo 3. If the bubble is larger, it has likely leaked over the years making it more difficult to accurately balance tires. I imagine someone has managed to find a way to refill these levels, but I don’t know how. Check to see that the centering cone slides up and down freely as in Photo 3 and that the release lever indeed lifts and frees the chrome head, allowing it to “float.”
There are three leveling feet on the base of M-76 unit (Photo 4), make certain they are there and working OK. Encountering a unit with rusted leveling feet or a stuck centering cone isn’t the end of the world; that is, if the price is right. Usually WD-40 or other quality penetrating oils will do a good job of freeing things up if given plenty of time. If you can get at the rusted area with a small wire brush, it can aid the penetrating oil in working through the rust.
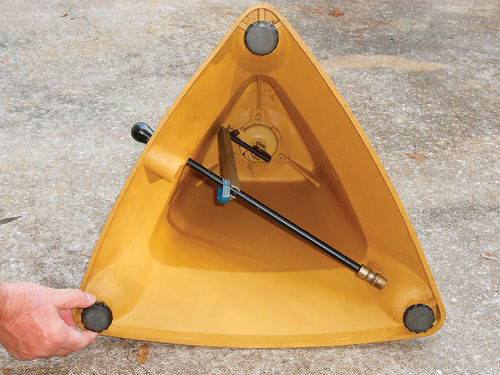
These feet have 3 ⁄8"-16 threads, so there is no mystery to making new ones should one be missing. An interesting note, these original feet can be installed from either side. As shown in Photo 4 you have a wide foot that would be adjusted by reaching underneath the balancer to turn it. This is a huge benefit if you are working on a surface like a hard-packed dirt floor. They can also be used in the same position when on concrete, or they can be reversed and threaded down from the top. This puts the large black knobs topside, giving you easier access for leveling, but yields a much smaller foot, which wouldn’t be a problem on concrete.
On the M-60 and M-76 Coats Micro Precision models, the level will thread off and the cone should slide straight up and off exposing a spring below it as shown in Photo 5. One that is lightly rusted in place can usually be freed up with penetrating oil and once the cone is lifted off, remove any remaining rust so that it works freely again. There is a close tolerance between the centering cone and tube, so be careful when cleaning to maintain it. If the fit were to become loose, the balancer would be unreliable. If it’s badly rusted and pitted, avoid it unless the owner will load it on your truck for free. Possibly there may be salvageable parts.
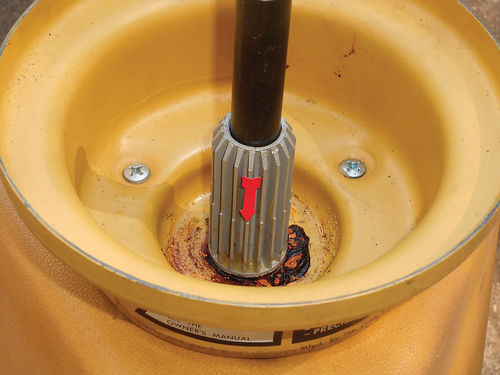
Finally, lift the chrome balancer head off the foundation. This will expose what is called the dampener basin. It should be filled to the top of the step on the center post (where the red arrow is pointing) with 20-weight oil as shown in Photo 6. That should be about 6 fluid ounces. This isn’t for lubrication purposes, but instead it acts as an oscillation dampener to stabilize the balancer. If it’s nasty-looking or empty, refill it, and then replace the balancer head.
For some reason today the prices are all over the place on these vintage bubble balancers. Possibly folks are buying them up on speculation. Although speculation of what, I haven’t a clue. A reasonable price for one not needing any major repairs might be in the $150 range, and you will certainly find them priced much higher. On the other hand, if you happen to be in the right place at the right time it might be half that price.
Other Needed Items
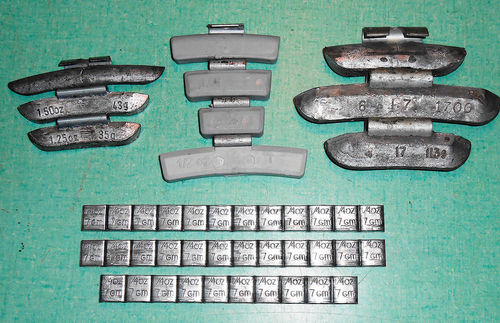
Wheel weights and a weight hammer are about the only other tools and accessories necessary to get things going. Photo 7 shows just a few of the many different wheel weights. To the far left are lead weights to fit the majority of steel passenger wheels. In the center are weights designated as “T” series. They have a plastic coating on them and, interestingly enough, the physically largest weight located at the bottom is only a ½-ounce. It weighs less than any of the ones above it. These particular weights fit the polished aluminum aftermarket wheels on my El Camino. I removed them from the rims once the new tires were brought home from the “club store” where they were purchased. Wheel balancing is pretty much built into the purchase price if you want the “road hazard protection.” I don’t bellyache about it; I just add the wheel weights to my tool collection. Today’s vehicles use a wide variety of wheel weights. They differ in the material they are made of, the contour of the weight where it fits up against the wheel, external contour of the weight, coated and non-coated, the shape of the metal retaining clip, and most likely other differences that I failed to notice. Wheel weights marked with an “MC” are used on many later model GM, Ford, and some Mopar products. If your wheels have existing weights on them, look for any alphabetical identification marked on the weight. Online you can do a Google search for “wheel weight application chart” or check with your local auto parts store to find out what your newer vehicles’ wheels require.
Those larger wheel weights to the right are for trucks, motorhomes, and other vehicles with larger wheels, and these are not even close to being the largest weights. With bigger wheels come larger weights to correct imbalance. In the bottom of the photo are three rows of tape-on weights. They’re flat, and the lines on these indicate ¼-ounce divisions. Simply cut off the amount of weight needed. These can be used on most wheels and are placed so that centrifugal force will be working to keep them in position. The area where they are to be applied must be clean, so use an appropriate cleaning solvent to make sure it’s spotless. Then simply remove the backing from the tape and press in place. Once on, there is no repositioning the weight. Tape-on weights will be covered in greater detail when we actually get to wheel balancing.
New weights can be purchased through auto parts stores such as JC Whitney, and/or of course online there are plenty of options. Even amazon.com offers wheel weights, and you can see some of the varying types available.
If I Had a Hammer…
Installing and removing weights is almost impossible without a pair of wheel weight pliers/hammer. Photo 8 shows several variations. The tool that looks like a hammer will probably limit you when trying to remove some of the newer type weights, but works well on most passenger vehicle steel wheels. The other two are a “pliers” type of design. This allows them to open the amount needed to remove any type of weight. Both have hammers, and the old PDQ model (with straight handles) has a cutter for trimming lead weights if necessary.
Find a Good Location and Then Level the Balancer
Start this part of the project by finding a good location for your balancer. You want to avoid any breeze, and while I love to open the back walk-in entrance to my garage, it creates a venturi effect. Though it may feel great, it will float the tire around while it’s on the balancer.
Personally, I am more comfortable sitting down for the task, so an adjustable height brake stool is a good option.
Find a hard surface that’s as level as possible. Concrete is perfect, but a hard packed dirt floor can be used too. Just re-check the balancer occasionally to make sure it remains level.
Old-style balancers should all have leveling feet similar to that in Photo 4. A good method is to thread them all in fully, and then thread each out the same amount, say four or five turns. This should give you enough adjustment range in both directions.
The method I have used for leveling the balancer is as follows:

Position the balancer where you want to work and adjust the feet until the bubble is centered in the cross hairs. If you are working with a model like the M-76 that has a release lever to allow the head to float freely, depress it and re-check to make certain the bubble remains centered, as is being done in Photo 9.
If the bubble is not centered, the release lever will need to be held down while any final minor adjustments are made, as my wife Mary is doing in Photo 10. Once done, slowly release the lever, again locking the head, and then depress it once more for a final re-check.
Recently I discovered the following leveling procedure outlined by Coats for the M-76, and I will paraphrase here:
First place a tire/wheel assembly on the balancer and then adjust the leveling feet to center the bubble between the cross hairs. Depress the release lever freeing the head and proceed to balance the wheel. (Simply apply the weight needed to center the level bubble; this tire will only be used for leveling verification.) Once the bubble is centered, with the lever remaining depressed, slowly rotate the wheel 180° without lifting if off the balancer head. When the oscillating motion has settled down, note the bubble’s position. If the bubble has moved from dead center, use the leveling feet to move it half the distance back to center. The unit is now ready for use.
Note, on the new pedestal-type balancers, for example the one pictured in the Northern Tool catalog, or even the M-61 currently sold by Coats, they have no leveling feet, simply a circular base. There are three small screws equally spaced around the small level bubble. Use a screwdriver and adjust these screws to level the bubble. The leveling method outlined by Coats could be applied here as well, although there is no locking lever to contend with.
Wheel Inspection and Preparation
Remove any old wheel weights. Make certain that the wheel to be balanced is cleaned of any dirt, mud or grease buildup, and that there are no pieces of loose gravel in the tread to affect the balance. Taking the time to do so will naturally improve your results.
Anytime wheels are removed for balancing or even simply rotating, I take advantage of it and not only clean the tires and wheels, but give the tires a close visual inspection. It’s not surprising to find things stuck in the tread that shouldn’t be there, and caught early, you may just avoid a tire puncture. Simply put, if the wheels are grungy, now is a great time to get them clean.
Also, the wheel’s center hole must fit the centering cone.
This might sound silly and obvious, but if you own an early VW and go to place the wheel on the balancer, you will quickly find that the huge bolt pattern and center opening won’t fit any bubble balancer without the use of a special adapter.
They’re out there, but it’s unlikely you’ll have to worry about tripping over one at your local swap meet.
Large truck wheels will likely require an adapter as well. The M-76 and M-60’s centering cone will handle up to 4.75" diameter holes.
Next, we’ll work with our bubble balancer.


