
How -to More About Disc Brake Projects
We Recently Ran a Two-Part Series On Adding Front Discs. Here Are More Tips To Help Your Stopping Power.
I’VE COME TO realize there were a few topics that I failed to discuss in-depth during the disc brake conversion articles that ran in the September and October issues.
One of those topics was brake fluid.
Yes, I mentioned the necessity of adding brake fluid to the system, as well as the need to properly bleed the air from the system before the fluid can do its job.
But what I didn’t talk about was the fluid itself.
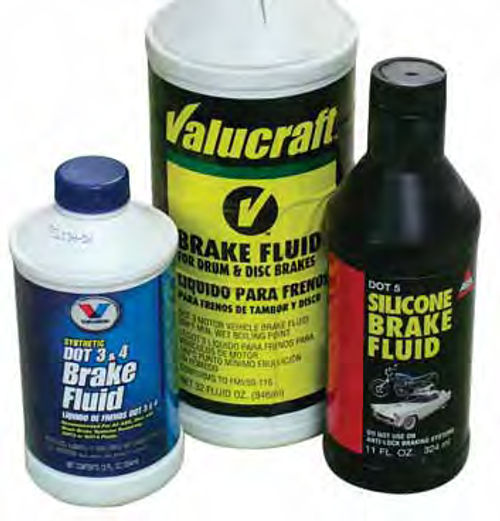
Just like motor oils, there are several different grades of brake fluid out there, including DOT 3, 4, 3&4, 5 and 5.1,with the most popular being DOT 3, 3&4 and 5 (Photo 1).
Let's start by explaining the DOT designation. DOT, of course, stands for Department Of Transportation. The DOT inspects and then interjects its opinion into just about everything automotive. If it is important to the operation of your ride and it doesn't say “DOT approved,” don’t use it.
The numbering system for brake fluid, 3, 4, 3&4, 5 and 5.l is derived from a rating given by the DOT when determining a brake fluid’s compressibility and its ability to resist boiling under extreme braking conditions.
In a nutshell, the higher the DOT number, the better the fluid.
But then that doesn’t do much to explain all of these numbers. To do that you have to consider how far we’ve come with brake technology.
In the early, post-mechanical brake era, DOT 3 was the fluid of choice. It did everything a brake fluid should do in a drumbrake world. It didn’t compress much, resisted higher braking temperatures, and because it is a glycol-based fluid, it also absorbed moisture to help prevent rust from forming inside the brake system.
In the ’70s, disc brakes came into vogue along with the need for a fluid that could withstand even higher brake temperatures. To do that, DOT 3 was replaced with DOT 4. This was basically a higher-temperature rated version of DOT 3.
But then as with a lot of other things automotive—the 10W designation for motor oil comes to mind as one example—there was some confusion as to which fluid should be used in what vehicle. The DOT fixed that by combining DOT 3 and DOT 4 and calling the result DOT 3&4. This fluid is basically DOT 4, but the combination numbering seemed to quell the confusion. By the way, DOT 3 is slowly being phased out and may not be available in your area.
Next on the list is DOT 5. This is the one fluid in the group that is completely different from the others in that it is silicone-based. Developed specifically to satisfy the extreme heat tolerance requirements of the racing industry, which would be 500° F plus, this is the fluid found in all of the colorful left-turning race cars.
This fluid has also found its way into the aftermarket due to its high heat tolerance and it’s being used in off-road vehicles, drag cars and other types of extreme vehicles.
The last fluid, DOT 5.1, was developed as a counter fluid to DOT 5. This is a glycol-based fluid that has the same high tolerance to extreme temperatures that silicone fluids have, but unlike silicone fluids DOT 5.1 has a natural lubricant that makes it the best brake fluid out therefor ABS(anti-lock braking system) setups that use mechanically cycling proportioning valves.
So that raises the question of which type of fluid is best for use in vintage rides, glycol or silicone?
Look for Crystal Clear Fluid
From the beginning,automobile manufacturers have specified the use of glycol-based brake fluid in their vehicles. The reasoning is simple. Glycol-based brake fluid absorbs moisture in the braking system, preventing rust from forming in the lines and master cylinder. This fluid is also extremely forgiving. When was thelast time you changed the brake fluid in your ride? Last year? Two years ago? How about never?That’s me; I can’t recall having ever changed the fluid in any brake system for the sake of changing the fluid. I’ve changed the fluid because I restored the entire system, or replaced a line or two, but never because the maintenance log said I should. That’s another reason automobile manufacturers use glycol-based brake fluid. It takes a beating and keeps on stopping your ride.
Not sure if your glycol-based brake fluid needs to be changed? Open the master cylinder reservoir and observe the fluid. Clean fluid will be crystal clear. Fluid that has moisture in it will have a brown tint to it. Flush the system if the fluid is tinted brown; keep driving if the fluid is clear.
Are there any disadvantages to using glycol-based brake fluid? The big disadvantage would include its ability to destroy paint and corrode electrical components. It also can wreak havoc on your Ford truck should a leak develop in the plastic reservoir on the master cylinder. I’ll explain. Fluid drips from the reservoir down onto the cruise control module, the electrical terminals inside the module corrode and overheat. Your truck burns. No, I’m not kidding. If you own a late ’90s, early ’00s Ford truck or SUV, check with your dealer to have the vehicle “fixed.”
In the silicone world you have a fluid designed specifically for high heat conditions and it won’t harm your paint or hard plastic if you get sloppy. On the down side is its inability to absorb moisture. It is also more compressible than glycol-based fluids, which can equal softer brakes. It provides no lubrication to the system, is incompatible with the mechanical valving in some ABS systems, and it must be changed yearly because of its tendency to aerate. What's that? Shake up a bottle and it will turn milky due to its tendency to absorb air. To get rid of the air, let the bottle sit undisturbed for a while.
Whichever route you choose, be aware that glycol and silicone brake fluids are completely incompatible with each other. Mixing even a small amount will turn your entire brake system into a sludge pit.
Do any of the OEM guys use silicone? At this writing, Harley Davidson is the only manufacturer using silicone-based brake fluid.
Brake Rotors
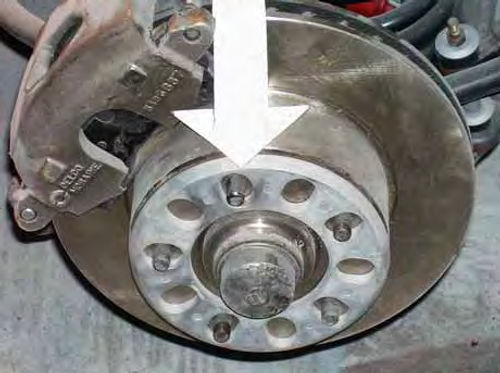
Despite the fact that many disc brake conversion kits can be ordered vehicle specific, it is still a very real possibility that the stock wheels on your ride won’t fit after the conversion. Why not? Most disc brake conversion kits come with 11-inch rotors and 11-inch rotors were designed for use with 15-inch or larger wheels. That’s great in that the stopping power provided by 11- inch rotors is about as good as it gets, but that’s not so great when you consider that a large number of older vehicles came with 14-inch wheels. It’s like trying to bowl wearing shoes two sizes too small.
The problem isn’t so much that the larger rotors are causing an interference problem with the wheels; it is more that the calipers that must reach around the rotors just don’t have enough room to clear the smaller 14-inch wheels (Photo 2).

Is there anything that can be done to correct the problem other than scrapping this brake conversion kit and starting over?
Maybe.
For starters, you can try adding shims between the rotors and the wheels. Shims are available in sizes ranging from 1/8-inch thick up to 1/2-inch thick. Just be aware that adding shims thicker than 1/8-inch thick will require the use of longer wheel studs (Photo 3).You need at minimum 1/2-inch of wheel stud threads extending beyond the edge of the mounting surface of the wheel to safely mount the wheel.
What the shims will do for you is to move the wheels outboard a little, hopefully enough to provide the needed clearance between the wheels and the calipers.
But when I added shims in the old days, the wheels had a tendency to loosen.
I mention that issue because this was, and maybe even could be, a very real problem. But as I recall, back in the old days you didn’t even have to add the shims to encounter wheel loosening problems, especially when using custom (Mag) wheels. Those wheels just came loose. Period.
These days I’ve yet to encounter a wheel loosening problem, even when adding shims.
Perhaps the wheels have improved. Perhaps we simply no longer tighten wheels with 4-way spinners the way they used to at the local gas station. Now we use torque wrenches to get it right.
Getting back to the 11-inch rotor inside a 14-inch wheel issue, try mounting one of the wheels and looking behind it to see where the interference is located. Usually it is the caliper that is touching and usually it is touching right at the outside edge of the wheel.
That thin shim I talked about will often provide the necessary clearance to move the wheel away from the caliper and gain that needed clearance.
Rather not deal with the shim issue at all? In that case, I urge you to check the wheel size on your ride before ordering a disc brake conversion kit.
If your ride is sporting 14-inch wheels and the plan is to keep the wheels, then to be on the safe side order a kit with nine-inch rotors.
Here’s a tip for you. If in doubt about which size rotor is best for your vehicle, remove one of the wheels, remove the tire, haul the cleaned wheel to your automotive parts supplier and ask to see an 11-inch rotor.
You won’t need your rocket science degree to tell right quick if there is at least an inch and a quarter of clearance between the rotor and the inside of the wheel all the way around. If you don’t have at least that much clearance, you need a kit that has smaller rotors.
Can you just switch out the rotors and be on your way? No, you can’t. Caliper mounting brackets are designed for use with specific-sized rotors. Switching to smaller rotors will not shrink the position of the calipers. To do that, the disc brake kit must include spindles, or spindle brackets, designed for use with the smaller rotors.
Finally, be aware that converting to disc brakes will, in many cases, push the position of the wheels outboard by up to one half an inch. That's rarely an issue as most vehicles have plenty of clearance between the front wheels and the fenders. This only seems to become an issue when you aren’t aware this could become an issue.
Adding a Little Boost
Another way to improve the braking on an older vehicle, even without making the swap to disc brakes, is to add a brake booster.
In the old days, late ’50s through the ’60s, brake boosters were optional. If your ride was a high end vehicle, then it probably came with power brakes. Those are brakes with a booster added. If your ride was an economical one, more than likely it didn’t come with power brakes.
Power brakes were such an improvement over non-power brakes that many manufacturers touted the improvement by plainly stating the added option of power brakes right on the brake pedal.
Generally speaking, adding a brake booster is a pretty simple task. Just unbolt the master cylinder from the firewall and insert the booster between the master cylinder and the firewall.
However, you will find some vehicles, especially Ford products, that require the addition of a mounting bracket between the booster and the firewall to make the conversion work. How will you know if you need to add the bracket? The mounting position of the booster will be higher on the firewall than would be the case for a master cylinder without the booster. And yes, the firewall has been pre-drilled to accept the change.
Where can you find this bracket? Most Mustang restoration parts suppliers carry this item and it can be used on any Ford.
Then there is the matter of brake booster size. When you order a disc brake conversion kit that comes with a brake booster, the issue of size will have already been factored in. If you are adding a booster for the sake of brake improvement, consider that a seven-inch diameter booster will work fine on a vehicle that weigh sin from 2800 to 3200 lbs. (roughly speaking) while a nine-inch or larger diameter booster will be better suited to heavier vehicles.
Finally, since brake boosters require vacuum to work properly, you will need to find a large, at least 1/4-inch diameter, vacuum port on the intake manifold to deliver vacuum to the booster.
The first place to look is on the base plate of the carburetor. If one is there it is probably capped and may require a screw-in fitting. Find the fitting at your local parts supplier.
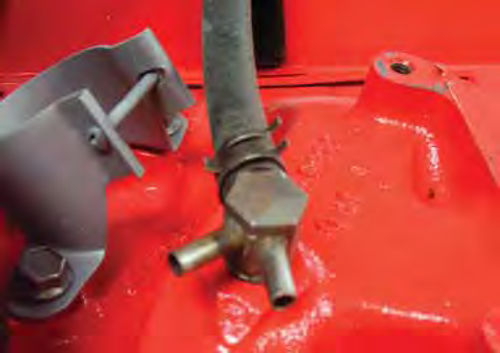
If the carburetor doesn’t have a vacuum port on its base, consider adding a vacuum “tree” to the vacuum port located on the intake manifold just behind the carburetor (Photo 4). Check with your local parts supplier to find a tree, and be aware that more than likely he’ll have to order it.
Brake Light Switch
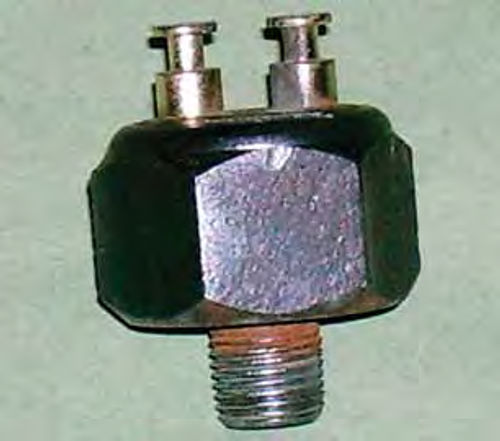
This is for anyone doing a conversion swap on a vehicle that has a pressure type brake light switch. What’s that? This switch uses brake line pressure to engage a switch and turn on the brake lights. When you press the brake pedal, fluid pressure builds and the switch is activated, illuminating the brake lights. Generally speaking, this switch is found screwed into a “T” fitting somewhere along the brake line exiting the single bowl master cylinder. It has two electrical connections; one is the power input and the other goes directly to the brake lights (Photo 5). You can retain this switch in your system by inserting it back into the front brake line somewhere between the master cylinder and the “T” connection that splits the brake line off to each front wheel.

Safety First With Two Bowls
Whether you decide to convert your ride to disc brakes or keep the stock drum brakes, I would urge you to consider exchanging the single-bowl master cylinder for a dual-bowl unit. This is a safety issue in that it allows for the separation of the rear brakes from the front brakes. Should a line crack to the front brakes, for example, with a dual-master cylinder you will still have rear brakes and a means of stopping your ride before you wrinkle all that nice paint.
The conversion is a fairly simple process as many of the older domestic brand vehicles opted for the Borg Warner brand master cylinder and replacement is a matter of removing the old and installing the new.
Which new one? My preference is the master cylinder that fits the 1980 Corvette. This is a large, two-bowl master cylinder that can handle either drum or disc brake systems (Photo 6). But don’t write this swap in stone. It works for many vehicles but as you know, there is always that odd vehicle that will not accept the mounting. In that case, a well-placed drill bit will solve that issue. Drill any necessary mounting holes through the firewall, not the master cylinder.
After installation, the brake lines can be easily separated at the “T” where the rear brakes are joined to the front brakes. Two couplings and a couple of lengths of new line will be needed to route the rear brakes up to the small reservoir and the front brakes up to the large reservoir. A little bleeding and you have just made your ride safer.
Where Do You Start to Bleed?
Finally, there is the issue of which wheel do you bleed first?
Back in the old days, that would be the single-bowl era; we always started the bleeding process at the right rear, worked to the left rear, right front, and finished at the left front. The idea was to start at the farthest point away and work toward the master cylinder.
These days I don’t think it really matters where you start the process if you are using a vacuum pump to do the bleeding. Any air that is in the system is going to be pulled toward the vacuum, and as long as you double-check each wheel cylinder to make absolutely certain that no air is left behind then you have accomplished the task at hand. Got a question? Send it along.
Resource
LPL Body Works, LLC
5815Contented Lane, Amarillo, TX 79109


