
Building Paul’s Personal Ride, Pt. 1
He Wanted a Driver That Would Suit His Own Tastes and Needs. So He Started Planning and Gathering Lots of Parts.
I HAVE BEEN WORKING on and restoring classic cars for over 15 years at this point in my life and most of the full blown restorations have started out the same way…I always tried to start with the most complete and rust-free candidate I could. In the long run it was always a financially sound plan that required less time and less money to complete the job.
That being said, over the last three or four years I’ve been bitten by the custom bug a bit and began to form a vision in my head of a particular vehicle I wanted. This one would use very few stock parts and there would be a good amount of fabrication involved on the body.
So begins the story of my new project that I will be chronicling in a series of occasional articles over the next year or so.
Let’s Make It a Driver… With My Shop Logo
Deciding that I was beginning to tire a bit of having perfect, shiny, highly detailed show cars, I came to the conclusion that I wanted a classic vehicle that I could drive almost daily and not be paranoid of road chips or parking it at the local burger joint if I was out and about. Knowing I want to drive it so often means I would be best-off using a modern engine and transmission. And, finally, it had to be an old pickup truck with my shop logo on the doors.
Thus began my search for a starting point. After researching trucks from the ’20s through the ’60s I decided that the Ford pickups from the early ’30s appealed to me stylistically as well as functionally for the body modifications I had in mind. I searched for several months online, utilizing sites such as Craigslist and eBay but nothing jumped out at me that was a good enough starting point at a reasonable price.
I then began to turn to some of the hot rod and rat rod forums online and searched the classifieds sections. A few weeks later I came across a 1934 Ford pickup cab for sale about an hour away that seemed like a possible candidate.
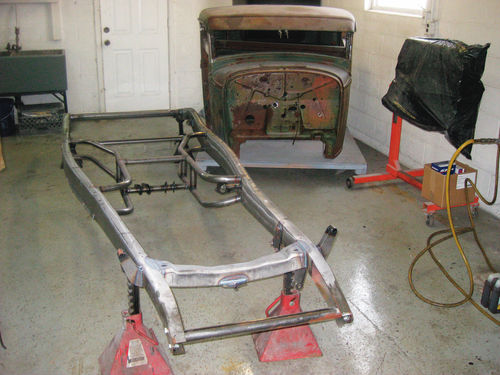
I took a ride to the owner’s house a day or two later and looked it over. The cab had already been chopped 6" which was something I had in mind anyway. The welds weren’t finished but the proper bracing had been installed for the chop to keep everything square, and the rust on the rest of the cab was minimal for a vehicle that is essentially 80 years old. The owner also had the doors which hadn’t been chopped yet. They are pretty rough on the outside but skins are available and the upper portions around the windows are still very solid. After some negotiating we reached a deal and I picked the cab up a few days later. Now I had a starting point for my project.
Time to Think…and Locate Components
The cab sat in the back corner of my shop for over a year just staring at me, waiting for a rebirth. All the while, I was formulating the rest of the build and collecting parts here and there as the budget allowed.
Along the way I found good deals on an engine and a transmission...both Craigslist finds.
The engine is a GM 350 crate engine that supposedly has about 10,000 miles on it. A man had purchased it for use in his plow truck and after a few seasons the truck’s frame cracked and he didn’t want to repair it. I picked up the engine for around $400. As the time approaches to clean it up and detail it, I will pull the heads and inspect the cylinders to really assess the condition and prior usage.
The transmission I chose is a GM NV3500 5-speed manual unit that was used in some of the two-wheel drive Chevy Blazers and 1500 pickups in the early 2000s. The bell housings are integrated into the cases and are a bit large but I think it will work for the project. If during mockup it doesn’t seem like it’ll fit nicely I can always make a change. For $150 I got the transmission, fork, throwout bearing, clutch, flywheel, and slave cylinder. How could I go wrong?
A Good Source for Frames
Now that I had the start to a body for the truck as well as most of the drivetrain, it was time to address the question of a frame. I know many builders are into designing and building their own frames for these vehicles and as much as I’d love to go that route as well, time isn’t something I have an overabundance of at this point in my life.
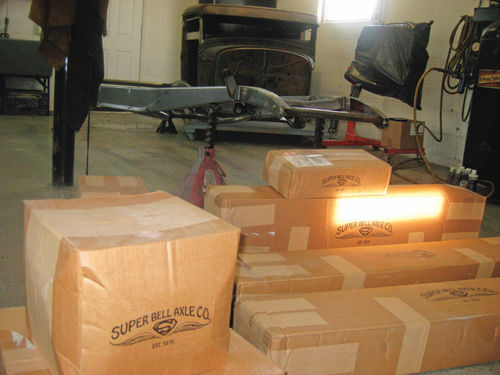
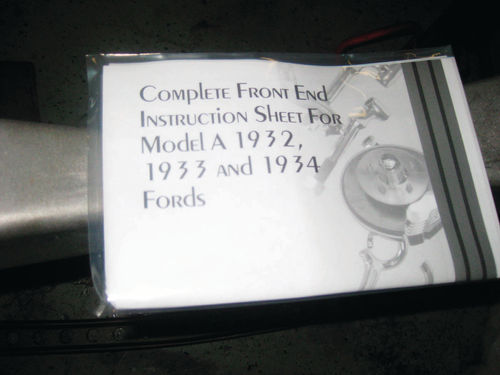
I researched a vast number of frame manufacturers and for the most part a ’34 Ford frame isn’t available. Luckily a 1932 frame is very similar and the ’34 cab mounts to it very easily. For anyone who’s followed my articles in the past, you know that I’m a huge supporter of buying American-made parts and buying from small businesses who put out quality products instead of lower-quality mass-produced junk.
This is where Pete & Jake’s Hot Rod Parts come in. Based in Peculiar, Missouri, these guys make some of the finest chassis and suspensions around, right here in the good old USA (peteandjakes. com).
After several discussions with my contact over there about the overall plan for my truck, we decided to use one of their Economy ’32 frames with the c-notch in the rear axle area, tubular X-member, setup for rear coil-overs, new mounting plate for a Vega steering box, and some other options.
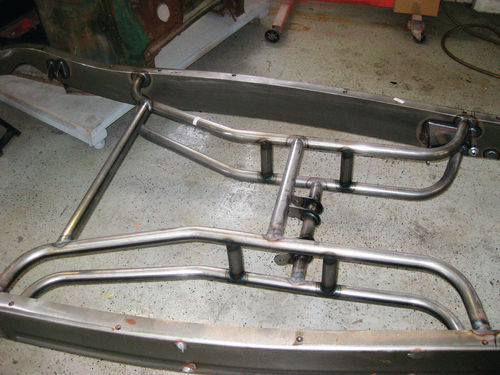
The frame is absolutely gorgeous. It’s boxed almost completely through the entire length and all of the welds are of the highest quality. When they assemble the frames at their facility, Pete & Jake’s mock up an entire front and rear suspension to it before welding to ensure that all dimensions are dead on. You also have the option for a stock rear spring suspension, Ford or Chevy motor mounts, different pedal mounts, standard or drop axles, 4-link rears, etc. No matter what your needs are, Pete & Jake’s can certainly fill the bill.
Let’s Assemble a Few Sections
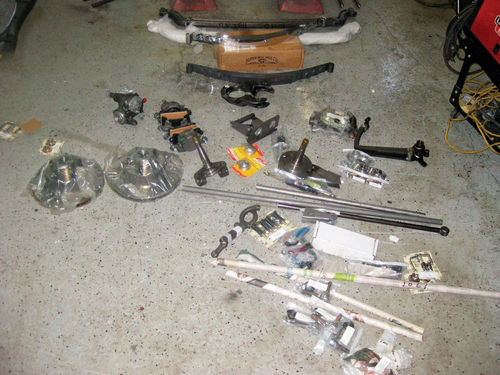
After taking delivery on the frame, I was finally ready to get to work on my mockup. I uncrated the fresh steel and set it up on jack stands. Wanting to see some immediate results after years of designing the build in my head, I started mocking up the front suspension. Again, because of their great quality, and because it’s designed right around their frames, I went with Pete & Jake’s front suspension for the truck. I chose to use an I-beam front axle, purely for aesthetic reasons and it had to be a 4" drop setup to give the truck a low and aggressive look, plus improve handling. They also set me up with a GM front brake assembly with GM hubs which means replacement parts in the future will be available at any local parts store.
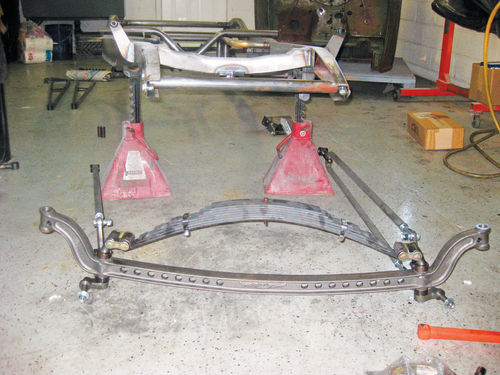
The entire front axle assembly was built off of the vehicle on the shop floor as per the detailed instructions provided by Pete & Jake’s. I then bolted it up to the front of the frame, followed by the hairpins that run from the bat wings to the frame just ahead of the doors. Finally, to finish up the front end I installed the brand-new Vega steering box onto the mount that was welded to the frame when I received it along with the cross steer arms with tie rod ends.
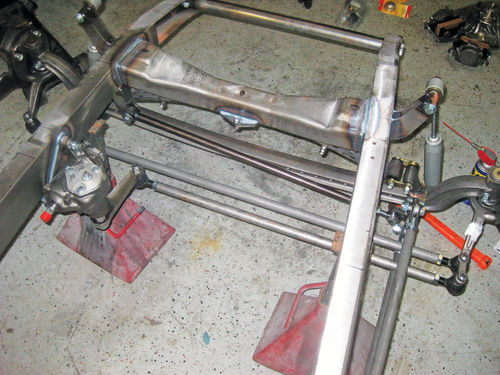
To continue my instant gratification, I followed up the front suspension and steering by mating the transmission to the engine and dropping them into the chassis. This required welding the early style GM motor mounts into the frame. Pete & Jake’s provides very detailed instructions on placement of the small block mounts in the Ford frame. It’s as easy as following their measurement off of the front radiator mounting hole on the frame and placing your mount the appropriate distance behind it. The mounts are extremely sturdy and contain gussets to further ensure that they don’t vibrate loose and break the welds over time. The driver side motor mount needs the gusset bent slightly to clear the steering box. It’s important to have the box and all steering arms bolted in place first just to make sure you don’t have clearance issues later.

Once the motor mounts were welded in, dropping the engine and transmission into the frame was quick and easy with no body to get in the way. For now I just propped the tail of the transmission up with a jack stand. I have a crossmember and mount assembly but until I know for sure I’ll be using the NV3500 I don’t want to weld anything in permanently for the tranny.
The final step for now is just setting the cab onto the frame to give me a rough image of an actual vehicle at this point. This will help keep me excited about the project and serve as part of the mockup I will need for the bed in the future.
The next step for this build will be channeling the body down over the frame. While these trucks originally sat completely on top of the frame rails, it’s just not aesthetically pleasing to the eye, especially for a hot rodded truck like I’m building. I will also begin to address the rear suspension in my next installment. Stay tuned for a series of articles on this build as time and budget allow!


