
Building a Fiberglass Dash
Readers Have Asked for More on the Custom Dash In Project ’46. Now You Can Design & Build Your Own Special Unit.
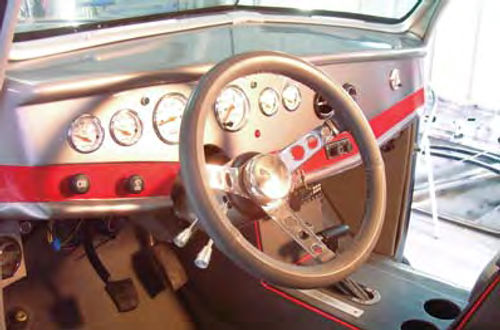
THE DASH I constructed for Project ’46 drew a lot of interest. Readers seemed to like the clean look and the red accent band I added to the bottom of the dash. But aside from thinking the dash was pretty slick, most wanted to know how I made it.
I’d like to say that I spent hours and hours at the drawing board designing then constructing the dash, but actually that’s not the case. I knew I had a very rounded and somewhat ordinary looking factory dash in the Ford Business Coupe, and that was the exact opposite of what I wanted for this car. To get the desired clean lines I wanted, I knew I had to shift away from the rounded look and flatten things out.
Flattening those surfaces did three things for me.
First, making the top of the dash flat completely killed the original, rounded look I wanted to lose. Second, flattening the front of the dash allowed me to vertically expand the face of the dash without making it look like I had actually stretched out the dash. That, in turn, helped hide the Hot Rod Air unit that was tucked neatly behind the dash without making the dash appear as if I had intentionally widened it in an effort to hide something. Third, all this front face flattening afforded me quite the canvas for laying out the gauges, switches and knobs.
Making the Fiberglass Sheets
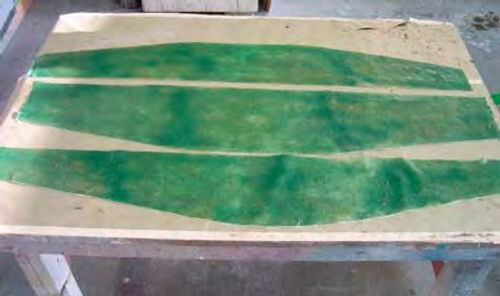
The first thing I did was to pour a 3 x 4-foot sheet of fiberglass (Photo 1). You can actually purchase 4x8 sheets of flat fiberglass as opposed to making your own. Try your local fiberglass fabrication shop. If they carry the premade fiberglass sheets opt for a 3/16-inch thick or thicker sheet.
I do more than my share of fiberglass fabrication, so I made my own sheets of fiberglass on a workbench using two layers of 2.0 oz. chopped fiberglass mat and a gallon of polyester fiberglass resin. I selected 2.0 oz. mat because this is a heavy mat that works best when used to lay out and form flat surfaces. If you have to purchase fiberglass mat from a local source it comes in 38-inch-wide rolls. Purchase two yards to be sure you have plenty of material.
I started by covering the workbench with a piece of four-mil-thick plastic sheeting, making sure to pull the edges tight to prevent any wrinkles or air bubbles from forming on the surface. My fiberglass panel needs to be as flat as possible. A little masking tape on the sides helps hold the plastic in place and keeps it taut. Next I waxed the plastic sheeting with a heavy coat of Turtle Wax paste wax. The wax prevents the fiberglass from sticking to the plastic sheeting.
Next I coated the plastic with a layer of fiberglass resin then covered that with a layer of the 2 oz. fiberglass mat, followed by more resin, followed by a second layer of mat, followed by more resin.
The trick to pouring your own panels is to be sure you remove all of the air bubbles that form between the layers of fiberglass mat as you work. To get rid of the air bubbles I use a small, 4-inch-wide paint roller. You’ll find this type of paint roller at the local home improvement store next to the paint brushes. Allow the panel to cure overnight before removing the plastic backing.

Incorporating the Old Dash
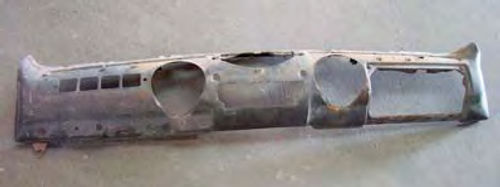
The actual construction of the new dash begins with the old dash panel (Photo 2). If you consider that the original dash already has the mounting tabs and correctly located mounting screw holes, it only makes sense to use the old dash panel not just as a pattern, but also as a base over which I can build my new dash. This method eliminates the need for fabricating mounting plates on the new dash as well as ensures that the new dash will fit without a problem once I have it painted and ready to install.
Take note in the photo that I removed the glove compartment door, ashtrays, and everything else that had been bolted to the dash. All I need here is the shell.
As I mentioned at the beginning of this article, the front of the new dash will be basically flat. That helps maintain the clean look I’m seeking.
However, if you look at Photo 3 you can see that the area where the red stripe is located is actually recessed. The recess is the thickness of my poured sheet of fiberglass, in this case roughly 3/16-inch, and is there to add some dimension to an otherwise very flat surface.
While you are studying Photo 3, be sure to note the rounded bottom edge of the dash. I’ll get into how I fabricated that part of the dash shortly.
The top of the new dash is also flat. If you look closely in Photo 4 you can see the top does have a slope to it. It is highest where it meets the windshield, then slopes downward as it travels toward the face of the dash.
This was a natural occurrence as the top of the old dash panel is rounded and slopes toward the face of the dash. All I’m doing is exchanging the roundness for a flat surface.
Also make a mental note that the leading edge of the top is not straight. It may look straight in the photo, but in reality it has a slight curve to it. That slight curve is aesthetic in nature and is there for the sole purpose of removing that massive, imposing look a completely flat-faced dash might otherwise exhibit.
Cutting and Placing Some Sheets
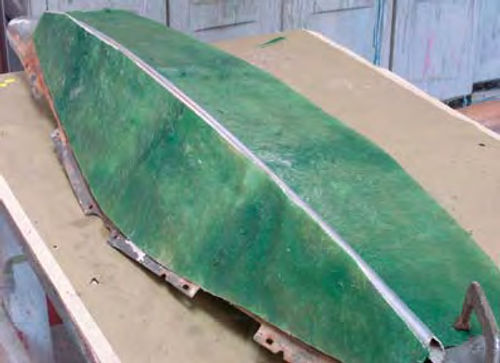
Construction starts with cardboard templates. I laid out a template for the top panel and one for the face of the dash using the old dash panel as a pattern. I then cut my sheet of fiberglass per the patterns (Photo 5). Notice that I cut out one panel for the top (lower) and two panels for the face of the dash (upper). Also notice that one of the face panels is shorter than the other face panel. I need two face panels so that I can stack them to achieve the recessed area where the red stripe is located.
However, I don’t want a double thickness up high where the gauges and turn indicator lamps will be located. A double thickness would put me roughly a half inch thick in this area and that would make it difficult to install the indicator lamps. Thus the reason for cutting one of the face panels three inches shorter than the other panel.
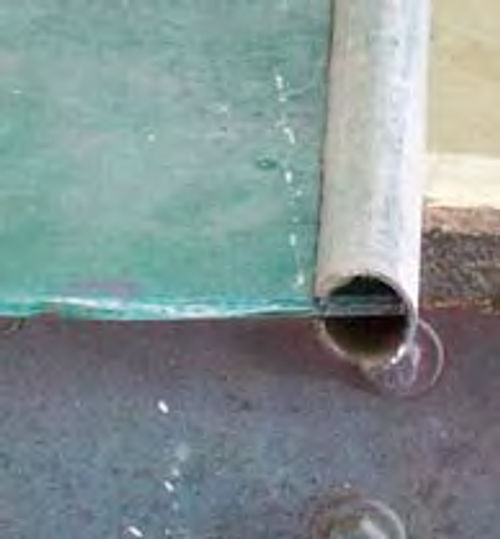
Here is the result (Photo 6). I’ve positioned the top panel and the longer of the two face panels in place on the old dash panel. Notice that you can see the screw holes where the original dash mounted to the windshield frame. Leaving these holes exposed lets me use them to mount my new dash in the car. Also take note of the slots you can see on either side of the old dash panel. These are for the defroster outlets and must remain open. The space between the back edge of the old dash and the back edge of the new top panel is a full inch, enough room to make my transition from new panel to old and still leave the mounting holes exposed.
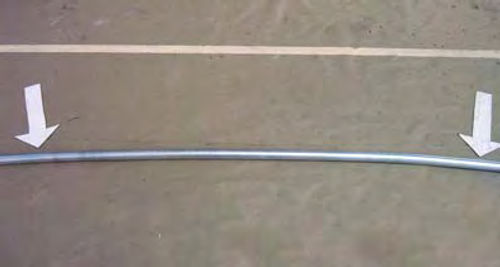
Now take note of the length of electrical conduit placed just under the leading edge of the top panel. This is 3/4-inch diameter electrical conduit and is there to facilitate rounding over the top edge. Pretty slick…
This stick of conduit is also curved (Photo 7). Recall that I said the leading edge of the dash has a slight curve to it? It isn’t much, but as you can see in the photo, an arc is definitely there. How did I make the curve and get it symmetrical? I constructed a jig on a work bench that held the center of the conduit and bent the ends down one inch.
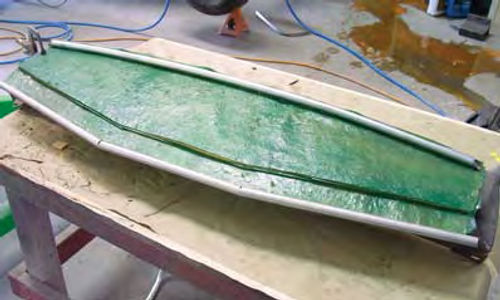
Be sure to note that both of these fiberglass panels are slightly shorter lengthwise than the old dash (Photo 8). That gives me plenty of room to blend the edges of the new dash panels into the ends of the old dash panel. I also angle cut the ends of the electrical conduit to help with that transition.
What will I use to blend the fiberglass panels to the old metal dash? I’ll sand the old dash with 80-grit sandpaper to remove the old finish then use fiberglass resin and 1 oz. fiberglass mat to adhere the new panels to the dash.
A different grade of fiberglass mat? Yes. The 2 oz. mat I used to make the flat panels is extremely heavy and doesn’t conform well to curved surfaces.

The 1 oz. mat will easily conform to the curved surfaces and make life as a dash fabricator much easier.
One thing that isn’t so obvious in the photos is that I extended the top panel a full half inch beyond the face panel. That allowed the new top to become something of a cantilevered shelf under which I positioned the length of electrical conduit I showed you in Photo 7. Doing so let me wrap the conduit with resin and mat, thereby joining the top panel to the face panel in a way where I ended up with the rounded leading edge you can see on the final product.
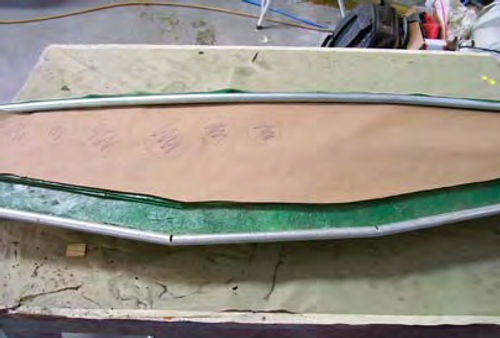
Getting back to the construction work, remember that I cut one of the face panels shorter than the other? The longer of the two panels has already become my dash face. The shorter panel now slides under the longer panel to a point where only 21 ⁄2 inches of the shorter panel are exposed at the bottom of the dash. This now becomes the recessed area I eventually painted red (Photo 9).
Adding Some Taper and Curves
Now for the trick parts. One way to make a very flat surface appear more pleasing to the eye is to get rid of the boxy look.
To do that I made the center section of the front face nine inches tall then tapered the bottom edge upward until it reached the bottom of the old dash. This taper can be seen in Photos 3, 4 and 5. What’s the width of the center section? From center it extends seven inches in both directions for a total width of 14 inches. The ends of the dash measure six inches tall. The length of the taper is 18 inches on each side of the dash.
To get the rounded edge at the bottom of the dash I took another length of 3/4- inch diameter electrical conduit and split it open along its length.
A die grinder with a three-inch cutoff wheel works great to make the cut.
I then made two 10-degree pie cuts in the conduit at the points where the new face panel transitions from the nine-inch wide area and sweeps up toward the ends of the dash. You can see this in Photo 9.
After that I pushed the split conduit over the bottom edge of the new dash (Photo 10). This is an easy way to secure the conduit to the dash. Once secured, the conduit is wrapped with 1 oz. fiberglass mat and resin.
Some Additional Tips
Are there any tricks I didn’t mention that make this type of fabrication easier?
You bet. Fabrication usually means a lot of trial-and-error fitting to get things right. To make assembling and disassembling a little easier, I hot glue the pieces together.
The hot glue will hold everything in place, even to the point where I’m ready to permanently bond the new panels to the old dash using fiberglass resin and mat. The good news here is that hot glue doesn’t bond to solid objects the way it bonds to fabric.
So if I need to break some section of the dash apart, it just takes a few curse words and a good screwdriver.
I also lay out the gauge locations on paper before cutting the holes (Photo 11). Moving holes on paper is much easier than filling and moving holes in fiberglass. I also delay marking and cutting the opening for the steering column until I’ve had a chance to bolt the dash in the car and get a precise location for the column. It is only after the steering column hole has been cut that I center the gauge template and mark the dash for cutting. I want my tachometer and speedometer to be perfectly centered above the steering column.
It is my preference to mount and wire all of the gauges before installing the dash in the car. Each gauge needs a power wire, a ground wire and a light wire. Some gauges will require an additional sending unit wire.
That’s a lot of wiring and it is much easier done on the bench.
Of course, all of this work is done after you know the dash fits perfectly and it has been finished.
Use hole saws to cut the gauge openings. A hole saw gives you a very clean cut. Just be aware that sometimes gauges, tachometers and speedometers are odd sizes. If you can’t find the correct sized hole saw, opt for the next smaller size then carefully file and sand the opening to fit the gauge.

So how does the final product look? I’ll let the dash speak for itself (Photo 12).
I’ve received a number of questions concerning the construction of the console I installed in Project ’46 so next time I’ll go through that process. Got a question? Send it along.
Editor’s note: Check out the ad below to order Larry’s latest project in book form and his earlier restoration books as well.
Resource—LPL Body Works, LLC
5815Contented Lane
Amarillo, TX 79109
Paint and body work DVDs


