
Browsing Through JOHN’S TOOL CHEST
This Month’s Journey Into the Toolbox Found Something for Removing Wiper Arms and a Set for Dealing With Rounded Fasteners.
Tight Quarters Hacksaw
If someone were to say “bring me the hacksaw,” a mental image of a bowshaped tool with a handle securing a blade is generally what comes to mind. These are great for most general cutting tasks…unless you are trying to get into a tight area. For those situations you may need little more than a hacksaw blade, and the saws seen in Photo 1 are among the best for that situation. The reason so many are shown in this photo is twofold. First, these tools were marketed under several different names. One very recognizable name is Blue Point (division of Snap-on) #hs-13, followed by Dreier Brothers Jab Saw, and M. Klein & Sons #703. The second reason is to show that these aren’t too difficult to locate used, as it appears no one is currently manufacturing this tool. These were all flea market or automotive swap meet finds, usually in the $3 to $8 range. There’s always eBay as well, but they’re certain to cost you more there.
Photo 2 shows a closer view of the way the blade is secured. The nose of the tool has a tapered conical shape, and inside are two corresponding pieces of steel. When the handle is twisted and tightened they wedge the blade securely in place, making it the most rigid blade fixture. This allows you to choose how much of the blade extends beyond the end of the tool. If you need to reach deep into a cavity, extend the blade far enough to reach the target. Naturally, keep the total length as short as possible for maximum strength.
It’s useful for cutting metal, plastic, wood and most anything you encounter. The blade is installed so that it cuts on the pull stroke. This protects the blade from becoming bent and distorted during use. The tool length in 10.5” and with a 12” blade installed the minimum length is 12.5”.

Windshield Wiper Arm Removal Tool
Photo 3 shows two handy tools that make removing wiper arms on many older vehicles easy and they help in avoiding damage. The one at the bottom is made by Anco, while the one above is made by “ROCRO-BA” out of Orange, Connecticut. The Anco fits two specific sizes, while the one above it is adjustable. Photo 4 shows it being used on my ’66 Malibu. If you noticed the damaged paint on the cowl, that was caused by someone previously removing the wiper arm without using the proper tool.


With the tool in place, press down slightly while lifting the wiper arm. The arm can now be easily lifted off.
These are both older vintage tools and due to wiper arm design changes are not required for use on later-model vehicles. Therefore, to locate either one of these, searching the swap meets or eBay is your best choice. Knowing what they look like will help you spot one in the bottom of a box of tools at the next flea market you visit.
I found nothing on the Eastwood Co. website so I phoned and was advised that they don’t offer anything like this. Summit Racing shows a tool made by Dorman (#49023) that while not the same, it may get the job done. O’Reilly Auto Parts shows a tool made by Lisle (#65750) that may also work. Both of these tools are different in appearance and possibly more universal in application, so do some checking to see if they’ll work for you.
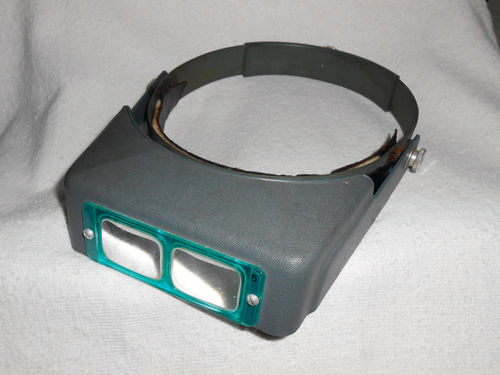
A Magnification Visor
Occasionally you find yourself in a situation where your eyes alone can’t get the job done. Possibly you may be doing an initial inspection looking for a crack in a mechanical component or inspecting an electrical switch. Soldering small connections is another time where magnification can be very helpful. Trying to use a handheld magnifying glass can be difficult or even impossible in some cases, so an optical visor, like the one seen in Photo 5 is the best solution. This one is an Optivisor Magnifier, and though decades old and showing some wear, it still delivers like the day it was new.
These are still made in the US, and are available in six magnifications: 1.5x-3.5x. The greater the magnification, the closer the focusing distance. For example the 1.5x is 20”, while the 3.5x is 4”. Choosing one too powerful can be frustrating to use; the bigger is better theory doesn’t apply here. I have two different visors, a 1.75x and 3.5x, but by far the 1.75x (14” focus) is used the most frequently. Enco shows them in their current flyer for $35.95, and for an additional $8.95 you can add a 2.5x magnification loop that swings out of the way. Naturally you can find less expensive visors by other manufacturers, but if you want a quality product that will stand the test of time, this is it (www.use-enco.com).
Tools for Removing Rounded Fasteners
This is not something you will need every day, but undoubtedly when working on older vehicles you are bound to encounter rounded-off nuts or bolts, and even stripped-out screw heads.
If you’re dealing with fasteners that have become rounded due to the threads themselves being rusted and seized, an oxy-acetylene torch is the tool of choice. This is most often the case when dealing with fasteners that are open and subject to weather, like those used in suspension and steering. If it’s old, and been subject to northern winters you can be certain to run into this problem frequently. Just getting a better grip or increased leverage on the nut or bolt without the aid of serious heat will usually end up with a broken bolt or stud. In other instances, retaining nuts and bolts, especially those subject to high heat like exhaust manifold bolts can easily become rounded off when trying to remove them. Those bolts just seem to wear away with time to the point that the proper-size socket will spin around, further rounding the bolt or nut head. Always use a 6-point socket when attempting to remove these bolts. Someone using a 12-point socket is very possibly what caused the problem in the first place. If the proper-size socket fits loosely on the fastener (not unusual for old exhaust bolts), look at your selection of metric sockets and see if there is a better fit than the correct-size fractional socket. If your vehicle has metric fasteners then do just the opposite and see if a fractional socket will fit better.
Often you can find another socket that you can tap onto the worn bolt head with a soft-faced hammer, and it will fit snugly enough to loosen the fastener successfully. It is a good idea to remove the socket once the nut or bolt is loosened but not completely removed. You can be certain it’s always more of a challenge once it’s off and stuck inside the socket.
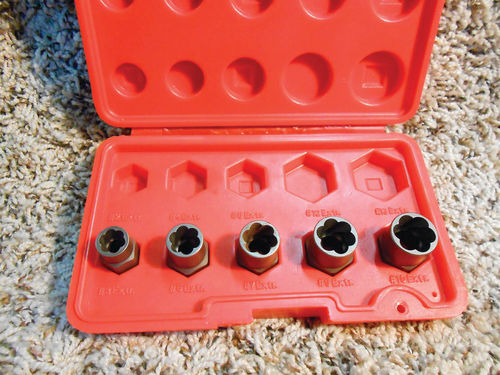
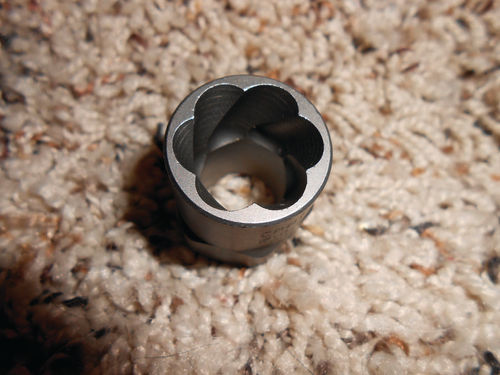
So what’s next if all of the above fails? Photo 6 shows the Craftsman 5-piece damaged bolt/nut remover set. It appears my old set has been superseded by another with slightly different-size removal sockets; #0550CRA. At http://www.craftsman.com/ craftsman-5-piece-bolt-out-5-piece-bolt/p00952061000P is currently priced at $19.99 or is available on eBay for $39.99. They also offer a 10-piece set #52166 online at Sears for $30.39; also available on eBay for $41.88. Don’t you just love eBay? Evidently someone there doesn’t realize that Sears runs tools on sale with regularity or doesn’t care. The 10-piece set will fit sizes 3 ⁄8”-3 ⁄4”. These special sockets have a spiral fluted bore that’s designed for right-hand threads. The business end of the socket has a scalloped appearance as you can see more closely in Photo 7, and the backside has a clearance hole to allow a stud to project through it. Because of this clearance hole, there is no square drive in the center of the socket to accept a ratchet. The socket can either be used with an open end/box wrench or the appropriate socket and ratchet. In the set I have, a 5 ⁄8” fits the small and 7 ⁄8” fits the large. The more pressure you apply, the deeper the socket bites into the nut or bolt head. This set has been a US product in the past, but online I was unable to determine if the new stuff is still domestic or made in China. Certainly there are similar kits offered by other companies and an online search will answer that question.


