
Browsing Through JOHN’S TOOL CHEST
It’s Time to Go Searching Through John’s Large Tool Collection Again. Since One of These Tools Is Hard to Find, He’ll Tell You How to Make a Substitute.
Editor’s note: Auto Restorer contributor John Armstrong is always on the lookout for new and different tools at his local auto parts and hardware stores and area swap meets. From time to time he shares some of this favorite helpful finds with us. Here’s his latest batch:
Bulb Service Repair Tools
IF numbers like 1034, 1157 and 1156 ring a bell with you, then we are in the same automotive world. In the mid 1970s I purchased a K-D Tools Bulb Service Kit #134; that’s it in Photo A.
The kit is no longer being made, certainly because the bulbs in most vehicles these days are designed differently, not securing in the same manner. A few online sources were showing the red-handled brush, among them were Amazon, but everyone listed the item as out of stock. It’s a shame because this is a useful kit for dealing with broken bulbs or neglected corroded bulb sockets for vehicles of our era. So what are the options? It’s highly unlikely you will find the three piece kit still intact in the plastic pouch at a swap meet, but you might just spot the individual tools here and there, so it helps to know their numbers.
In the right of the photo is K-D #136, a special serrated gripping tool for removing the metal base of a broken bulb. The red-handled socket cleaning brush is K-D #139, and to the left next to the pouch is K-D #138 a rubber-tipped tool for safe bulb removal (meaning that bulb won’t break between your fingers).
In searching for these tools, one online forum was encountered where someone was trying to identify the function of #138 bulb removal tool, so don’t be surprised if the party selling such items has no idea what they are.
If you don’t have any luck locating the tools or just don’t get out to the swap meets often enough, the next best option is to come up with good substitutes, or try to make the tools yourself.
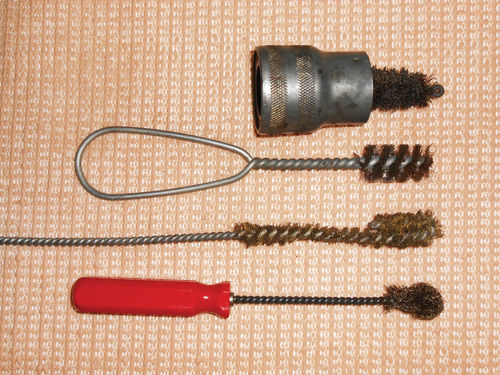
Let’s start with the easiest tool to duplicate, that would be the cleaning brush. Several options that would top the list are a battery terminal cleaner, a plumber’s pipe cleaning brush or a bottle-type wire brush. Here they are in Photo B compared to the original brush. The bottle brush next to it appears to be the best choice of items that I had laying around. The end has been bent over to duplicate the width, as well as yield bristles at the end. The bristles are stiff and made of brass, certainly able to do the job, and the added length will be a plus. It was a $2 swap meet purchase, and there were plenty of other sizes offered for sale. The plumber’s brush uses a thick wire handle, so it might be too hard to work with, if you’re trying to bend it. If you decide to utilize a battery terminal cleaner, it may be difficult to use in more confined locations. By all means make certain to purchase a new one. You wouldn’t want to take a chance on introducing any battery acid to your light bulb socket and wiring. All of these options are inexpensive, probably around $5 or less.

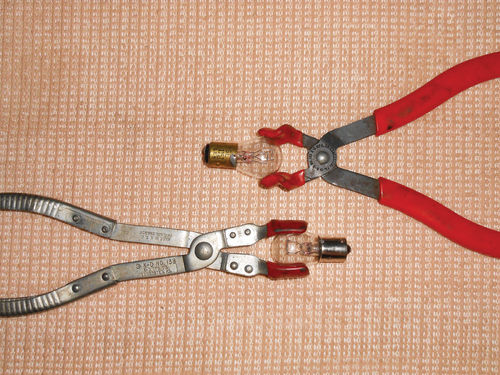
Next is the bulb removal tool #138. The first thought that came to mind as an option is a pair of spark plug boot pliers (K-D tools #135). Photo C shows the common #135 pliers up top, compared to the old #138 below. Are they just as good? No, they require a little more working room to use them, It’s Time to Go Searching Through John’s Large Tool Collection Again. Since One of These Tools Is Hard to Find, He’ll Tell You How to Make a Substitute. By John Armstrong JOHN’S TOOL CHEST Browsing Through This K-D Tool bulb service kit is no longer made, but it’s worth grabbing if spotted at a swap meet. And there is less contact area with the bulb. They do, however, seem to have enough of a grasp to be able to push and turn a bulb, and the tool remains fully functional for what it was intended. The #135 pliers are available most everywhere. Looking online, Advance Auto parts shows them for $12.99; they’re at ToolTopia for $8.42 plus shipping (free shipping on orders over $75, so find another $66.58 worth of tools) and Amazon was $14.28 including shipping.
The last item is #136, the bulb base removal tool. This is used when the glass bulb is broken off, and all you are left with is the brass base, stuck in the socket. No existing tool is close in design, so it would need to be made, or another option used to remove the broken base. Let’s explore that second thought. Needle nose pliers are an excellent tool for removing a broken bulb base. Use them to grab and hold onto the edge of the base, then push inward and turn counterclockwise for removal. The side of the bulb’s base will bend inward when doing this; that’s to be expected. If that doesn’t free the socket, go to the opposite side and repeat. If it still hasn’t come out, try sticking the end of the pliers into the socket, pushing inward and turning counterclockwise. The sides that previously folded inward now give the pliers something to twist against. Pay attention to notice if it turns. It may be in position to come out, but due to a build-up of junk in the socket it may not pop out on its own. This method certainly works, and sometimes it comes down to this whether you have tool #136 or not.
If you decide to make the tool, you need a closer look at the gripping portion and here it is in Photo D. There are serrated jaws inside, recessed 1/8” below the raised exterior. The approximate diameter of the jaws is 5/8”, or the same as the base of a #1157 bulb. The adjustable pliers also aid in getting a grip on the broken bulb base. A suggestion for making the jaws would be something easy to work with like a piece of copper water pipe of a close diameter. The jaws can be formed with a Dremel tool using a miniature cut-off wheel. If that’s not available, use a small file or a hacksaw blade to make light cuts forming the teeth. They won’t look perfect, or be evenly spaced, but they don’t have to be. With the inner jaws formed, use the appropriate size copper pipe union to form the raised exterior. Your local hardware or even a plumbing supply store is a good source. You will need to de-burr the jaw portion so it will slide into the copper union. Establish the depth where it should be, and remove any excess portion of the union toward the rear. Once all looks good, clean up the mating copper surfaces. De-burr where any excess copper tube and/or union was cut off. To secure the inner and outer sections you can solder, epoxy or rivet them together. If soldering is the choice, then coat the mating surfaces with flux and reassemble the two pieces. They can be soldered together just as though you were doing a plumbing job. Heat the united pieces, and the solder will be drawn in by what is referred to as capillary attraction. Introduce the solder from the bottom side (opposite the jaws), and you won’t want too much, it could end up getting into the jaws. Epoxy is a good choice. It’s easy to use, and a product like JB Weld is very reliable. Another option would be to drill and rivet (or screw) the inner jaw to the union sleeve. If riveting, use 2 short rivets spaced exactly across from each other.
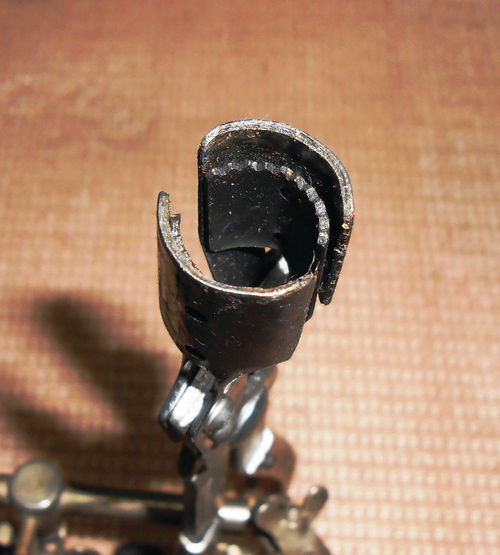
Next the newly formed jaw can be carefully cut in half creating two equal sections. If screws or rivets were used, try to make sure they are positioned opposite each other before it’s cut in half. They should have a resemblance to those in Photo D. They can now be affixed to an inexpensive or damaged pair of pliers (needle nose are a good choice) using a strong epoxy like JB Weld. Brazing the jaws onto an old set of pliers is an option, but if you do, the soldered inner jaw will come loose. In that case, braze the outer shells to the pliers, and then secure the inner serrated portions as discussed above once all has cooled. The jaws must be mounted at the same height, and line up when they meet.
Deciding whether or not to take the time and make this tool or just use a pair of needle nose pliers for the task is your choice. But the cost of putting everything together will likely be close to $20 and it’s worth the effort.


