
To Protect and Preserve, Pt. 3
The Police Truck Was Needed for a Special Show In a Week... Many People Pitched In—Then the Engine Stalled.
Editor’s note: This is the last in a three part series on the restoration of a former police truck at the LeMay-America’s Car Museum in Tacoma, Washington. Work on the truck was to be completed in time for the vehicle to be featured at the museum’s annual show last August. But with just a little over a week before the project deadline, there still was a lot of work to be done.
IT’S FRIDAY, AUG. 17, there are eight days before this Chevrolet truck is to be featured at the annual LeMay Museum Car Show & Auction, and the engine is successfully started. Several days will be spent tuning the engine, running the brake lines and beginning the wiring. While the engine was being prepared, the cab was given its final coat of paint. Work continued on the upper sides of the box as they still did not meet the expectations of Tom Towers, head of the LeMay restoration shop.
Aug. 18: One week until the show and the smaller chrome parts begin to arrive while several teams of younger volunteers continued to concentrate on the box sides.
Don Mettler, a volunteer upholsterer, arrived to take seat and cab interior measurements. He was helped by Mary Collins, a registered nurse assistant, who removed springs from a parts seat and prepared them for welding onto the paddy wagon seat (Photo 1). Meanwhile, the cab received its final coat of polish.
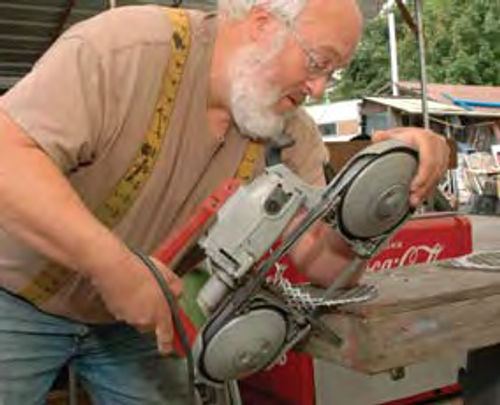
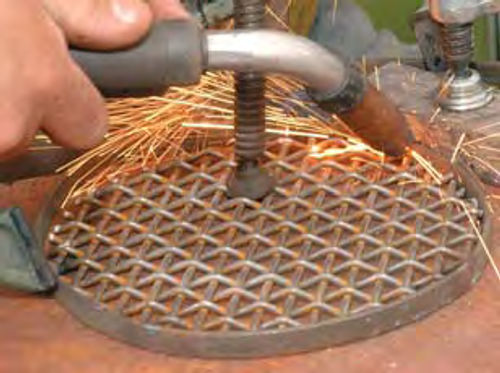
Aug. 20: Five days remaining. Tom Shields, a steel erecting contractor from Yakima, Washington, took a week’s vacation to work on the project. Using an original air vent as a template, he sprayed some 10-gauge woven mesh to create a pattern and cut it with a Porta-Band saw. A 1/8” x 1/2” bar was bent around the mesh and cut and welded into place (Photos 2 and 3). These were then combined with the original air vents and screwed onto the box roof to provide rain protection.
The interior of the cab and the dash were sprayed a bronze tone in keeping with their 1940 vintage. The clutch head screws, which held on many of the cab interior parts, were pushed into a piece of cardboard and “gang sprayed.” The running lights and headlight buckets were attached to the fenders while wiring continued on the cab interior.
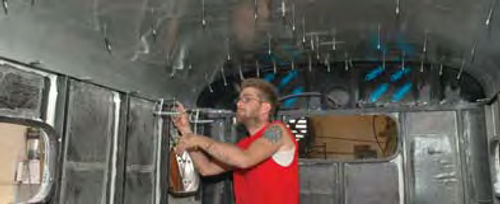
The interior box skins were clamped into position with Clecos to the point where they resembled a porcupine’s back (Photo 4).

Tuesday, Aug. 21: Four days to go. The door windows and windshield became the major concern today. The windows were cut to the original frames, but years of use, in addition to the new window track, caused everything to be exceptionally tight. Padded clamps were slowly tightened to force the glass into its track. Weather-stripping adhesive was used for the rubber surround and it was held in place by the glass overnight. By the next morning, the weather stripping had formed itself to the frame.
The original speedometer was received today. The core had been sent to Jim Carter Truck Center in Independence, Missouri, where it was fully restored and was as perfect as anyone could imagine, down to the original block printing on the gauges (Photo 5).
The dash had been painted in-house, but perfection was carried too far. When the ashtray was to be installed, it turned out this paint application was several layers too thick. The extra paint that was blocking the ashtray was removed and the area retouched. With the dash now intact, attention was given to the wiring.
Measurements of the box had been taken with rear wheel cardboard “cutouts” in place, but there was a difference between the mathematical calculations of where the wheel wells should be and their visual appearance. That difference was due to the finished weight of the box versus its original weight. The wheel well patterns were visually re-adjusted for the additional weight and marked on the skins.

The attachment of the box to the frame was strengthened by the addition of a pair of steel beams which ran the length of the frame. The frame was primed and the beams were attached with eight S.A.E. grade 8, cadmium-plated bolts. After the box was positioned correctly on the frame, it was welded to the beams. The box was then unbolted from the frame and returned to the prep room for more sanding.
Wednesday, Aug. 22: Three days to go. The wheel wells had been successfully cut, and sanding continued on the box. A “sloshing” compound was put into the gas tank to seal it, the tank was painted and the float and sending unit were installed.
Meanwhile, panels of graffiti were cut from the inside skins of the box. These eventually will be framed and preserved as a historical reference to the paddy wagon’s prior passengers.
Radiator Work Required
Several days had been spent attempting to cut, bend and rebuild the diamond-plate rear bumper and step. Not satisfied with the results, the original was sent to HELM Manufacturing in Puyallup, Washington. Overnight, Tom Campbell and others recreated a duplicate stepped bumper for the truck.
Kurt Hixon from “Speedy Glass” in Olympia, Washington, arrived to install the windshield. The glass had been cut using the windshield frame only, so some “nudging” was required. The windshield frame and glass were temporarily installed later that day to check for fit.
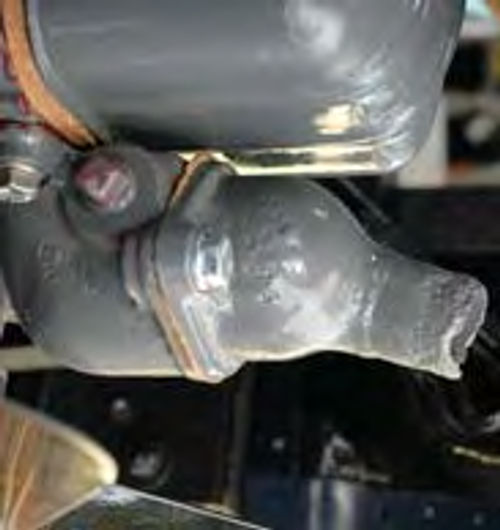
The cab was permanently attached to the frame. Oak blocks, identical to the originals, were used to support and establish the correct height of the cab over the engine. But with the cab and radiator now in position, the cab frame interfered with the current radiator inlet (Photo 6). An appropriately shaped inlet was located and the radiator sent out, re-soldered and returned within a few hours (Photo 7).

The Collapsing Drip Rail
A drip rail had been ordered and received several months before it was needed. It was attached along the top side of the box with no problem, but when the crew attempted to bend the drip rail around the corner, it collapsed on itself. The rail had been extruded with a concave design, and no amount of support or roller bending would keep the rail from flattening. Tom Towers decided that a brass, half-round rail would be appropriate for the paddy wagon’s era and could be quickly obtained. The original drip rail was removed and replaced by the brass rail. Attachment holes were drilled, countersunk and screwed tight. The rail was supported by a wood frame to assure that it would remain level while a one handed sledgehammer and a wooden block were required to complete a tight curve around the corner (Photo 8). While the rail was being attached, work continued on the interior. Hydraulic lifts plus some back power supported the inner skins until they could be attached with rivets.
Thursday, Aug. 23: Show day plus two. The interior box skins were lightly sanded to give bite for the primer, while sanding continued on the exterior. The final decorative belt line was added along with the viewing window between the cab and the box.
The chromed radiator grille was received from the plating shop and was attached to the cowling. This was held up to the cab only to discover that it wouldn’t fit within the cab brackets because of the thickness of the paint. As with the ashtray installation, excess paint was quickly removed and the grille installed.
Where’d Those Bolt Holes Go?
By now, eight different volunteer crews, of one to three people, were working throughout the restoration yard. This included electrical work on the cab, attaching the inner and outer fenders, welding the security windows inside the box, painting and buffing small parts of the cab and box, attaching the gas tank, testing the fit of the rear step and bumper to the frame and sandblasting the donated truck turntable for displaying the vehicle. After most of the volunteers left, Tom Towers remained late to give the box several coats of paint.
Friday, Aug. 24: One day until show time. First thing in the morning, Ty Madden, a volunteer for more than 20 years, arrived to attach the rubber protective step pads, which he had handmade. Later that morning, the box was wrapped with plastic and the inside was painted. With time becoming critical, fans were brought in to speed the drying process.
2:30 p.m. The internal cab wiring had been completed and the cab’s sliding rear security window was installed.
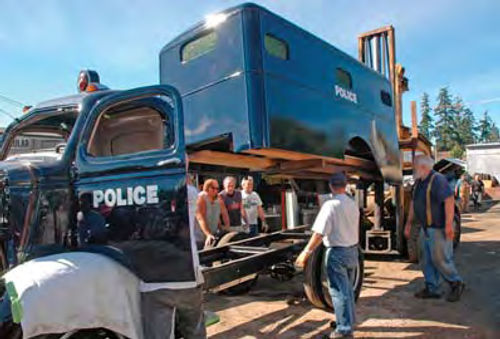
4:30 p.m. The box was at last ready to be permanently attached to the frame. Using the 1944 Hyster, the box was moved into an open area while the cab and frame were pushed beneath it (Photo 9).
The logical approach to ensure that the box would accurately fit on the frame is as follows: 1. Bolt the supporting beams to the frame. 2. Weld the box to the beams while the beams are bolted to the frame. 3. Wait for everything to cool, and unbolt the box and beams from the frame. 4. The bolts in the frame should now line up with the bolt holes in the beams, which have been permanently welded to the box.
In theory, that should have worked perfectly… However, when the box was carefully lowered onto the frame and given some minor nudging with muscle power the theory didn’t hold.
A front hole and a middle hole lined up and were loosely bolted. The other six holes were off by as much as half the diameter of the bolts. Obviously, tweaking a several-thousand-pound metal box requires more than muscle power and profanity. The holes in the frame could be opened only a limited amount, so a hydraulic “spreader” was employed (Photo 10). Eventually, the bolts were worked into the welded nuts on the beams and drawn tight, and the box was now attached to the frame.
The Cab, The Box and Ignition
6:43 p.m. The windshield was permanently screwed into place and the air vent and steering wheel were installed. Don Mettler arrived with the finished bench seat and back. With the cab and box now attached, the paddy wagon was started for the first time as a unit. The rear window and seats were in location, so the pressboard ceiling could now be installed. An hour later, the rear fenders were held in place with “Vise-Grips,” measured and eye-balled for correct appearance.
The rear end was jacked up and the tires removed so the fenders could be attached from underneath the cage. By now, it was beginning to get dark. One crew installed the bumper brackets and front bumper, while the gas tank was re-installed by another crew. After the gas tank, volunteers installed the rear step and bumper. It took over two hours to fit and weld the rear step into position.
Midnight, and the cab floor mats are cut to fit. It is 12:38 a.m., and the cab interior is officially complete. At 12:39 a.m. the left prisoner bench was installed, and at 12:46 a.m., pizza arrived.
Some Last-Minute Problems
Aug. 25: It’s now early morning the day of the show. From 1:30 to 3 a.m. the rear tires were installed, the truck lowered onto its wheels and the right prisoner bench installed. Another hour was required to install the left and right rear doors onto the box. With the doors in position, the tail lights and reflectors were installed. The rear bumper was taped, primed and painted. The next three hours involved waiting for the paint to dry, doing touch-up painting and checking all the details.

6:06 a.m. The crew sets out for the show at Marymount, three miles away.
6:09 a.m. The truck breaks down on the highway. Some 20 minutes later, it is loaded onto a rollback and arrives at Marymount within a few minutes. It is removed from the rollback and nudged onto the turntable, only to discover that the truck was ill-balanced for it.
7:21 a.m. A neutral spot was located between the truck and the turntable, but the turntable won’t turn today.
7:38 a.m. The police truck is given a final cleaning and 15 minutes later the restoration crew departs.
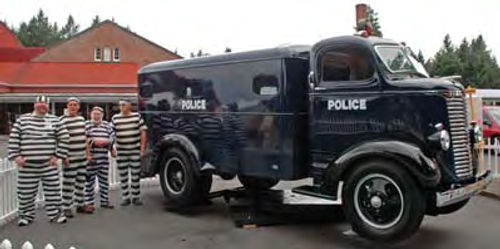
8:00 a.m. The show begins. 10,000 people arrive for the yearly exposition. Several “prisoners” volunteered to be information specialists for the spectators (Photo 11).
Lessons Learned
In a project wrap-up talk Tom Towers discussed some changes that he would make in his approach to this vehicle if he had it to do over again.
Some photographs had been taken of the truck prior to disassembly. These photos were put onto a CD and referred to constantly during the reassembly—but there weren’t nearly enough. In the future, extensive digital photography will be done of the entire vehicle prior to and during disassembly.
Also, if he were to repeat this project he would change two major decisions. The first would be to completely replace the entire “top hat” side rails in the box rather than just the rusted bottoms. Years of hard use had created minor bends in the rails, so when the skins were drawn tight to the rails, they followed those imperfections. Second, creating side windows in the new skins would have been far easier than originally believed, and would have consumed much less time than applying body filler to the old skins, followed by extensive sanding.
(The 31st Annual LeMay Museum Car Show & Auction will be held 9 a.m.-5 p.m. Aug. 30 at the Marymount Academy and LeMay grounds in Tacoma, Washington. Visit www.lemaymuseum.org.)
Resources
Don Mettler, upholsterer
#7 Fir Glen Drive
Lakewood, WA 98498
H.E.L.M. Manufacturing
5915 176 St. S.E.
Puyallup, WA 98375
Jim Carter Truck Center
1508 E. Alton
Independence, MO 64055
Speedy Auto Glass
215 Washington St.
Olympia, WA 98051


