
Building “Bowtie6,” Pt. 3
It’s Time to Wrap Up This Project With a New Dash and Gauges, a New Electrical System and Cosmetics as Well.
Editor’s note: This is the third and final installment in the build of “Bowtie6,” a 1972 Triumph TR6 whose new name came from the 3.4-liter Chevy V-6 engine installed by the owner. As you’ll recall, we finished up the previous article in the May issue by painting the Triumph Viper red. There were 19 photos in the first two installments, so we’ll start here with Photo 20.
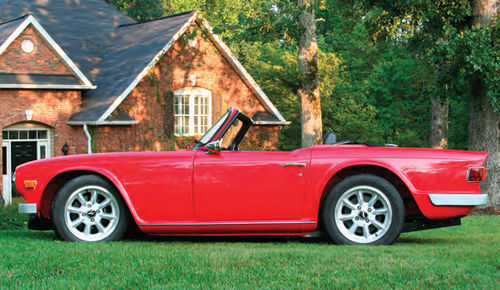
WITH RED PAINT as expensive as it is, I did not have the heart to cover any of it up. That is why the rockers, windshield frame and rear valance remain red (original TR6s had these sections painted flat black). I am extremely pleased with the results.
The rear fenders have the original TR6 emblem (instead of the Union Jack with the TR6 logo through it), but instead of being white I chose the black one. This gives a very “stealth” look and does not jump out at you. (In fact, you have to look closely just ahead of the right taillight in Photo 20 to see one.) I did leave the “Triumph” emblem on the right side of the rear deck and for kicks I was able to find a nice crossed-flag emblem like the ones fitted to the Triumph Italia (a limited edition Triumph from the 1950s). These crossed flags were sourced from a vendor in the UK and are quite rare and expensive.
Finally, a South Carolina personalized license plate was requested from the Department of Motor Vehicles with the signature name of BOWTIE6 (Photo 20).
A Look at the Bumpers & Grille
Ah, the bumpers! This is a special handmade feature of Bowtie6. The original bumpers were pitted and had their fair share of damage from 30 years of use. But spending the time it would take to straighten them and have them rechromed was not something I wanted to do. Replacements often are not up to the quality of the original ones, so new ones were made.
The new bumpers were hand formed from aluminum. Sheet aluminum was cut, shaped and TIG welded. Then all welds were filed smooth and sanded to make the seams almost disappear. Several grits of sandpaper were used to finally get the bumpers smooth and straight. Finally, the bumpers were taken to a powder coating specialist and finished in a color similar to that of high end Panasport wheels. The final result is stunning and extremely lightweight (less than 5 lbs. each). Granted, this will not provide much protection but neither did the original bumpers.
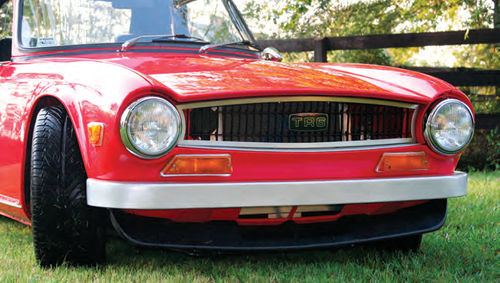
Fortunately, the egg crate grille was in decent shape; however the surround was rusted quite badly. So, why not try something different? A new surround was made from aluminum and shaped to fit the grille opening. The lower valance trim piece was also made from aluminum. The new aluminum pieces were brushed with Scotchbrite and sprayed with clear coat (Photo 21). The last touch was mounting a new, enamel TR6 emblem (not easy to find and not cheap, either).
New Gauges for a New Dash
The interior of Bowtie6 is another signature feature of the project. Quite some time was spent fabricating and improving upon the original dash and surrounding areas.
The original instrumentation was mechanical and this proved to be non compatible with the electronic systems employed by the new Chevrolet powertrain. VDO Vision gauges were purchased and they include an electronic speedometer with an electronic interface that accepts speed pulses from the onboard Powertrain Control Module (PCM). The electronic tachometer is also interfaced to the coil packs and all are very accurate. (They have been calibrated using a diagnostics device that interfaces directly to the PCM.) Finally, there is a voltmeter along with fuel, oil temp, oil pressure and coolant temperature gauges all from the same VDO Vision family. Each gauge is individually illuminated with a red-capped light bulb. At night, this gives the gauges a very appealing red glow that’s extremely easy on the eyes and also coordinates with the red paint on the exterior.
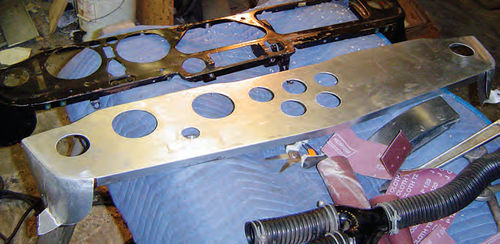
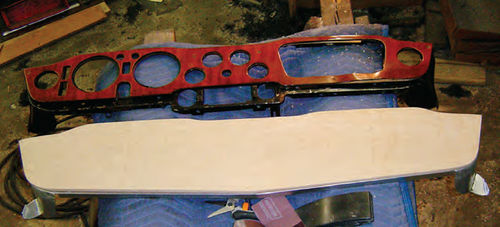
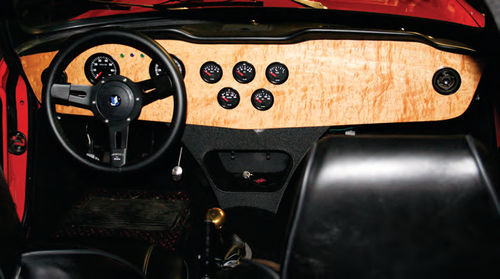
With the new gauges came the need to properly mount them on the dash. So, a new dash backing plate was made from aluminum (Photo 22). The dash also is new. It was made from a solid board of quilted maple (no veneer, mind you— this is the real thing) and finished in Tung oil (Photo 23). It was then polished with British fine furniture beeswax. The luster obtained is not too bright or too dull—it is very nice, indeed. It requires an application of the wax from time to time, but this is a small price to pay for such a nice dash (Photo 24).
The Triumph’s seats are the stock highback units. They were completely disassembled and the frames media blasted and painted. New foam inserts, bladders and ribbing were used along with new vinyl skins. All was then reassembled and the restored seats are quite comfortable and supportive.
The carpet was another matter completely. I bought a new carpet set but the quality of the carpet was not very good. I was not pleased with the backing material either. So, I started off by covering all surfaces with Dynamat Extreme. This material does an excellent job of reducing vibrations and sound deadening. Then I bought a roll of black automotive carpet from an auto carpet supplier. The tunnel, floorboards, rear shelf, trunk interior, etc. were cut to fit and glued in place. On the floorboard and tunnel areas I used closed cell foam underneath the carpet (so it won’t absorb water). Finally, a set of custom made coco mats (like the ones used in the ’60s) was made to order. The mats are black with red specks, to pick up the red paint on the outside. The interior is, indeed, unique and is very quiet.
A Car With Brass
The original steering wheel looked pretty used and was just too big, so I decided to replace it with a 13-inch Mountney Premium leather steering wheel with matching boss. The boss had to be machined on a lathe just a tad in order for the center of the wheel to fit it snugly. Once that extra material was cut off, the wheel fit perfectly and was secured with button-head fasteners.
The 13” steering wheel really has a nice feel. The downside is a little extra effort when the car is barely moving, but that is no problem.
Since the transmission tunnel is new, the original dash brace did not fit so a new one was made. The new center dash support is made from aluminum and finished with black crinkle paint (see Photo 24). This also serves as a place to hide some of the switches. The wiper switch, heater switch and windshield washer switch are all mounted in a “stealth” mode completely out of sight. Speaking of switches, the ignition switch, start button and light switch also are hidden under the dash, on the left-hand side. This was done to give the dash an uncluttered look and also prevents any distractions that might detract from the beauty of the wooden dash. Also, no glove box was added because that also would detract from the dash.
If you note the shifter toward the bottom of the photo, you will see it’s equipped with a solid brass shifter knob. The knob started as a piece of cylindrical brass stock that was chucked on a lathe. Then, very carefully, the knob was shaped and then bored and tapped to match the threads on the shifter rod, a piece of custom-bent stainless.
No Fan of Lucas Electrics
The electrical system of Bowtie6 was completely handmade and is yet another signature feature. Mr. Lucas is persona non grata in my book so a proper electrical system was mandatory. The fuse box was made in a custom enclosure and fitted with modern spade fuses. I used several relays for the ignition circuit, electric fan, headlights, fuel pump, etc. because this keeps the load off the switches. All connectors were soldered and shrink wrapped and finally taped together where appropriate. Since I knew the electrical system was in tip-top shape, I had no problem fitting powerful Hella H4 headlights.
With modern wiring and a stout GM 140-amp alternator, Bowtie6 has had no electrical issues whatsoever.
A Low, Aggressive Stance
Once Bowtie6 was back together, inside and out, a few “eye candy” items remained to be added. To further complement the car’s low stance, a set of Panasport 16 x 7 aluminum wheels was purchased along with 215-55/16 Kumho tires. Unfortunately, the 215 width was too wide for the front and there was a slight rubbing on the edge of the fenders. So, a pair of 205-55/16s was mounted on the front only (the rears remain 215s). They really do look the part and the car handles extremely well (Photo 25).
A new soft top was special ordered and made in the UK and this gives Bowtie6 an even meaner look. The top is Haartz Stayfast Canvas which consists of a canvas outer layer and a preshrunk cotton inner layer, custom-made to fit the car. I elected to leave the rear side windows out because they do tend to get worn after repeated folding and unfolding. In addition, all modern convertibles don’t seem to have side windows. The rear window is plastic, and surrounded by a zipper so it can easily be lowered.
Working With the Brakes & Springs
The brakes did require some adjusting once the pads had seated. This is when the Wilwood proportioning valve came in handy to dial in the front/rear bias. After several adjustments, the current balance yielded very respectable stopping distances.
Some adjustments were also required with the rear coilovers. At first, the springs were too soft and the rear of the car squatted quite considerably. Since springs can be changed very easily and are quite inexpensive, I tried several sets until I finally found a set that gave the least amount of squatting while providing a comfortable ride.
A List of Things to Like
Bowtie6 took three years to build. It also took quite a bit of resources and there are people who would question why I did this. My answer is this project has yielded a unique and responsive sports car that is very dependable and quick. Sure, there were nearly 100,000 TR6s built but there is only one like mine.
Driving Bowtie6 is a delightful experience. The engine has a very nice torque curve and that, coupled with the Borg Warner gearbox and the 3.90 differential, gives a very nice acceleration when stomping the gas pedal. The car has been on a scale and it weighs 2400 lbs. with me in it and a full tank of gas. Add to this 150 hp at the rear wheels and you have a very fun car to drive.
Shifting gears is also a delight thanks to the special B&M short-throw shifter that was installed. This makes for quick shifts at the flick of the wrist. First gear is a little tall but the rest of the range is spot on. At highway speeds fourth and fifth gears are right on the cam with excellent throttle response. And speaking of fifth gear, it can be engaged at low speed and the engine has enough torque to pull the car very nicely. The suspension also works very well. The ride is firm but not uncomfortable.
On to the Next One…
There are a couple of final notes I’d like to share with you: I had made a promise to myself that one day when the car was back on the road I would try to contact its previous owners. So, I wrote them a letter and we arranged to meet at a local car show. They drove four hours to the event and told me quite a few stories of when they owned this particular TR6.
And, now that the Triumph has been completed, my current project is rebuilding a 1968 Mini Cooper. We have a GM Ecotec engine for that one—it will be a real handful.
For more details on the Triumph, you can visit Joe’s Web site, bowtie6.com if you have any questions.
Resource
Dynamic Control of North America, Inc.
(Dynamat)
3042 Symmes Road
Hamilton, OH 45015


