Taking Engine Measurements
Question:
I am restoring a 1965 Chevrolet Malibu with a 283-cubic-inch smallblock in it. I want to keep it original, but I want to do the job right. I know the engine is about due for an overhaul, because it has well over a hundred thousand miles on it, and smokes and uses a little oil. I imagine it will need a lot to make it factory fresh again. I have done most of the work on my old cars over the years, but I have never done a complete overhaul before, and want to do it for the experience. What tools do I need to determine what condition the engine is in, and what needs to be done?
I am reluctant to just drop the engine off at a machine shop and let them figure it out. I will also need to verify that they did everything correctly when I get it back. Can a novice do this accurately at home before dropping off the parts to be machined?
Answer:
I wrote a book on those engines a few years ago that covers the Chevrolet small block engines in detail, though it was primarily written for the home hobbyist who wants more performance out of those motors. It covers how to clean, examine, measure, and repair them and which heads and blocks are better suited for which purposes. It is used with the Overhaulin’ TV show and is titled “How to Hot Rod the Chevy Small-Block V-8,” and is available through Amazon.
Rather than rehash all the information in the engine measuring chapter, I include it here, along with the accompanying photos. Like most things mechanical on cars, you need to work methodically and carefully, and I advise you to measure everything at least twice, especially if you are not familiar with the tools involved.
Your machinist will measure it all again, and can tell you if you have made any errors and what he recommends in order to make your engine as good as new, or actually be better than new. That is because the factory only took the time to make things good enough, because making them perfect would not have been cost effective. Here is what I advised in the book as regards engine measuring:
I went to my favorite machine shop, L&R Engines, Auto Parts and Supplies in Santa Fe Springs, California, to drop off a 350 block and heads for some machine work. As it turned out, another guy was dropping his mouse motor off as well. The difference between the engines was his was still all together, right down to the carburetor and oil filter. It also appeared to be dripping a brown, thick mixture of coolant and oil from somewhere. The fellow mumbled something about overheating as the engine was lifted off his truck.
It occurred to me that his bill might well include an extra zero or two over what my trip to the machinist was going to cost because I had taken the time to tear my engine down, clean it up and check it out. You see, it strikes me as folly to pay a high-end machine shop to degrease and disassemble an engine. Why would you pay skilled craftsmen at going rate to do work you can do yourself?
And judging from the chocolate pudding oozing from his engine’s cooling system, the machinist’s efforts may well be for nothing anyway because the guy’s block and heads may be ruined. Besides, the block may have already been bored out as far as it can go. Oh well. It’s his money. Personally I would rather tear down an engine myself, figure out what it needs, and know what I am getting into before taking it to a machine shop.
I had disassembled my engine completely, found out that it still had an overhaul left in it, and figured out what needed to be done before I ever dropped it off. I knew the block had been bored .020” over in a previous overhaul, and that the taper in the cylinders was beyond cleaning up with a hone and a drill. I also determined that the main bearings were still in alignment and that the decks (mating surfaces for the heads) and the heads themselves were not cracked and were nice and flat.
I verified that the crankshaft was in good shape, but not so the cam. It was pretty much what I had expected. Now you might think figuring out what an engine needs would require years of experience and expertise and that not everyone can do it. If so, you’d be wrong. Actually, the process is pretty simple. It just takes a few very precise hand tools and the know-how to use them. Here’s how it’s done:
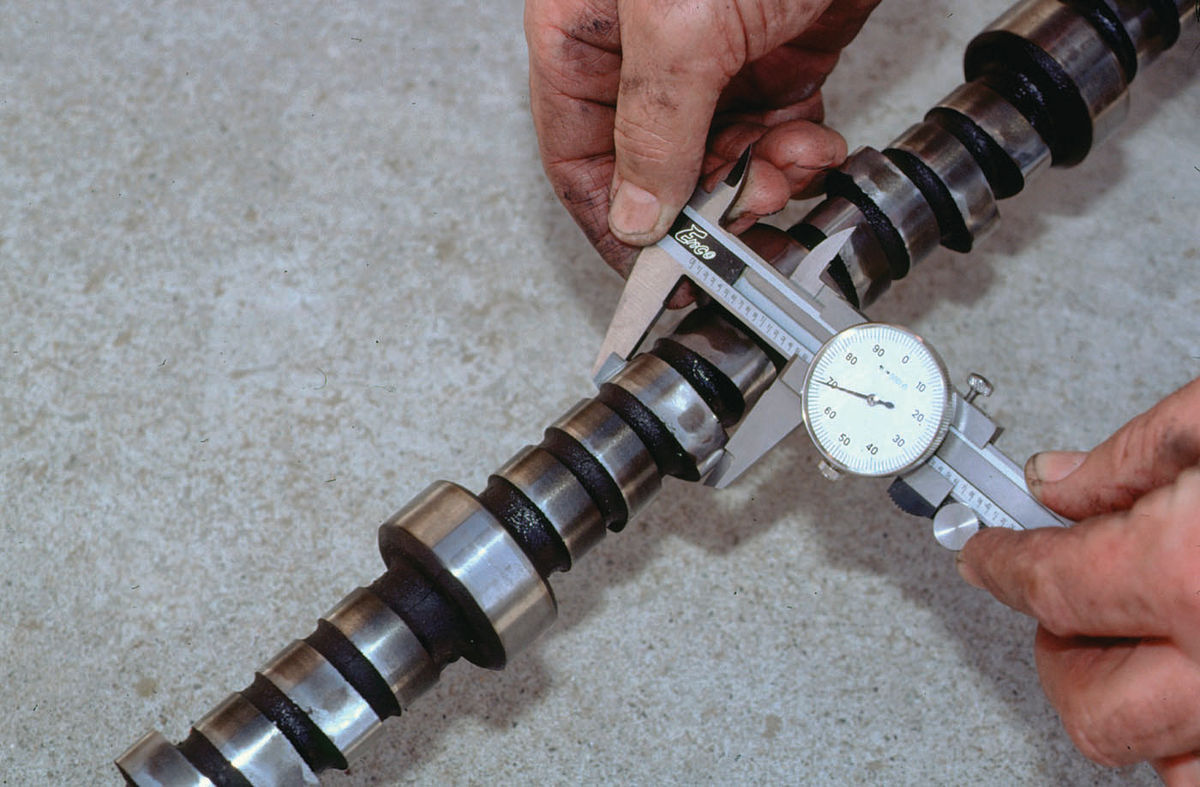
Calipers
These devices can measure any length up to 7.5 inches accurately to within .001” (1/1000 of an inch) and are very handy and easy to use for quick checks of engine components that don’t require more accurate measurements. There are three styles of calipers. Which you choose depends on how much you are willing to learn, and how much you want to spend. Oh, and by the way, if you need to measure beyond 7.5 inches, extended calipers are available, but you won’t need such large ones for engine work.
There are smooth calipers that have no measuring scale on them at all, and those are just for transferring a particular dimension to another measuring device such as an inside micrometer. They can be handy for getting into tight places, and when combined with micrometers, can provide accurate information. Using them does require some skill and experience though, because two measurements have to be taken instead of one. However, un-kjojkhjcalibrated calipers are inexpensive, and can be a handy addition to your tool chest.
The most accurate and durable of these tools is the vernier caliper. The device is called that because it has a vernier scale etched into it that tells you the dimension you are measuring to the thousandth of an inch. But vernier scales can be a little confusing until you get the hang of reading them. On the other hand, most professional machinists will use nothing else.
If you don’t want to bother with the vernier scale, for a few bucks more you can get a dial caliper. As the name indicates, these have an analog dial built into them that will tell you dimensions in thousandths of an inch. You just zero out the dial with the calipers closed or zeroed on a measuring standard, then take your measurement. If you buy a quality dial caliper, accuracy will not be a problem and they are easy to use.
Then there is the new kid on the block—the digital caliper. This is the most expensive of the choices. It comes with a battery-powered digital readout that is simple to comprehend, but it becomes a paperweight if the battery dies. Digital calipers can also be confining in the same way that learning to drive a car with an automatic, but never mastering a standard shift can cut down on your options. After all, someday you might be in a situation where all that is available to you is a vernier caliper and you won’t be able to use it if you never learn.
Micrometers
There are times when measuring engine components to one thousandth of an inch isn’t close enough. For instance, the stock, cast-aluminum piston clearance in a Chevy 350 is .0015” to .0025”. This means a piston with a clearance of .0012” could seize in the bore when the engine warms up, and a piston that has a clearance of .0027” is in danger of developing piston slap when it wears in. If you can only measure to the nearest thousandth you can’t verify such clearances precisely enough. As a result, you could have a problem if you went ahead and installed new pistons without checking them.
Micrometers are what you need to measure your pistons. The most precise micrometers can measure to .0001” using a combination vernier scale. Such tools can be pricey if you want the finest, and even the lessexpensive alternatives aren’t cheap. Sears sells a Craftsman 0 to 4-inch set of four micrometers for a modest price, But Starrett, Mitutoyo, Fowler and Mahr Federal—the brands favored by the pros—cost more.
Craftsman micrometers are excellent, as are many other less-expensive brands, but beware of extremely lowpriced imported micrometers. Rather than buy those—if you want to save money—do as I did and pick up a set of micrometers at a pawn shop.
You can sometimes find name brands for a fraction of what they cost new. Just make sure you get the proper measuring standards with them, and make sure the scale on each mic zeros out at the correct dimension.
The manufacturer can recalibrate micrometers that are out of adjustment, but that will cost money.
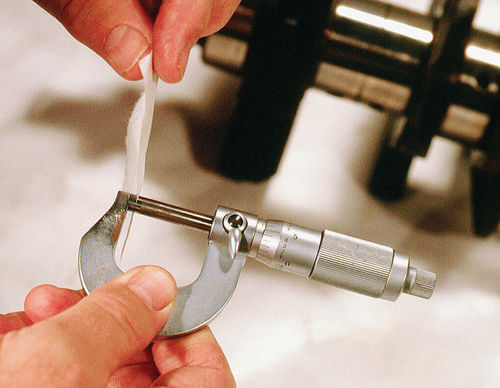
To check the calibration, clean the measuring points (the anvil and spindle tips) and the measuring standard with a piece of paper or a lint-free cloth, then turn the fine adjustment on the end of the thimble in until it clicks. The scale should zero out at the dimension of the measuring standard.
Never oil a micrometer, because doing so will cause it to read incorrectly.
Also, treat your micrometers with the respect delicate measuring tools deserve. Avoid dropping them or treating them roughly, and never use a micrometer as a C clamp. This last bit of advice should be obvious, but every auto shop teacher can tell you stories about people who have done such things.
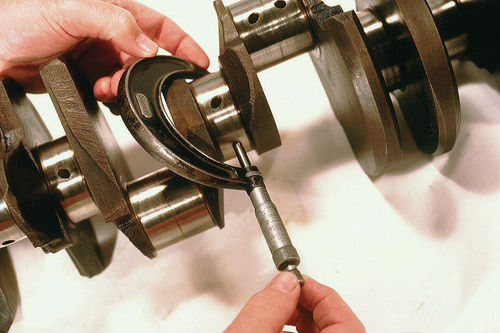
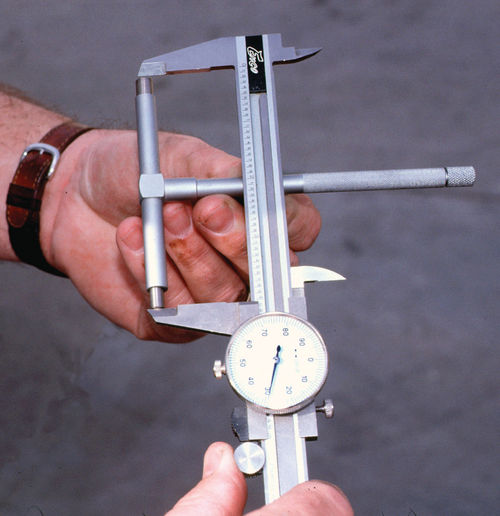
Ideally, your selection of engine measuring micrometers would include inside and outside mics, but you can get by using a telescope gauge set and your outside micrometers. Telescoping gauges are also called snap gauges, because you insert them in the opening to be measured and snap them out against the surfaces. You then lock the snap gauge using the twist barrel on top and slip it out of the hole. Use an outside micrometer to measure the snap gauge and you have the dimension you are looking for.
Whether you use inside micrometers or snap gauges, the key to measuring correctly is having the gauge or inside mic exactly 90 degrees to the surfaces being measured. You can make a light pencil line on the extension of the snap gauge and then rock it in the hole slightly and watch the line move in and out when you rock the mic back and forth. When the line is in as far as it will go before it starts to come back out, you are at exactly 90 degrees.
In the case of a cylinder bore, you can also push a piston up from underneath to help line up your mic or snap gauge.
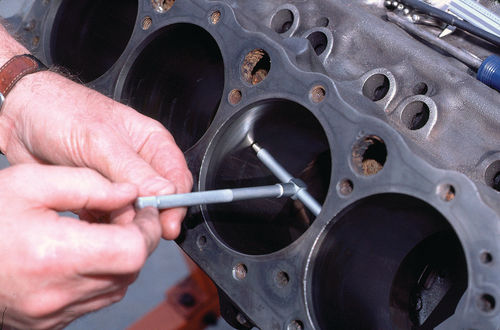
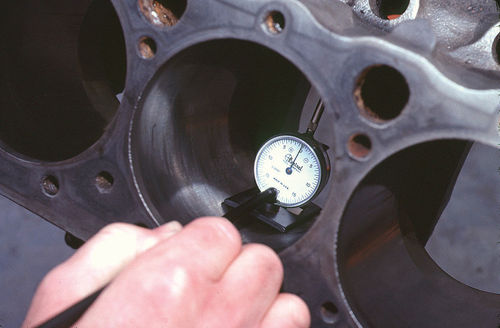
But the most accurate way to measure a cylinder bore is using a dial indicator mounted in a special jig that holds it straight while you move it up and down the bore.
Dial Indicators
These are invaluable devices that can perform all sorts of automotive tasks. They can measure gear lash on a differential and run-out in a transmission or flywheel for example. And they are indispensable for checking crankshaft straightness, finding precisely top dead center for pistons when you are degreeing in a cam, and determining cylinder bore taper. Dial indicators aren’t terribly expensive, and are vital for careful engine rebuilding. New, these can run around $90 dollars, but again you should be able to beat this at the pawn shop.
When you purchase your dial indicator, be sure to pick up a good magnetic base as well. You’ll want one with a minimum 90-pound pull so it will hold firm to the part on which it is placed. New, a complete magnetic base with attachments from Craftsman retails for around $50.
Machinist’s Straightedges
These are great for measuring valve spring height and checking flatness of heads and decks. They are also great for determining whether an engine needs its main bearing journals align bored or not. Don’t be tempted to use an ordinary straightedge, because it may not be straight enough to give you an accurate reading. A machinist’s straightedge can be found for under $10.
You don’t need all, or even any of these tools to build an engine, but the fewer measuring tools you have, the more you will be required to depend on your machinist to tell you what needs doing, and the more you will have to trust that the job was done correctly. And in the end, the bigger your machining bill may become.
Also, to blueprint an engine and make it better than the factory original—something you will want to do especially if you are planning to pump more performance out of your small-block—you will need to understand how to take precise measurements. (For tips on how to make an engine better than new, see the December MOD.)


