
How -to Repair a Modified Disc Brake System
Many People Are Installing Discs for More Stopping Power. Try This If the New System Isn’t Working Correctly.
MODERNIZING OUR VINTAGE rides with front disc brakes is a popular trend these days. The disc systems provide improved stopping distance, less brake fade and more confidence to drive in today’s traffic. However, what do you do when a modified system doesn’t work properly? For some answers, follow along as we diagnose and correct the brakes on this old ride, building on the knowledge we gained about disc brake conversions in the September and October 2009 issues of Auto Restorer
Our project vehicle is a 1955 Chevrolet that is best described as an older restoration. It is mostly stock, but was modified with power front disc brakes about 12 years ago. Ironically, the car had been used as a daily driver,so it was shocking to discover just how horrible the brakes were. For Example, I had to press both feet firmly on the brake pedal to keep the car from creeping at idle (Photo 1).
One trip around the block was enough to show that the car was unsafe to drive. In fact, these brakes were worse than the original drum brakes.
So, what was wrong and how could we get the disc brakes working up to their potential?
Assessing the Braking System
After the car was safely transported back to my home workshop, the first step was to examine the system to determine what we were working with. A visual inspection revealed that the front brakes were 11” GM intermediate discs from a mid-’70s Chevelle, and the rear differential and drum brakes had been upgraded to a 9.5 x 2” self-adjusting type from a 1972 Chevelle. These are very solid underpinnings and should be the basis of an excellent brake system.
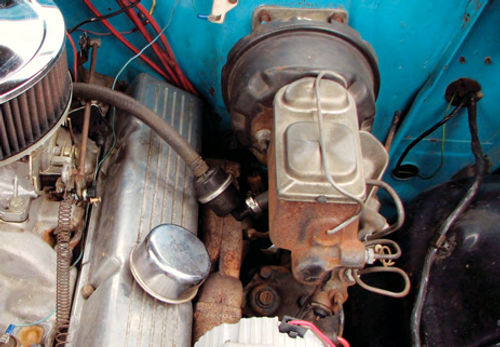
At the top end of the system, the car was equipped with a 7” diameter single diaphragm booster, which is pretty small for a car this heavy (Photo 3). Vacuum booster output is based on diameter, so the larger the booster the more “free pressure” is generated. The master cylinder was of indeterminate size and origin, and was filled with black gritty fluid. The system had been fitted with a factory style combination valve, also of unknown origin. Theoretically, this brake system should work well, other than the small booster size.
So, was the problem a component failure or a poor mixture of parts? In the end it was both, but it took some troubleshooting to isolate the problems.
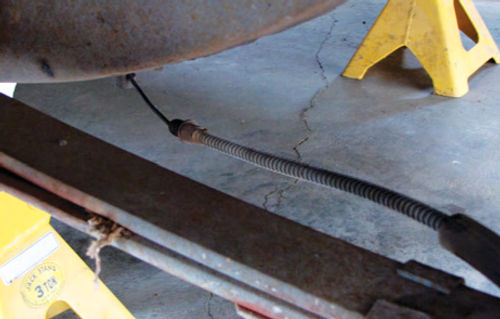
While inspecting the brakes, I also found the driver’s side emergency brake cable bracket had broken off and was missing from the frame. Although the center cable was connected, the outer housing was dangling loose, preventing the emergency brake from working (Photo 2).
Faced With Some Booster Blues
The first suspect part in the system was the vacuum power brake booster. The job of the booster is to multiply the input force from the brake pedal by converting engine vacuum into additional force on the master cylinder piston. Theoretically, the brake booster will not make the car stop any faster if the system is properly installed and balanced and the driver has a strong enough leg. However, in practical experience the booster can make the brakes much easier to control and improve the stopping distance because the driver has shorter reaction times without having to do a “leg press” to make a panic stop.
Power brake boosters in general are quite reliable, but there were several indications that this booster had failed.
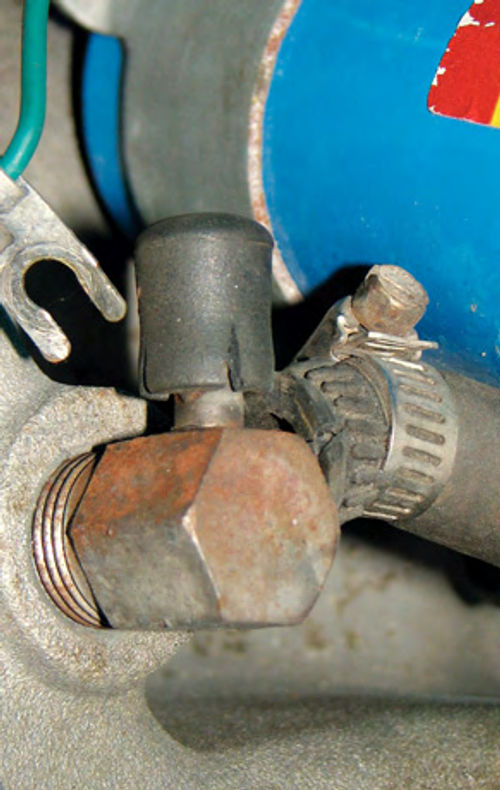
First, I measured the idle vacuum at the booster. Boosters work best with 18” of vacuum or more, and typically have problems when vacuum is below 16”. I measured the vacuum by plugging a gauge into the booster vacuum line (photo 4). The test revealed a pretty low vacuum reading of 15.5” with quite a bit of fluttering of the needle. Furthermore, a visual inspection showed a cracked vacuum cap and hose, which were replaced (Photo 5). A quick check with a timing light showed late ignition timing, which was advanced to spec. The vacuum increased to just over 17” at idle, plus the engine ran much better. The needle was still fluttering slightly, indicating an additional vacuum leak. That was noted for a later fix, but there was adequate vacuum for proper brake function.
Next,I ran a booster function test. With the engine off, I pressed the brake pedal several times to bleed off any residual vacuum, and then held the pedal firmly. Upon starting the engine, the brake pedal should sink an inch or two toward the firewall as the booster starts to work. However, when I ran this test, the brake pedal did not move at all; the engine started idling rough and I could hear a sucking sound under the dashboard. Letting off the brake pedal stopped the hissing sound and the engine idle smoothed out. Suspicions confirmed—the booster had expired, and since it was too small for the application anyway, it had to go.
The Master cylinder, Combination valve and Pressure Tests
As noted above, the brake fluid was very dark and carried a gritty substance like coffee grounds. This certainly was not a good sign, since there are several small ports and passages in the master cylinder and combination valve that can easily be plugged by grit. I separated the master cylinder from the booster and discovered a lot of rusty brake fluid trapped between the master and the booster, indicating a leaking master cylinder piston. The master cylinder diameter was 1 1/8”, which is pretty large, especially for a disc/drum combination with such a small booster. With everything else the same, a 1” master cylinder will require 27% less input force for the same brake pressure, but at the expense of 27% more pedal travel. Installing a master cylinder with too large of a diameter makes the pedal effort very high. Conversely, too small of a master will lead to too much pedal travel and a very low brake pedal. It’s a matter of balance.
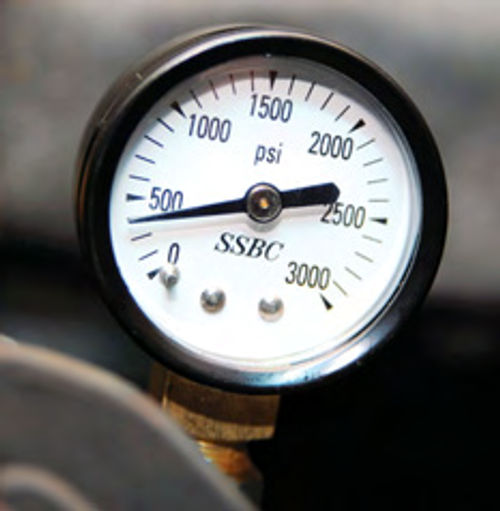
The system had been fitted with a combination valve, which is a vital part of the system. As the name implies, it combines the functions of a proportioning valve, metering valve, and hold-off valve, and controls the pressures and timing to each half of the system. This valve also isolates half of the system in the event of a brake system failure. Factory style combination valves are typically sealed units and there is no practical way to disassemble or service one. So how do you test the combination valve to determine if it is working? The best method is to measure the front and rear line pressures. I used a brake pressure gauge which is designed to be screwed into the bleeder port of a caliper or wheel cylinder (Photo 6). Brake pressures were measured in both the front and rear circuits under moderate and firm pedal applications with the engine at idle.
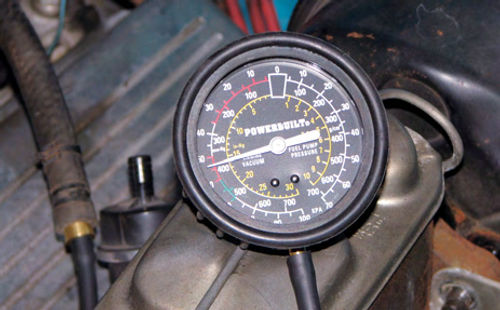
The pressure tests revealed several key issues. Moderate brake application had a front brake pressure of 350 PSI and rear brake pressure of less than 50 PSI. With the brakes firmly applied (both feet pushing), the front pressure rose to just shy of 600 PSI and the rear brakes never even reached 100 PSI. Disc brake calipers require 600 PSI minimum to operate and 1000 PSI for a panic stop, which is quite a bit higher than drum brakes. These pressures showed conclusively that the front pressure was too low and that the rear brakes were not functioning at all. No wonder this car was such a nightmare to drive!
Making Repairs
Factory style combination valves are designed to lock out half of the system if hydraulic pressure is lost in one circuit, still leaving half the brakes working. This happens when the metering valve piston over-travels inside the valve block, shutting off the leaking circuit. This can also happen accidentally with overly vigorous brake bleeding. Typically, this condition can easily be corrected by re-centering the metering valve by pressing the pin on the end of the valve. However, in this case the valve was stuck and could not be centered. The combo valve needed replacement, especially with all that grit roaming around in the system.
The front disc brake pads were about 60% worn, so they did not necessarily require replacement. However, is it really worth the risk? Caliper inspection showed a sticky piston on the right front, so all lines were flushed and a set of rebuilt calipers and pads were installed. I also checked the alignment of the calipers to the rotors and founda minor problem on the left-side caliper mounting bracket, which was easily corrected.
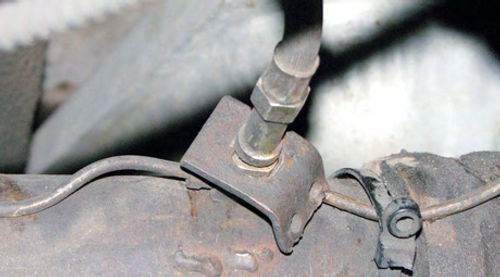
The rear drums were inspected and the linings were full thickness, more proof that the rear brakes were not working. To be on the safe side, the wheel cylinders were replaced, new shoes installed and the drums turned. I also found that the bracket that holds the rear flex line to the rear differential had broken off (Photo 7). Every bump in the road caused the rear brake lines to flex. This was a ticking time bomb, since it was only a matter of time before one of he brake lines snapped off! The offending bracket was welded back onto the differential and the brake lines were carefully cleaned and inspected. It is vital to go over every aspect of braking on these old rides.
I happened to have a new 7” brake booster and a new GM intermediate combination valve left over from another project, so for test purposes I flushed out the gritty fluid and temporarily installed those components. Table 1 on the next page shows the effect of those changes on system pressures. With a working booster and combo valve, the car was now safe to drive, but the pedal effort was still quite high—the master cylinder was still oversized for the car. It took both feet on the pedal to make a panic stop, and even then it was nearly impossible to lock up the wheels on dry pavement.
Installing a New Booster & Master Cylinder
Again, as noted above, the amount of brake booster output, sometimes called “free pressure,” is a function of the diameter of the diaphragm. So, what do you do when space is limited and you need more boost? Boosters are also available with dual diaphragms to increase their output.
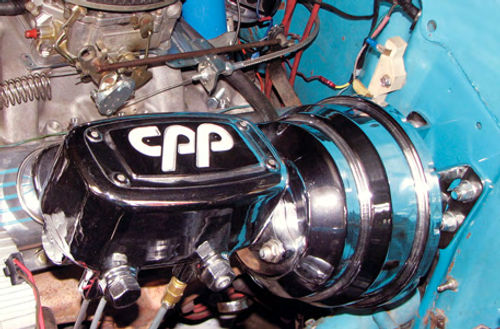
Space is an issue on an early Chevy, so I ordered an 8” dual diaphragm booster. It provides roughly the same output force as a 9” booster. The OEM booster size on GM intermediate brake cars was either 9” or 11” depending on the application. For the master cylinder, an OEM-type installation using a 1” diameter Corvette master cylinder and combination valve with the addition of an adjustable proportioning valve would have done the trick nicely. However, I decided to go upscale on my master cylinder, and bought an aftermarket unit that also has the metering valve and proportioning valve functions built in, along with a tremendous amount of adjustability (Photo 8). Either way would have worked well. In the end, it was a matter of personal preference.
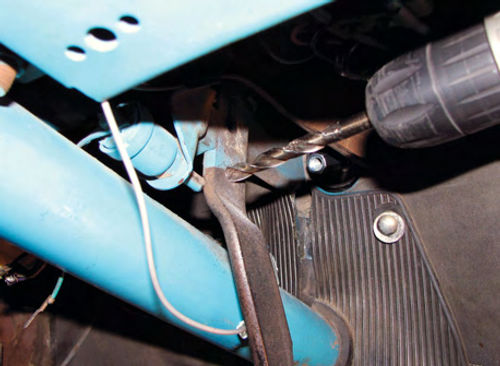
Installation of the new brake booster and master cylinder was straight forward. It required connecting the pushrod to the pedal arm in the power brake position. This car only had a hole for the manual brake position, but correcting that was as simple as drilling a hole 1 inch below the stock hole (Photo 9). I fabricated new steel lines(with built-in flexibility at the frame for safety), then bled the system. Getting all the air out was a challenge, but persistence eventually paid off.
Fixing the Parking Brake
Remember the emergency brake cable issue? I fabricated a new bracket from angle iron to hold the cable housing which I bolted to the frame with drilled and tapped holes. I would have liked to use an original bracket, but it is an integral part of the frame so there is no practical way to get a replacement. Since it can’t be seen when the car is on its wheels, the angle iron bracket should be adequate. Someday I will scratch build a new replacement bracket, but that is very low on my priority list.
Now, It Is a Driver
Careful road testing showed a significant improvement in braking. It only took three short drives to get the valves adjusted properly and dial in the brakes. The result? I Made a world of difference for drivability. The combination of more boost and a smaller diameter master cylinder makes the pedal effort much better, both for normal driving and panic stops. It feels like an entirely different car; it stops very well and is a pleasure to drive.
Resources
Stainless Steel Brake Corp.
Brake pressure gauges, brake components
Classic Performance Products
175 East Freedom Ave.
Anaheim, CA 92801
Brake, suspension and steering components


