
Diagnosing and Repairing a Rough-Running Engine, Pt. 2
We’ll Install a Rebuilt Carburetor and Take a Look at the Distributor as Well.
Editor’s note: Last month we started to diagnose and work on the rough-running condition exhibited by our Project ’55 Chevrolet. We assessed the engine’s condition, performed a basic tune-up, and fixed an intake manifold coolant leak. The engine is improved, but still not running properly, so we’ll continue with our diagnosis, troubleshooting and repair. Last month’s installment included Photos 1 through 6. We’ll start here with Photo 7.
The Carburetor Challenge
Following the overall assessment of our small block Chevrolet 350 and the tune-up we performed, the engine has improved, but it still has ongoing issues with a rough idle, low power, and surges under cruise conditions at low rpm. The car was being driven occasionally, but it was not performing as well as it should.
At this point in the diagnostic process, the guilty finger often points toward the carburetor as the source of all undefined ills. After all, it is one of the more mysterious and complex systems under the hood, so when all else fails it’s natural to blame the carb, right?
Well…maybe.
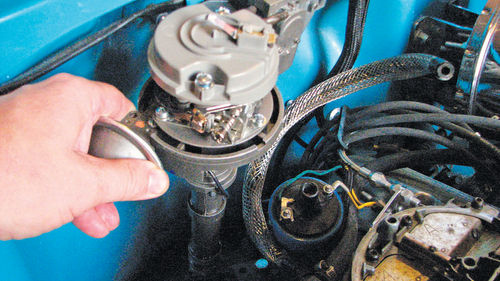
The carburetor on this car was an aftermarket 600 CFM version of the venerable Carter AFB 4-barrel. Overall this is not a bad choice for the street, and there are a great number of small block V-8 engines out there running well with this setup. However, there are some indications that this particular carburetor has some serious problems (Photo 7).
The car ran very rich at idle and did not respond at all to idle screw adjustments. Tightening the idle screws all the way in had minimal effect on the idle and rich-running condition. The spark plugs were all covered with soot, which also hints that the carburetor is running excessively rich.
In addition, I discovered one important symptom in a very embarrassing way.
Shortly after getting this car on the road we took an overnight trip to visit family. I parked the car nose up in a steep driveway, and it was nearly impossible to start the next morning because it was severely flooded. I was eventually able to get it started, but with a big cloud of black smoke. Rich running and flooding over when sitting at an angle are both symptoms of an excessively high float level.
There are several things that can cause a high float level, including a float adjustment, a leaking or stuck needle valve, or a “heavy float,” a term that describes a float that has either developed a leak or become saturated with fuel, causing the float to soak deeper into the fuel. This results in the fuel level rising in the float bowl, richening the mixture and in extreme circumstances the float bowl spills over into the throat of the carburetor. This is a relatively easy problem to resolve, typically by rebuilding the carburetor and replacing the needle and seat, and if necessary changing the float.
The more serious problem, however, was revealed during the last round of vacuum leak checks, as discussed last month in Part 1. The main throttle shafts in the carburetor had worn to the point that vacuum was leaking around the shafts and in through the main throttle shaft bushings. This is a somewhat common problem on very high-mileage carburetors and throttle bodies (both stock and aftermarket), and is caused by the continual metal-on-metal wear to the throttle shafts and bores caused by the repeated opening and closing of the throttle butterflies while driving. The main issue with leaking throttle shafts is it can lead to fuel metering problems and an inconsistent idle.
This particular carburetor appears to have many miles on it and the primary throttle shafts were quite loose.
I performed a temporary rebuild on the carburetor by replacing the needle and seat and properly adjusting the float level. A new accelerator pump and a set of gaskets rounded out the repairs. After reinstalling the carburetor, I performed on-the-car adjustments like idle mixture and idle speed. This resolved a few of the problems like hard starting on a hill, and improved the overall performance. However, it didn’t completely resolve the rough-running condition. It was good enough to get through the summer, but I needed a much better solution.
Time for a Carburetor Swap
I have always been a fan of the Rochester Quadrajet carburetor, so my long-term solution to the carburetor conundrum was to build up a good Quadrajet, which was the original-type carburetor for this vintage small block Chevrolet. This is a “spread bore” style carburetor, which has very small primary throttle butterflies which are good for around town drivability and economy while cruising. The secondary throttle bodies are huge, so under full throttle these carbs are capable of making good power. It is a good balance between economy and performance.
I sourced a good core and took my time as a fun winter project, building up a nice reliable street carburetor. Quadrajet carburetors are also quite notorious for throttle shaft wear, so I had bronze bushings installed in the throttle plate during the rebuild, which should eliminate future wear.
Installation and calibration of the new carburetor was again a step in the right direction that resolved some issues and significantly improved drivability. The new carb dialed in well and was well-behaved on the road. “Reading” the spark plugs showed a clean-burning engine (Photo 8).
By now the engine ran reliably and was adequate for local outings and short trips. However, all these fixes still did not completely resolve the intermittent rough idle or cruise surge problems. Since it was running adequately, the remaining issues were put on the back burner while we turned our attention to other more-pressing issues. The car was driven this way for two summers.
Starting Over With the Basics
Now let’s fast forward to the present. During the interim period there was time to do a lot of other projects on the car, along with some occasional drives and shows. The engine was running OK, but something still was not quite right.
Some days were better than others, but those old nagging problems were still there: rough idle, intermittent misfire, and surging during cruise. When the car was acting up, it would sometimes “lope” like it had a performance camshaft in it. In fact, on one trip a friend mistook the rough idle to be a racing camshaft. When he asked what kind of a cam it has, I shrugged my shoulders and said “it’s a ‘Canardly.’ I can hardly tell what it is, but it doesn’t run very good!”
.jpg?tr=w-500)
I had a fair amount of time to think through all the possibilities and talk through it with several of my trusted gearhead buddies. The most likely culprits could be unstable ignition timing, an issue within the primary ignition system, cam timing issues (loose cam chain or excessive cam end play), or possibly a “flat” cam lobe (where a lobe of the cam had worn to the point that it was not fully opening and closing its respective valve). Once I had a few other problems out of the way, it finally was the right time to chase this problem down once and for all.
So far, we have gone through the basic tune-up, corrected all the vacuum and coolant leaks, installed a rebuilt carb, and adjusted everything to specifications.
It was time to start over again from the beginning.
One of the most important symptoms I had noticed was the car ran the worst during hot weather, so one very hot Saturday afternoon I started the car and took it for a short drive to bring it up to operating temperature. It was running so poorly it had trouble making it up the steep winding road to our house. Caught red-handed, it was time to dive in to find the root cause.
A quick check showed that both idle mixture and speed were set properly. Next, I checked the timing. I connected a timing light to the number 1 cylinder and while the timing was set to specifications, there were two odd things that I noticed right away. About every three four seconds the timing light would fail to blink, indicating a misfire condition. Also, the timing would occasionally jump by 4-5 degrees, then back to the normal setting. Both of these symptoms indicated an issue in the ignition system (Photo 9).
Next, I spent some time trying to isolate which cylinder(s) had a misfire. I used two different approaches. First, I went old school and pulled off one plug wire at a time while the engine was idling, using a plastic insulated spark plug pulling tool made specifically for this purpose.
Each time I pulled a plug I noted the rpm drop and change in behavior of the engine. Note that I would never attempt this method on a computer-equipped car, but on an old school ride like this one it can be a useful diagnostic test.
Normally, if there were a problem with a single cylinder, removing that plug wire would result in less of an rpm drop on the engine. In this case, the first four cylinders I tested indicated the exact same thing—each plug was seeing the exact same intermittent misfire.
Next, I took the timing light in turn to each of those plug wires and watched the light. The results were the same—every 3-4 seconds each plug failed to fire once. Finally, I connected the timing light to the coil wire and observed the same odd behavior. Clearly the problem was somewhere in the ignition system.

Investigating the Ignition System
I connected my dwell meter across the coil and measured the dwell angle (Photo 10). The dwell measurement is the number of degrees of distributor rotation with the points closed, charging the ignition coil. In a conventional ignition, the dwell angle is set by adjusting the ignition points gap. The dwell angle should remain steady regardless of engine speed, which is a quick way to measure the stability of the distributor. Although the distributor in this car was an aftermarket electronic ignition unit, there is still knowledge to be gained by reading the dwell to see if there was anything unusual. This ignition system has an “adaptive dwell” feature that changes the amount of time the coil is energized based on engine rpm. When I measured the dwell, I noticed something very interesting. Every time the engine stumbled, the dwell angle jumped nearly off the scale. Now we are finally getting somewhere. There was clearly an issue with the primary (low-voltage) side of the ignition system.
The nice thing about electronic ignitions is that there aren’t many adjustments, but there definitely were some things we needed to check out. First, I removed the cap and rotor, visually inspecting the entire distributor. The cap and rotor looked good, since they had been replaced in the initial tune-up. I inspected the condition of the wiring, looked at the inside of the cap and rotor for signs of arcing or carbon tracks, and I checked out the vacuum advance mechanism using a hand-pumped vacuum source. Everything appeared normal.
Next I used a voltmeter set to Ohm (resistance) measurements to ensure proper grounding of the distributor. According to my research, grounding problems are a common fault with electronic ignitions that misbehave. I measured the resistance between a good engine ground and the distributor housing, then to the distributor “breaker plate.” All of the grounds checked out. Then I measured the voltage at the positive side of the coil and at the input to the electronic ignition module. Again, all of these measurements checked out.
Here’s the Source of Our Problem…
Wiggling the distributor shaft side-to-side showed a fair amount of free play in the centrifugal advance mechanism. I have not been able to find a specification for how much side-to-side movement (wobble) is allowed, but it was quite a bit more than I was expecting. I have also heard of similar poor-running electronic ignitions caused by the magnet wheel being too low compared to the sensor, so I checked to ensure the magnets were aligned vertically with the sensor, which they were.
The one spec I did have is the maximum permissible air gap of .060 between the magnet on the distributor shaft and the electronic module. Using a round feeler gauge, I measured the free play to be well in excess of .080 if I pushed the centrifugal advance mechanism to the side. This was definitely the smoking gun. I’m sure that the “wobble” in the centrifugal advance mechanism is allowing the magnet assembly to move too far away from electronic pickup, causing the misfire condition.
While I have reasonable confidence in repairing this distributor and returning it to a good working function, it has another strike against it: The aftermarket distributor is approximately 6" taller than the stock distributor (Photo 11). In most applications that is not an issue, but Tri Five Chevrolets have the windshield wiper motor mounted to the firewall directly above the distributor. The previous owner had solved this dilemma by removing the wiper motor entirely. In Southern California this may be a workable solution, but in the rainy Pacific Northwest it certainly is not. I have installed a vacuum wiper motor because it is smaller than the electric motor, but the distributor wires still rub up against the wiper motor. Switching to a stock distributor will resolve the hard riding condition, as well as look more correct on the car. I will repair and save the aftermarket distributor for some future project, but not for this car.
A Replacement Distributor to the Rescue…But There’s Still More to Be Done
Sourcing a stock distributor was as easy as going to my local parts store and buying one off the shelf. While there were some slight differences year to year, small block Chevrolets used the same basic distributor up through 1974, after which they switched to the HEI ignition. I purchased a remanufactured distributor for a 1974 Chevrolet 350, easy as that. It was very inexpensive, even without a core distributor to turn in. I installed it, added a ballast resistor back into the wiring circuit, and voila! It started in the first crank, and purred like a kitten. No more rough idle, no more cruise surge. For the first time since we have owned this ride, it is truly running like a champ.
The verdict: Each and every issue that was found and fixed contributed to the overall improvement, and every problem fixed was a real problem. Electronic Ignition issues are somewhat unusual, but they are not completely unheard of. An engine diagnostic scope at a fully equipped shop certainly would have found the problem much faster, but all tools needed to troubleshoot these problems are basic and can be found in the well-equipped hobbyist tool box.
If I could go back in time and do this all over again, I would have changed distributors during the first major tune-up, then delayed the carb replacement until later. Both would have been done eventually, but the car would have been more fun and run better in the interim.
Follow along next time when we install a retrofit electronic ignition module into this stock distributor, as well as disassemble and repair the aftermarket distributor that we removed.


