
Browsing Through JOHN’S TOOL CHEST
This Time, We’ll Consider Some Magnification Aids and Different Types of Compression Testers.
Useful Options for a Magnifying Visor
In a past installment of John’s Tool Chest, I discussed the Optivisor Magnifier (Photo 1a), a helpful optical visor for when you find yourself in a situation where your eyes alone can’t get the job done. As I said at the time, “you may be doing an initial inspection looking for a crack in a mechanical component or inspecting an electrical switch. Soldering small connections is another time where magnification can be very helpful.”
Since then, I’ve come across two options that will make your visor even more useful. They are:
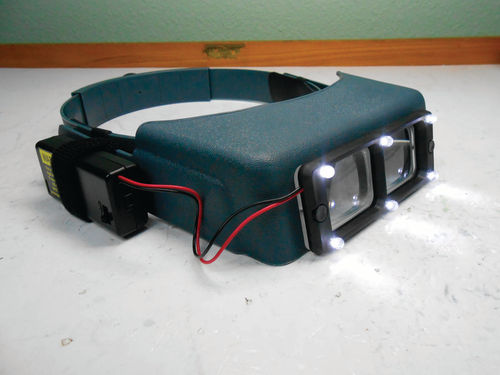
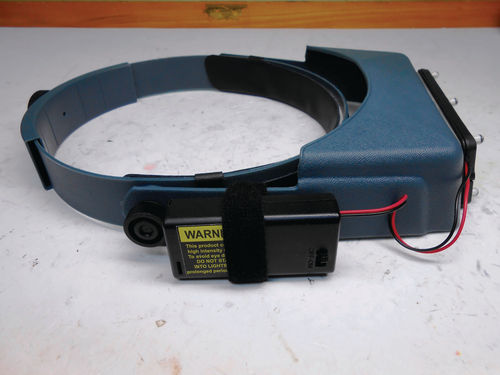

Quasar LED Lighting System— If you’re using a magnifying visor, you can be certain at some point you will need more light on the subject matter. Florescent workstation lights can be manipulated, but only to a certain degree. I have found myself using the Optivisor with my headlight mounted above it. It was an improvement, but awkward to say the least. If I tilted my head forward, the headlight would come sliding off. When looking on Amazon I came across the Quasar LED lighting system. It has six LED lights that surround both eyes as seen in Photo 1. This illuminates exactly what your eyes are looking at. If you are trying to see down into a cavity, this will get the light in there. The unit is easy to attach. Just remove the lens retaining pins or screws and mount the light frame in front of it with the included longer pins. It is powered by two AA batteries, and the battery chamber with an on/off switch is attached to the right side frame of the visor with a Velcro strap as you see in Photo 2. It’s not a bad idea to use a piece of tape to display the date the batteries were installed. If you forget the batteries for any length of time, you can be certain they will leak. Removing them each time you use the magnifying visor is not convenient in this application. In Photo 3 I am sitting in a room with no other lights on, so this is a good example of how much light this attachment floods onto the subject. The system’s box says “made in USA, contains imported components.” Translated that probably means the box is made here and the contents are made in China. Regardless, it does a superb job. Manufactured and distributed by eurotool.com, it includes batteries and all the necessary hardware. Amazon had it for around $30, but it’s likely you could find someone selling it for a few dollars less. Now, here’s another useful option:
Optiloupe for Optivisor—There are times that the magnification visor just isn’t powerful enough to see what you want to see. Enter the Optiloupe.
This mounts to either side of the visor lens by removing the original pin or screw, and inserting the Optiloupe as shown in Photo 4. This is an easy add on, and yields an additional 2.5X magnification. It’s Made in the US and priced at about $12 through Amazon.

Compression Tester
If you own your vehicle long enough, your engine eventually will experience a mechanical problem. The only question is when it will happen, and what type of problem will you face. Not all problems will be major ones but to get an idea of what the problem might be, you will need certain special tools. These same tools also are useful when inspecting a good-running engine to get a better idea of its general condition. And even if engine repair work isn’t something you wish to tackle yourself, it’s worth knowing some of the basic tests, how they are performed and the tools needed to do the diagnostics.
Most everyone involved in the old car hobby has heard of the Compression Tester, even if they haven’t used one. The tool will aid you in determining if there are worn piston rings, burnt valves, late valve timing, a leaking cylinder head gasket and more.
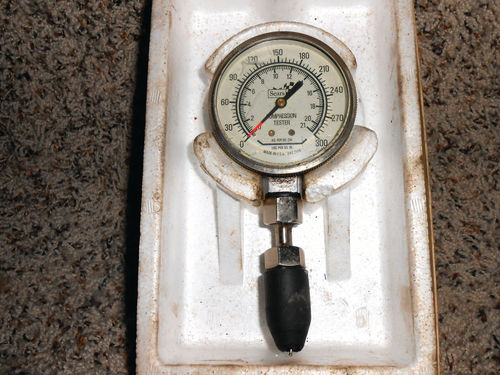

Simply put, a compression tester is an appropriately calibrated pressure gauge (meaning the pressure range is correct for checking cylinder pressures), and it has a means of connecting it to each cylinder. Photo 5 is of the most basic type of compression tester. This particular one was offered by Sears decades ago, and its tapered rubber end is held against the open sparkplug hole while the engine is spun over. Photo 6 is an old Snap-on of the same era that has interchangeable hoses and fittings that actually thread into the sparkplug hole. This style is by far the most common today. It can be used in areas where the basic hand-held type can’t go. It’s also easier for a one-person operation.

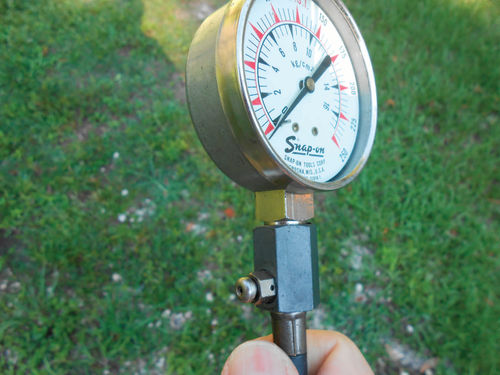
To use either of these testers, first remove the ignition wires from each sparkplug, and then clean away any dirt or debris from around the sparkplugs. Low-pressure compressed air is usually the best option for this cleanup, and the easiest way to do it. Think about what you’re doing up front and shield the area with a rag to avoid allowing dirt to blow around and end up in places it shouldn’t go. (Some manuals suggest loosening each spark plug one turn and spinning the engine over with the ignition disabled to blow away dirt from each sparkplug’s base.) Remove all the spark plugs, disable the ignition system, and open the carburetor throttle body fully. Additionally, make sure the choke plate is fully open as well. Depending on which type tester you are using, either hold the rubber tip tightly against the sparkplug hole or thread in the appropriate adapter. With the vehicle in Park or Neutral and the parking brake applied, have an assistant spin the engine over, or use a remote start button to do the same until the highest reading is recorded on the gauge. Spin the engine through a minimum of four compression strokes to achieve this. This is the method outlined in my 1966 Chevrolet service manual. Your procedure may be different, so reference your vehicle’s service manual to be certain of the correct procedure for your vehicle. Record the readings for each cylinder and then compare them to the specifications shown in your manual. For the 194 engine in my vehicle 130 PSI is the specification. As much as anything, you are looking for consistency. As a rule, a 10% maximum variation between the highest and lowest cylinder pressures is acceptable. If your manual mentions wet and dry pressure; the term wet is in reference to adding a small amount of oil to the cylinder, spinning it over several times, and then rechecking the pressure. This is primarily done to determine if low cylinder pressure is due to worn piston rings, valve-related problems or something else. Once a cylinder pressure is obtained and recorded, release the gauge pressure. On the Sears tester, just depress the valve core in the base of the very worn rubber cone shown in Photo 7. More typically, most testers will have a pressure release button usually mounted on the side of the gauge fitting like that in Photo 8. Today Mityvac offers a tester like that shown in Photo 5. It’s a model #MV5525 and available from www.tooltopia.com for about $13. An online search will show additional suppliers with varying prices. Snap-on offers kit #EEPV500 that’s comparable to the old one pictured in Photo 6 for $230 and it’s US-made. Additionally, Tooltopia offers an #OTC5605 compression tester kit with thread-in adapters, made in China and listed for about $65. Also, www.sears.com has a Craftsman kit Mdl #47089 for $62. I think it’s safe to say that both the Mityvac and Craftsman testers are most likely products of China. Keep in mind that diesel engines require a different gauge. If that’s what you need, look specifically for a diesel compression tester.


