
A/C for a vintage vehicle
Question:
I have a restored 1956 Chevrolet step-side pickup truck with its original six-cylinder engine and standard threespeed transmission. I also live in Phoenix, and last summer was brutal. My wife refuses to go anywhere in the truck during the summer. I love the old girl (and my wife too) so I am wondering if there is any way to put air conditioning in it.
Answer:
You can stay behind the wheel of your favorite truck and have your wife accompany you for a comfortable ride as well. Old Air Products sells complete A/C kits to do the job for around $1200. However, your sixcylinder engine will require a couple of special brackets—available from Patrick’s Antique Cars & Trucks in Casa Grande, Arizona—to mount the compressor.
Good instructions are provided, you only need hand tools, and installation is pretty straightforward, but here are some things to consider: You will need to make sure your truck’s cooling system is in top working order and you may need to make a few minor modifications to make sure your engine will continue to run cool on hot days and while climbing long hills.
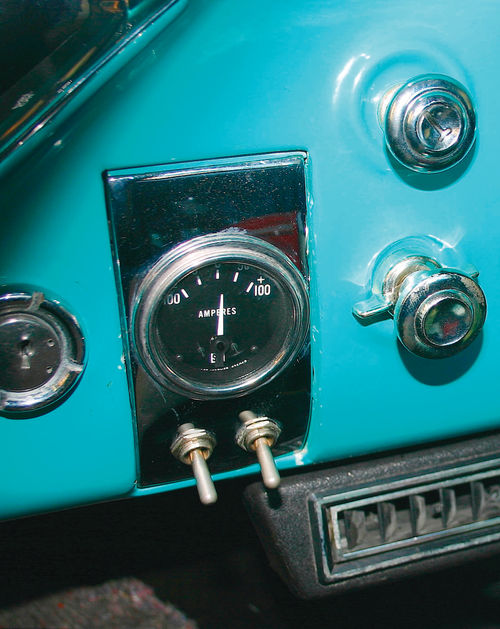
One modification you will need to make for sure is to your vehicle’s charging system. Air conditioning eats up the amps, so you will either need to find a heavy-duty generator or you will need to convert to an alternator. Converting to a GM, one-wire alternator is the easy way to go. But don’t hook an 80-amp alternator to your original 60- amp ammeter. You will toast it if you do. Instead, buy a 100-amp ammeter (Stewart Warner makes them) or go to a voltmeter.
Here are a few more tips:
Installing the system: Begin by removing your old heater. The new system has a heater built in, so you won’t need the old one. Next, figure out where you want the new evaporator/heater to go. A template is furnished with the kit that gives you a couple of possibilities.
Evaporator: You can position the evaporator a little lower if it is easier, and it won’t show much or interfere with legroom. At first glance it just looks like a replacement for the old heater. Use a hole saw to make the holes for the hoses to go through the firewall, and make sure you use the grommets with the kit so the hoses won’t chafe.
Nozzle: The spray nozzle attaches just outside on the firewall and its sensor tube needs to be bent around the air conditioning tube above it. Also there is insulating tape included in the kit to wrap this assembly.
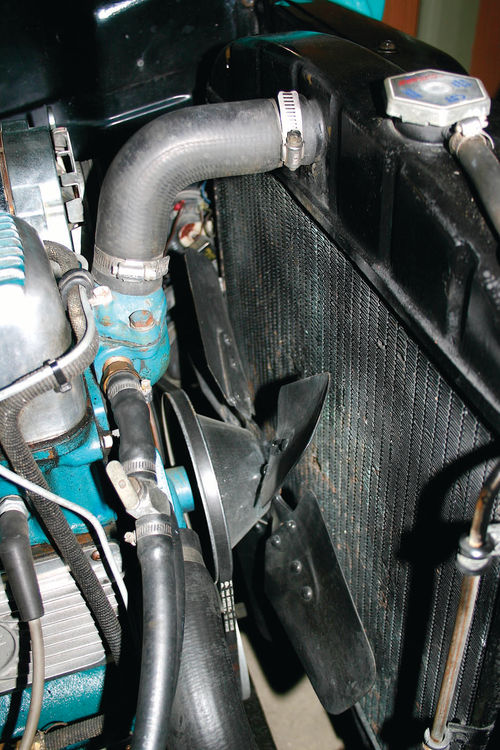
Compressor: Next you will need to mount the compressor. The compressor must be securely mounted so it won’t vibrate because it will be doing a lot of work and could tear itself apart if it were to come loose. The brackets from Patrick’s do the job well.
Condenser: The condenser mounts in front of the radiator. In an old Chevy hauler there is ample room for the condenser plus a 2 ½”-thick pusher fan to help keep things cool in heavy traffic or on long grades on hot days.
Fan: The original five-bladed mechanical fan used by Chevrolet on airconditioned cars from the ’50s is ideal for the job, but if you can’t find one, go with one of the high-efficiency, sixbladed aftermarket fans to give yourself the necessary cooling to deal with the increased heat load from the condenser. A mechanical fan will take about three horsepower from your engine, but it will be 25 percent more efficient than an electric fan.
For an electric auxiliary fan on the front of the radiator, just install a toggle switch under the dash to allow you to turn the fan on manually—or you can install a thermostatically-controlled switch in the radiator to turn the fan on automatically. Make sure you wire up the fan correctly to push air rather than pull it.
Drier/Filter: The drier/filter needs to be kept cool, and that is why it should be mounted on the front of the radiator cradle near the condenser. Just make sure you don’t block any cooling air by installing it over any of the radiator cooling fins.
Hoses: The hoses vary in diameter according to function. High-pressure hoses are bigger in diameter, and lowpressure hoses are smaller. You will also need to hook up heater hoses because, as mentioned, the evaporator in the cab has a built-in heater. Heater hoses are attached using standard hose clamps, but air conditioning hoses use nipples and O rings due to the high pressure they must sustain.
Keep the nipples clean, and use new O rings for the air conditioning hoses. Use a little compressor lubricant supplied in your air conditioning kit to lubricate the O rings, then tighten the hoses into place. Don’t over-tighten because you will deform the O rings and make them leak.
You will have to cut the hoses to length for your application, and the ends without nipples on them will need to be crimped into place using a special tool. Old Air will crimp the cut hoses for free if you send them in, or you can loosely install the hose ends and then have them crimped by a professional when you have the system charged. You can charge the system yourself, but it’s better to have a pro check it for leaks and purge it of contaminants before adding the coolant.
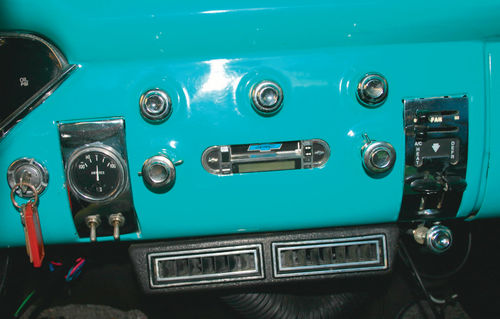
Controls: The kit comes with a set of controls that look factory original and fit right where the old heater controls used to be. There are a couple of cables that need to be hooked up that operate the heater and defroster, and a little adjustment may be necessary, but that’s about it.
The kit comes with a thermostat mounted on the baffle that goes in front of the cooling coils in the cab. The probe for it needs to be pushed into the coil about 2” and should be angled at about 45 degrees. This thermostat prevents the coils from freezing over.
Wiring: Wiring is straightforward. The system operates through a relay to prevent over-amping the ignition switch, and the relay hot lead hooks up to the ACC terminal on the ignition switch. A wire goes to the compressor, and there is a switch to hook up that is attached to the drier/filter. The heater is wired to your old heater switch on the dash. A schematic comes with the system, so you can’t go wrong.
Finishing the job: Install the ducting to the defroster ducts and the air outlets on the kick panels and under the dash. The kick panel pieces are molded black plastic and fit right where the originals went. They can be painted to fit the car’s decor, or left black as you see fit.
Resources
Old Air Products
1201 Forum Way S. Fort Worth, TX 76140
Patrick’s Antique Cars & Trucks
1079 W. Main St. Casa Grande, AZ 85193


