A ’36 Pontiac “Rolling Restoration,” Pt. 4
There’s More Work to be Done, But It Looks and Runs Well. One Lesson Learned—Scrimping May Not Pay Off.
SINCE I GOT my 1936 Pontiac running about three years ago, I feel like I have completed most of the goals I set out to hit. The car still could use a little clutch work, new carpets and upholstery. I’ll discuss that later, but first let’s talk about things that should have been addressed before the car was re-assembled.
I set out hoping to fix the Pontiac for an unrealistically small amount of money. (Don’t we all?) To stay as close to budget as possible, I skipped work that would have been easier to do while the car was disassembled. The funny thing is that I didn’t save money by scrimping. You can have a “nice” car that needs some paint, but you can’t have a “nice” car if it needs things like brakes.
Although my Pontiac was running well after the rebuilt engine was installed, it was not a very safe vehicle to drive! After years and years of sitting in storage, the Knee-Action front suspension, tie-rod ends, rear shock absorbers, brakes and rear spring shackles were all worn or damaged. I found that I could drive the car, but I didn’t dare go fast. With a “frozen” suspension and sloppy steering, I could hardly keep it on the road. It felt like a lumber wagon and weaved from side to side. When the brakes were applied, the car stopped, but I never knew which direction it would pull in or exactly what it was going to do.
Knee-Action Refresher
The Pontiac’s “Knee-Action” front suspension had to be rebuilt. (See Auto Restorer, May 2007.) This suspension, designed by Frenchman Abdre DuBonnet, is one of two systems where General Motors applied the “Knee-Action” trade name. My 1948 Pontiac has the other type of “Knee-Action” system which employs lever-action shock absorbers and is called “Open” Knee-Action.
In contrast, the DuBonnet system (also called “closed” Knee-Action) is a complete suspension that ties the front shocks, brakes, steering and springs together in a single system. After the car was running, I found I couldn’t drive it far because the front end bounced up and down crazily. It was possible to rebuild the DuBonnet suspension with the car re-assembled, but it would have been much easier to do this job before the front sheet metal was re-installed.
My mechanic friend Vince Sauberlich was leery of tearing into an unusual suspension he wasn’t familiar with, but I gathered enough information to convince him we could do it.
I found information in the 1936 Pontiac Shop Manual, in old Motor and Chilton books and in a story about a modern rebuild posted on the Internet. I also learned that the Vintage Chevrolet Club of America used to have a column about Knee-Action repairs in its club magazine Generator and Distributor. Combining information from all these sources, we rebuilt the shocks with the help of Rex Evchuck, a collector who owns Waupaca Machine Repair. The step-by-step procedure was outlined in the 2007 Auto Restorer article.
Vince and I actually had to re-seal the Dubonnet units three times. A man was selling re-seal kits on eBay for about $50 and I wound up buying four of them (one got ruined).
Each time the kit would seal up the Dubonnet cylinder at first, but it would eventually leak later on. Five Points Classic Auto Shocks also sells re-seal kits that may work better. I didn’t try them so I’m not certain. I can tell you that the people at Five Points know a lot about DuBonnet shocks.
The kits used lead washers like the factory supplied. Apparently the lead washers kept “squishing” forever, eventually letting fluid leak. A man at Apple Hydraulics, which rebuilds the shocks commercially, gave us aluminum washers to use instead of the lead ones. This did the trick. The aluminum “gave” a little when the bolts were tightened, but didn’t keep squishing forever. (The next time we redo Dubonnet units, we are just sending them to Apple Hydraulics.)
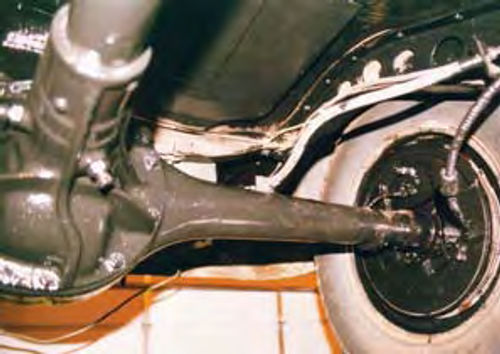
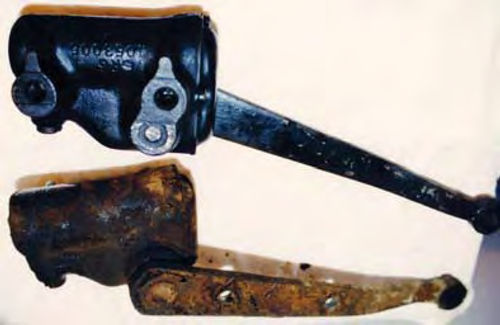
Since the Dubonnet suspension integrates with the front springs, the steering system and the front brakes, Vince and I had a lot more work to do to make the Pontiac’s front end really roadworthy. Flat, dogbone shaped radius rods run from the bottom of the Knee-Action units to the brake backing plate, where they attach with a large bolt in the Pontiac design (the Chevy design is different). We had to remove these. Then we took apart the brakes, and removed the brake backing plates. Next, we disconnected the tie rod ends and all of the steering linkage.
With things taken this far apart, it made sense to replace the kingpins, since the old ones had to be driven out to remove the Dubonnet units.
The rear end of the Dubonnet housing is welded to the steering member that carries the kingpin. It is held in place the normal way, with a tapered bolt. In 1936 Pontiacs, the kingpins are mounted on bronze bushings and there are metal plugs to seal out dirt. A large drift is used to drive the kingpin and lower bearing plug out through the bottom of the kingpin yoke.
Steering, Suspension & Brakes

Kingpins for these cars are readily available on eBay and prices range from $20 to $90, depending on how well you bid and how patient you are. We bought several kits. As it turned out, the kingpins we removed were in great condition, even though one bronze bearing was completely missing. The kingpin yoke was also like new. We did install new kingpins, however, since we had them.
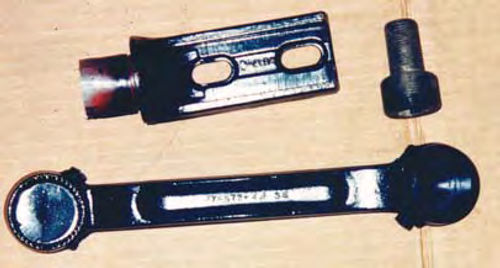
The ends of the radius rods had to be reconditioned. It is possible to find new old replacement stock (NORS) kits manufactured by a company named Wohlert on eBay, but in many cases the cork gaskets in the kits are dried out and broken. We had to purchase a bunch of them to get enough good parts. We also had to buy both Pontiac and Chevrolet kits to get enough parts that interchanged (some Chevrolet parts are the same as Pontiac parts and some are different).
Obtaining new tie rod ends seemed like a challenge, but turned out to be just a matter of cost. First, we found some very reasonable tie rod ends listed on eBay and purchased them, but although they were labeled for 1936 Pontiacs, they were of totally different design than our originals. They had the threaded bolt running at a right angle to the knuckle (like most tie rod ends), but the factory tie-rod ends were straight. Possibly, the cheap ones we bought were for standard 1936 Pontiacs without Knee-Action, but they certainly didn’t fit a Knee-Action car.
Luckily, we were going to the SEMA (Specialty Equipment Market Association) trade show that year and while there we came across a California company named Rare Parts, Inc., that remanufactures old suspension parts. The Rare Parts catalog listed the correct type of tie rod ends for my 1936 Pontiac. I called the company and soon had a pair of brand-new, USA-made replacements that looked gorgeous and fit perfectly.
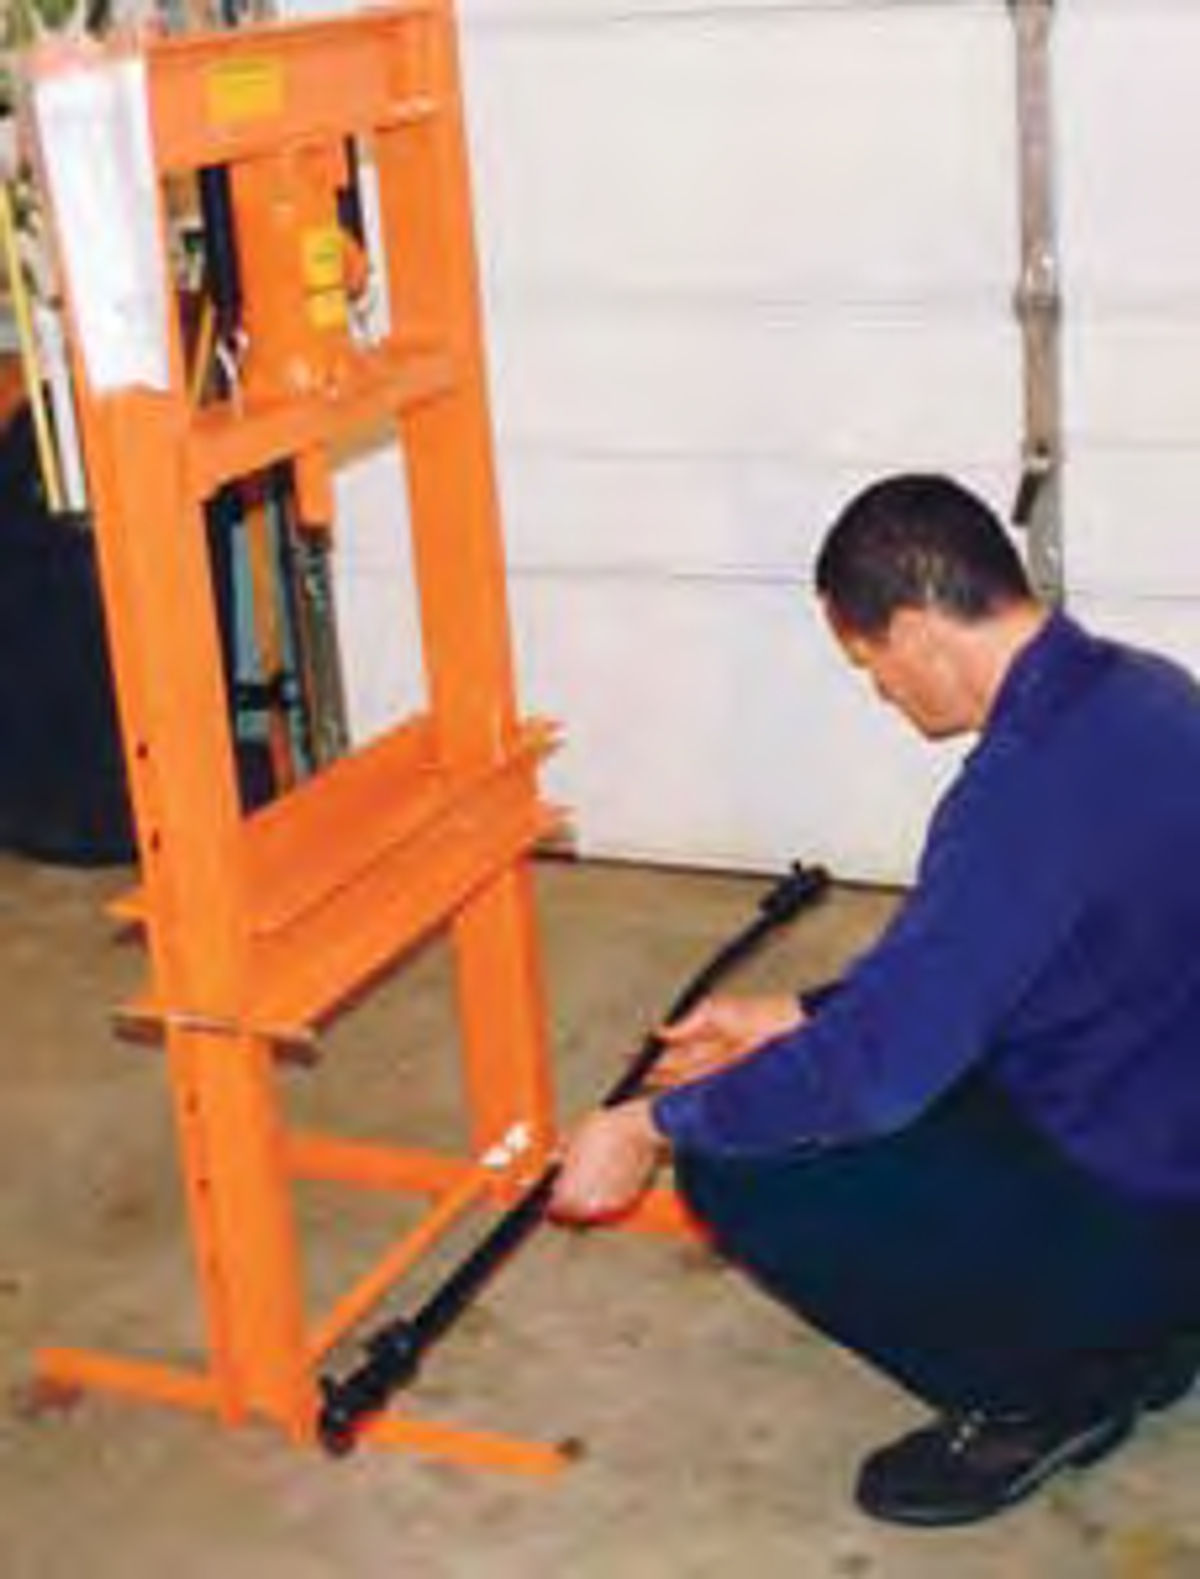
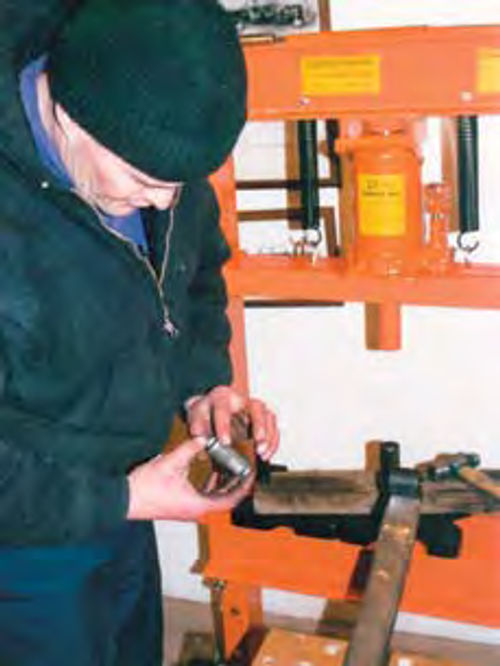
While replacing the tie rod ends, we noticed that the long steering connecting rod that runs from one side of the car to the other had problems. Over the years, this long, tubular piece must have hit a couple of rocks, curbs or other immovable objects. It had some ugly bends in it. Possibly the car was jacked up and then lowered against something that caused the long rod to bend. We removed the rod and carefully used a 20- ton shop press to take out the bends.
Vince placed the bar on a flat surface and used chalk to mark the spots where it bowed up. He pushed down on those spots with the press, then went through the process again while rotating the bar a uniform amount against the flat surface. Eventually, after a lot of pressing and rotating, things got to the point where we could roll the bar a full 360 degrees against the flat surface and not see any light. If we had not been able to achieve that degree of straightness, we could have sent the connecting rod to Rare Parts to have a new one made.
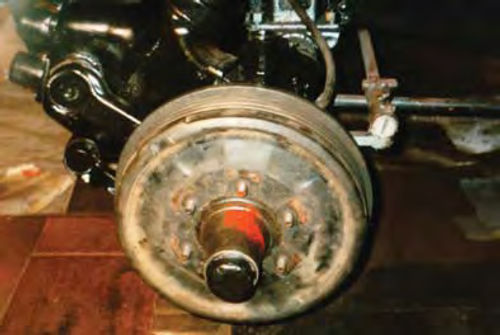
All 1936 Pontiacs came with Bendix Duo-Servo hydraulic brakes of a conventional design for the era and the way that the brakes were pulling on my car was a sure sign that something was amiss. Other than being 16 inches in diameter and having ridges or fins around their circumference, the brake drums were ordinary. When we pulled them off, we expected to see worn linings. This wasn’t the case. The brake shoe linings had hardly any wear. They were nice and thick, but there were large chunks of lining material broken off at the edges.
We again turned to eBay to purchase an NORS brake lining kit for $35. That gave us the 17-in. linings we needed, as well as rivets to attach them to the shoes. Luckily, an area mechanic named Al Suehring (who also sells vintage flywheel ring gears nationally) has an old “riveton” brake lining installer. Before long, we had the brake shoes relined and ready to go back on the car. (We later discovered that we had purchased four brake lining kits at a previous car show for only $5 each. It would have paid to check before we bought more parts on eBay.)
With all the teardown work we were going through, we wanted to make sure the brakes worked perfectly, so we decided to have all the wheel cylinders and the master cylinder—which was actually a new old stock (NOS) master cylinder—sleeved with stainless steel. We packed them all up and shipped them to Brake & Equipment Warehouse in Minneapolis. This company has the equipment and knowledge required to install the sleeves, plus all the parts required to rebuild each of the cylinders. Over the years, we have found that resleeving is the best way to go, as brake parts deteriorate quickly when a car isn’t driven regularly. The re-sleeved systems last a good long time, if not forever.
When the brake system was re-assembled, bled out and just about ready to go, Vince had a little trouble dealing with the final shoe adjustment. Despite carefully using a feeler gauge to get the right shoe-to-drum adjustment, he just couldn’t get a proper adjustment. He was growing frustrated, so I re-read the 1936 Pontiac Shop Manual very carefully and told him the brakes required the adjustment of an eccentric at the rear of the backing plate. Vince didn’t see how this could be causing the problem, but it turned out to be the correct thing to do.
The shop manual calls for inserting a .010 in. feeler gauge between the lining and drum about 11 ⁄2 in. from the adjusting screw end of the rear (secondary) shoe. Then, you loosen the eccentric lock nut slightly. Turn the eccentric in the direction that the wheel revolves as the car moves forward, until the feeler gauge is snug. Then, put the feeler gauge in about 11 ⁄2 in. from the anchor pin end of the secondary shoe. You want slightly less clearance. Re-adjust the eccentric until the clearance is correct. Then tighten everything up.
Rear Shocks and Springs
After dealing with the front suspension, steering and all four brakes, we moved to the rear of the car to deal with the shock absorbers and springs. The shocks are of the lever-action type. They bolt to the frame and have an arm sticking out and pointing to the rear of the car. A vertical link is used to connect the shock arm to the rear axle. We wound up replacing one frozen shock and both shock links with NORS parts.
We disassembled, cleaned and rebushed the rear leaf springs. For this repair, Steele Rubber Products carried most of the parts we needed. We had purchased an NORS rear link kit, but it looked like some kind of “universal” design and in no way resembled the look of the original parts. So we wound up cleaning and re-using the originals. This was another job for the 20-ton “bottle jack” press that we purchased from Harbor Freight. It worked great. Deluxe Pontiacs with Knee-Action have a rear stabilizer bar that connects to two rear shock absorber bars and we removed this, cleaned it, gave it a coat of Eastwood’s Chassis Black and re-used it.
What a Difference a Tire Makes
Since we first bought the car, the Pontiac had always had tires that looked like they were installed in the 1950s, after 10 years of use on a hay wagon!
The tires we had always dreamed of buying for the car were Kelsey Tire Co.’s 6.00 x 16 Deluxe All-Weather models. These are Goodyear Collector Series tires in Kelsey’s Antique/Classic line. They have 4-ply poly construction and a 31 ⁄2-in. whitewall. They also come in size 6.50 x 16.
On his Web site, John Kelsey says the following about these tires: “A pre-World War II restoration just isn’t complete without these Goodyear tires. This unique Goodyear diamond tread pattern continues to represent the discerning collector’s tire of choice for total authenticity.” We agree. It is the diamond-tread pattern and the “beveled” look of the sidewalls that make these the prettiest tires to put on a late-’30s car with Art Deco looks like the 1936 Pontiac.
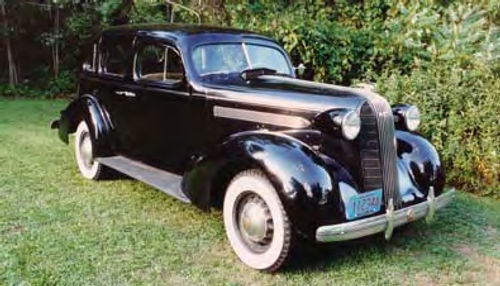
What a great decision! With the old black sidewall tires, the car had always looked nice, but a little “down on its luck.” We had a local garage mount the Goodyear tires with tubes (also purchased from Kelsey). Then we got out our Meguiar’s buffer and applied a nice coat of wax to the car’s original 1936 Duco lacquer. This was followed by the ceremonial removal of the blue protective coating on the tires’ white sidewalls.
As the blue turned to white, you would have thought that we applied some kind of magic “restoration potion” to the Pontiac. With the combination of a coat of wax and the old-fashioned style tires, the car suddenly “popped” to life visually. There were still nicks and dull spots in the paint, of course, but it seemed like only the good stuff caught the eye of the beholder. Basically, the appearance of the car was so greatly enhanced that the flaws seemed to fade out of mind.
This Rolling Restoration Is Ongoing
Our Pontiac still needs lots of work. The clutch sometimes “chatters.” The interior is in serious need of upholstery repair or replacement. It has no floor mats or carpets. There are spots where it was touched up with “spray bombs” to make it suitable for display in a museum exhibit and these spots need attention.
Professional restorers who see the car are anxious to completely restore it, but we would prefer touching up the original features. For instance, the paint on the car is about 85-90 percent original 1936 paint and still looks pretty good. The original pinstriping appears on the body and on the artillery-style spoke wheels. I have talked to body men about painting the car, but they want to completely repaint it and replace all the striping with tape stripes. “No way,” is what I say. So much history would be lost if I took that route.

The upholstery in the car has all of the original beading and buttons and bolsters. I have not seen a refurbished interior that preserves the complete character of the original. Professional trim shops always seem to make concessions because of costs and materials.
The Pontiac Motor Division had a car like mine redone and I photographed my interior for the shop that did the work. I asked the shop about the price of making a second interior. The quote was way out of my price range and did not even include the materials. I had to supply those and do the installation, too. I later saw Pontiac’s finished car and noticed that some things had been changed on the vehicle.
When I first bought my Pontiac, it had some type of bristly carpet that, for some reason, reminded me of visiting grandma and grandpa’s apartment in the ’50s. Maybe it was the slightly musty smell of the material. Over the years, the carpet in the car had gone threadbare. I have seen carpet displays at swap meets, but never found any that perfectly matched what I remember being in the car.
Today, my attitude is one of patience. With help from friends like Dave Sarna and Vince Sauberlich, I have fixed up the car to a condition I like very much. All of the work has been done at my home. Along the way, I have learned new skills, like rebuilding the DuBonnet suspension. If it comes to the point where I want to do the interior, I’ll buy a “walking foot” sewing machine and learn how to do it myself. If the car eventually gets its paint touched up, the work will take place in my shop and we’ll do only what’s needed to preserve the car.
The work may not be perfect, but at least it won’t cost a fortune and I will know who to blame for any flaws. And if the car never gets any more fixing than it has had already, so what. For a “rolling restoration,” it looks pretty good and I take a lot of pride in the fact that I got my hands dirty on the project!
The Longest Ride
Last year I took my “fixed up” 1936 Pontiac on the longest ride it has been on since I’ve owned it. I had seen advertisements for a show for prewar cars at the Circus Museum in Baraboo, Wisconsin. The next day, there was another interesting show at Botham Winery, in Barneveldt, Wisconsin.
I loaded the Pontiac with gas and luggage and took off on a real adventure. The total trip was around 400-450 miles and the car’s top speed is around 55-60 mph. We started off on the Interstate and stayed in the slow lane. I actually enjoy driving on multi-lane highways, as it gives other traffic a safe way to get around you. The Pontiac has no directional lights, so I had to roll the window down and use hand signals.
The car drove fine and the show in Baraboo, though dampened a bit by a morning shower, was great fun. I actually had one of the newer cars. In addition to the car display, they had circus acts and a Model T Ford assembly demonstration. (For more on team assembly of a Model T, see the July issue.)
Barneveldt lies southwest of Baraboo in a very hilly area of Wisconsin. Though the 1936 Pontiac could do a steady 55 mph on flat land, driving up and down tight winding hills was another story. I just couldn’t get the car rolling fast enough before I would have to brake for a curve or a downhill run before the next upgrade. We probably never made more than 25 mph for an hour or so and a few of the drivers behind us got so impatient they did some dangerous passes on curves. It’s ironic that part of the fun of driving an antique car is going slow and “smelling the roses,” but the rest of the world no longer appreciates that!
When we arrived at the Botham Winery we were instructed to park on a steep hillside with the nose pointing down next to a shiny Model A fire truck owned by an area fire department. We chocked the wheels and put the gear shift in reverse. Then we went off to look at the other cars. When we returned, we smelled gas. (Strangely enough, the firefighters hadn’t noticed it.) It turned out the fuel pump was seeping. The tool case came out and I tightened all the screws and fittings. I had a spare NOS pump with me, but to be honest I didn’t know if it, too, would seep the modern gas and who wanted to change a pump at a car show—unless it’s absolutely necessary.
After awhile, we left the shows. With the fuel pump suspect, we did not want to challenge the hills again, so we went home via multi-lane highways. In Wisconsin this usually means driving more miles, but arriving faster. Our route went from Barneveldt to Madison, then north from there to our rural home area. It was a hot day and we stopped in Madison for ice cream and to check the fuel pump. To our great pleasure, the seepage was totally dried up and there were no leaks. Old cars may not go fast, but they are easy to fix!
We are looking forward to more trips and more shows in our “Rolling Restoration.” If we have time, we might even fix some of the little things that will make the car even nicer. On the other hand, there’s always next summer!
Resources
Pontiac Oakland Club International (POCI)
PO Box 539
Victor, NY 14564
Vintage Chevrolet Club of America
P.O. Box 5387
Orange, CA 92863-5387
Apple Hydraulics
1610 Middle Road
Calverton, NY 11933
Brake & Equipment Warehouse
455 Harrison St. S.E.
Minneapolis, MN 55413
Eastwood
263 Shoemaker Road
Pottstown, PA 19464-6433
Five Points Classic Auto Shocks
2911 A South Main St.
Santa Ana,CA 92707
Kelsey Tire, Inc.
P.O Box 564
1190 East Highway 54
Camdenton, MO 65020
Rare Parts
621 Wilshire Blvd.
Stockton, CA 95203
Steele Rubber Products
6180 E. NC 150 Hwy.
Denver, NC 28037-9605
Suehring Automotive
10058 Krogwold Road
Amherst Jct., WI 54407
Waupaca Machine & Repair
310 North Division St.
Waupaca, WI 54981


