
Using vacuum to gauge your engine's health, Learn to use vacuum as a diagnostic tool..
IF YOU READ our first article on vacuum, you should have an understanding of the fundamentals and how to measure the vacuum pressure your engine creates. Taking this information one step further allows you to use vacuum to help determine engine condition. With the information from vacuum readings, you can pinpoint where engine malfunctions or abnormalities exist.

How do you know what’s normal?
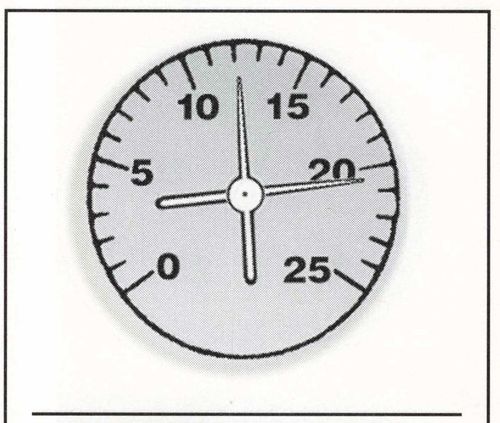
Among the many items covered in the article last month, you learned how to estimate the normal vacuum for your engine and how to get an accurate reading. For an engine diagnosis, connect a gauge to your intake manifold and observe the reading after the engine has reached operating temperature and the choke is disengaged. With the engine running at idle, the needle on the vacuum gauge should indicate close to your estimate and (this is very important) it should be steady. Don’t be alarmed if the reading is a couple of inches away from your estimate. The actual number is not the most important factor. It is more important that the number lies within an acceptable range, which is 16 inches to 22 inches (Hg) for the average street engine. High-performance engines with radical camshafts will have lower vacuum readings.
Vacuum Low, Steady Needle

A vacuum reading four inches to six inches (Hg) lower than normal for your engine accompanied by a steady gauge needle is indicative of a loss of power in most or all of the cylinders. Probable causes for this condition include moderately late ignition timing, moderately late valve timing, an air leak in the induction system such as the carburetor or intake manifold, or a decrease in compression due to worn piston rings.
Late ignition timing is relatively simple to diagnose. First, consult a shop manual for your car to determine the proper timing. Then use a timing light to check ignition timing and make any necessary adjustments. After setting the timing to proper specification, take another vacuum reading to determine if improper timing influenced your initial low reading.
If there is no change in the low vacuum reading (or if it gets even lower) try adjusting the ignition timing using the vacuum gauge as your guide instead of a timing light. Set the timing so the gauge indicates the maximum vacuum possible. It is possible the adjustment made with a timing light is not accurate or correct. For example, the outer ring on the engine’s harmonic balancer, which contains the timing marks on many engines, may have slipped. Or perhaps the factory timing specification for your car is no longer valid because someone installed a non-stock camshaft, distributor or other component that affects timing.
Setting the timing with a vacuum gauge instead of a timing light eliminates these potential pitfalls and may solve your low manifold vacuum condition.
Late valve timing, another possible cause of low vacuum, is not as easy to diagnose. Valve timing, which includes when each valve opens, closes and reaches maximum lift, as well as the duration that each valve remains off its seat, is measured in degrees of crankshaft rotation. The only accurate way to measure valve timing is with a dial indicator and camshaft degree wheel. The engine must be partially disassembled when using these tools.
Late valve timing can be caused by a variety of factors including a manufacturing defect in the camshaft, incorrectly indexed timing gears or timing chain, excessive wear in the gears or chain, and a chain that “skipped” a tooth on its sprocket. Another cause that results in a low vacuum reading accompanied by a steady needle on the gauge is a vacuum leak in the induction system. Vacuum leaks provide an additional air passageway to the cylinders. The more air that enters the cylinders, the weaker the manifold vacuum.

The source of an air leak is sometimes obvious, but can be tricky to locate. Leaks commonly develop around the base of the carburetor. Look for a damaged carb gasket or heat shield (thin piece of metal that mounts between the intake manifold and the carburetor) or warped, pitted or otherwise damaged surfaces where the carburetor base meets the intake manifold.
Vacuum leaks also develop inside the carburetor itself. Look for damaged gaskets or warped components where the carburetor components meet (gaskets can get damaged and components warped where the metering blocks meet the main body or where the main body meets the base plate) and look for sloppiness in the throttle-shaft bore.
A leak will frequently be found where the intake manifold mounts to the engine. Search for warpage or surface irregularities in the mounting surfaces of the manifold and cylinder heads and for tears or other damage to the intake manifold gasket. Air leaks between the intake and head can also be caused by misalignment of these components where they mount to each other. When the heads and/or deck surface of the cylinder block are heavily milled, this is a frequent dilemma.
There are several reliable methods for locating vacuum leaks. Snap-On tools sells a hand-held vacuum leak detector (Part #AC6600) that works well, but is rather expensive at about $275. It has a flexible probe that the operator places in the areas where a leak is suspected. The machine will beep if it senses a leak. The faster it beeps, the closer you are to the leak source.
Another type of leak detector utilizes propane to locate leaks. This detector consists of a valve that screws onto a standard propane bottle, a hose and an aluminum probe that connects to the hose. With the engine running, direct the flow of propane to areas where you suspect leaks. If there is a leak, the propane will be sucked into the engine and the rpm will increase. Snap-On sells this type of leak detector (Snap-On part #THX382) for about $55. Other tool suppliers sell this type of detector. If you can’t locate it, contact the manufacturer (Thexton Manufacturing Co).
An old-timer’s trick for locating vacuum leaks is to spray carburetor cleaner at the suspect area and listen for a surge in engine rpm. If the cleaner is ingested into the engine through a leak, it will enter the cylinders and momentarily enrich the air/fuel mixture causing engine speed to increase.
Another trick for detecting vacuum leaks is to strategically place puffs of smoke — commonly from a burning cigarette — around the area of the suspected leak. I don’t recommend this technique or any other procedure that involves sticking one’s head into the engine compartment with the engine hot and running. However, I’ve seen it work when air turbulence around the engine is eliminated by disconnecting the cooling fan and providing shelter from the wind or other sources of air disturbance. Simply observe the path the smoke takes. If it is sucked into the engine from anywhere other than through the top of the carburetor, you have located a vacuum leak.

Low engine compression due to worn or damaged rings can be checked by opening the throttle until the engine reaches about 2000 revolutions per minute and then closing the throttle quickly. The vacuum gauge needle should immediately jump two inches to five inches (Hg) above the steady reading you observed at idle. A smaller gain usually indicates low compression.
If the vacuum gauge indicates a possible compression problem, you should investigate further. Use a compression gauge or leak-down tester (a device that measures the rate at which air leaks out of the cylinder) to determine the compression in each cylinder. A low manifold vacuum reading accompanied by a steady needle on the vacuum gauge caused by low compression is normally the result of uniformly low compression in all of the cylinders rather than low compression in one or two cylinders. Uniformly low compression is in turn usually caused by worn or damaged piston rings.
Vacuum Very Low, Needle Steady
A vacuum reading of six inches (Hg) or more lower than normal for your engine, accompanied by a steady gauge needle, is indicative of a dramatic loss of power in most or all of the cylinders. Probable causes for this condition are the same as those indicated for moderately low vacuum readings, including late ignition timing, late valve timing, air leaks in the induction system, or a decrease in compression. Because the problem is causing a very low vacuum reading, it will likely be easier to detect. That’s the good news. The bad news is there is probably more than one problem contributing to the situation. I recommend you look beyond the first leak you find.
Vacuum Normal at Idle; Drops When Throttle is Opened

If the vacuum reading is normal or only slightly low at idle, but drops dramatically when engine speed increases without any load on the engine, there probably is a restriction in the exhaust system. This problem can also cause the vacuum reading to gradually drop at idle rather than remaining steady.
With a vacuum gauge connected, make note of the reading at idle and then gradually bring the engine speed up to about 2500 rpm. The vacuum reading at the faster engine speed should be greater than the reading observed at idle. If the gauge needle drops as engine speed climbs, something is causing excessive back pressure. Look for internal muffler and resonator corrosion, (tap on the muffler with a rubber mallet and listen for the sounds of loose parts or scale inside) a stuck heat-riser valve or a mechanical obstruction such as soil or some other foreign matter stuffed into the tail pipe.
If you have a car equipped with an exhaust-gas-recirculation valve (commonly called an EGR valve), this should also be evaluated. An over-active EGR valve will cause the same loss in vacuum that a restriction will cause.
Vacuum is Low and Fluctuates Slightly and Rapidly at Idle
In a healthy engine the vacuum gauge needle will remain steady at idle. If the gauge indicates vacuum is below normal and the needle fluctuates rapidly within a range of about three inches to five inches (Hg), worn valve guides are often the cause. Worn guides admit additional air into the cylinders, which reduces the ability of the engine to produce vacuum. It also upsets the air/fuel mixture, which causes the fluctuation in the needle. To verify your suspicions of worn valve guides, increase engine speed and the vacuum gauge needle should become steady.
Worn valve guides are usually the result of high mileage or inadequate lubrication. They frequently cause the engine to burn oil. To make a definite diagnosis concerning valve guides, remove the cylinder head and valves, measure the valve stems and guides, and compare these measurements with the specifications in your service manual. (’d say if your clearances are greater than .0032, the problem should be corrected by installing new valve guides or oversize valves.)
Low Vacuum, Slight Fluctuations at Idle
If the manifold vacuum is normal or slightly low at idle and the needle is slowly but regularly drifting back and forth in a range of about four inches to five inches (Hg), the air/fuel mixture is probably too rich and should
be leaned out. If the same readings are observed except the needle movement is irregular, the air/fuel mixture is probably too lean and needs to be enriched.
A slow fluctuation in vacuum production evidenced by drifting of the gauge’s needle can also be indicative of slight leaks in the induction system which, like an out-of-adjustment carburetor, will result in an air/fuel mixture that is too lean.
A drifting needle may also be caused by a restriction in the car’s crankcase ventilation system. Look for a clogged breather filter or inoperable positive-crankcase-ventilation valve.
Vacuum is Usually Normal, but Fluctuates Intermittently
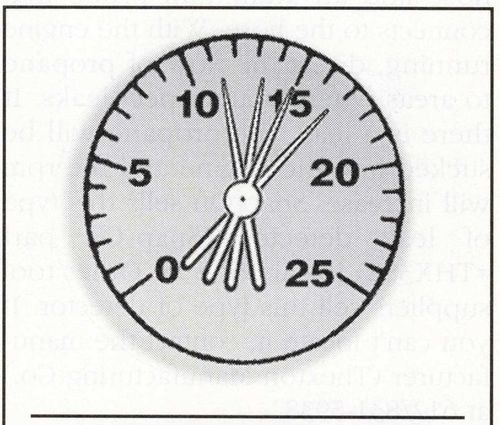
An intermittent vacuum fluctuation in an otherwise healthy engine is usually caused by a sudden and erratic loss of power. This phenomenon can frequently be traced to a sticking valve, but other causes — such as an intermittent problem in either the ignition or induction system — cannot be ruled out.
A valve that occasionally sticks will cause a sudden drop in vacuum that can be as much as ten inches (Hg). Sticking valves can be caused by inadequate lubrication, bent stems, weakened valve springs and deposit build-up in the guides. If you suspect a valve is sticking, watch the engine run with the valve cover removed and try to observe the problem as it occurs. A conclusive diagnosis can normally be made with the cylinder head removed and disassembled for inspection and measurement. Use a machinist’s edge or a new valve guide to check valve stems for straightness and to determine if any are too small and therefore causing a valve to stick. During your check, try to move each valve in its guide by hand with the valve spring removed to determine if one or more valves are binding.
Vacuum Fluctuates Regularly and Widely
A constant fluctuation in vacuum reading (as much as ten inches (Hg) or as little as only one inch (Hg) that occurs both at idle and as engine speed increases, usually indicates a partial or complete loss of power in One or more cylinders. While this type of problem can be traced to maladies in the ignition system (or on rare occasions a leak in the induction system or a bad head gasket), the most common source is a malfunction in the valve train.
The regular and sudden drop in the vacuum reading usually results from one or more valves not closing completely. When the afflicted cylinder is on its intake stroke — and is therefore called upon to contribute its fair share to the production of manifold vacuum — it fails because the open exhaust valve permits air to rush into the cylinder as the piston travels downward. This accounts for the sudden drop in vacuum. The greater the opening created by the unseated valve, the greater the drop in vacuum will be. If intake valves aren’t sealing, backfires through the intake will likely result. Exhaust valves that are not sealing usually result in an engine miss and stinky exhaust due to the unburned air/fuel mixture that enters the exhaust. When the next properly functioning cylinder in the firing order begins its intake stroke, the defective cylinder is temporarily out of the loop so the vacuum reading jumps back up again. As this cycle is repeated over and over again, the vacuum gauge’s needle will suddenly drop and return to normal in regular intervals.

There are several reasons why a valve does not completely close. The two most likely causes are leaks caused by mechanical defects in the valve system and leaks due to de posits of foreign matter between the valve face and its seat. A mechanical defect may be inherent in one of the valve train components, such as an eccentric valve, an out-of-square relationship between the valve guide and seat, or a lame valve spring. Mechanical defects may develop over time due to factors that include high mileage, insufficient lubrication, inadequate fuel causing valve seat damage, and poor quality machine work. Other defects that may develop over time include broken valve springs, bent valve stems, a warped valve head, excessive valve-stem-to-guide clearance, a burned valve face and seat, and cracks in the valve.
Any deposits on a valve’s face or On its seat can prevent the valve from fully closing and cause a vacuum leak. The valve face is the most likely place for deposits because of the face’s higher temperatures. Deposits are usually comprised of charred oil or fuel, or iron oxide and iron car bide that sometimes result from the interaction between the extremely hot exhaust gases and the metal alloys in the valve’s seat and face.
If your vacuum readings indicate a valve train disorder, take further steps in order to accomplish a more specific diagnosis. Unfortunately, this normally means removing the cylinder head to measure and visually examine the valves and their ancillary components.
Vacuum Is too High
A vacuum reading that is more than 22 inches (Hg) is not normal. Excessively early ignition timing can cause unusually high vacuum, therefore, ignition timing should be checked and compared to proper specifications if a high reading is observed. A restriction in the air intake can also cause unusually high vacuum. Look for a clogged air cleaner element or other obstructions in the air-intake system.

Keep the Basics in Mind Some vacuum anomalies are peculiar to particular engines or an unusual combination of malfunctions. When using vacuum as a diagnostic tool, don’t assume that every situation fits neatly into any one category. Vacuum readings are a useful method for evaluating an engine’s condition, but their value increases if you keep in mind the basic principles of how vacuum is produced and what variables affect vacuum.
Next article we will examine different types of vacuum motors, typical problems and their solutions.


