Ford flathead V-8
THE FORD FLATHEAD V-8 is | the most prolific of all pre 1955 engines. Somewhere near 25 million “flatmotors” were built by Ford during the engine’s production life (1932-53), and there is no end in sight for their use as bone-stock restored engines and customized, high-performance, street-rod motors. This bodes well for the enthusiast who wants to put a °49-51 Ford, Ford truck, or Mercury back on the road in stock, but slightly more reliable form, for a trouble-free run.
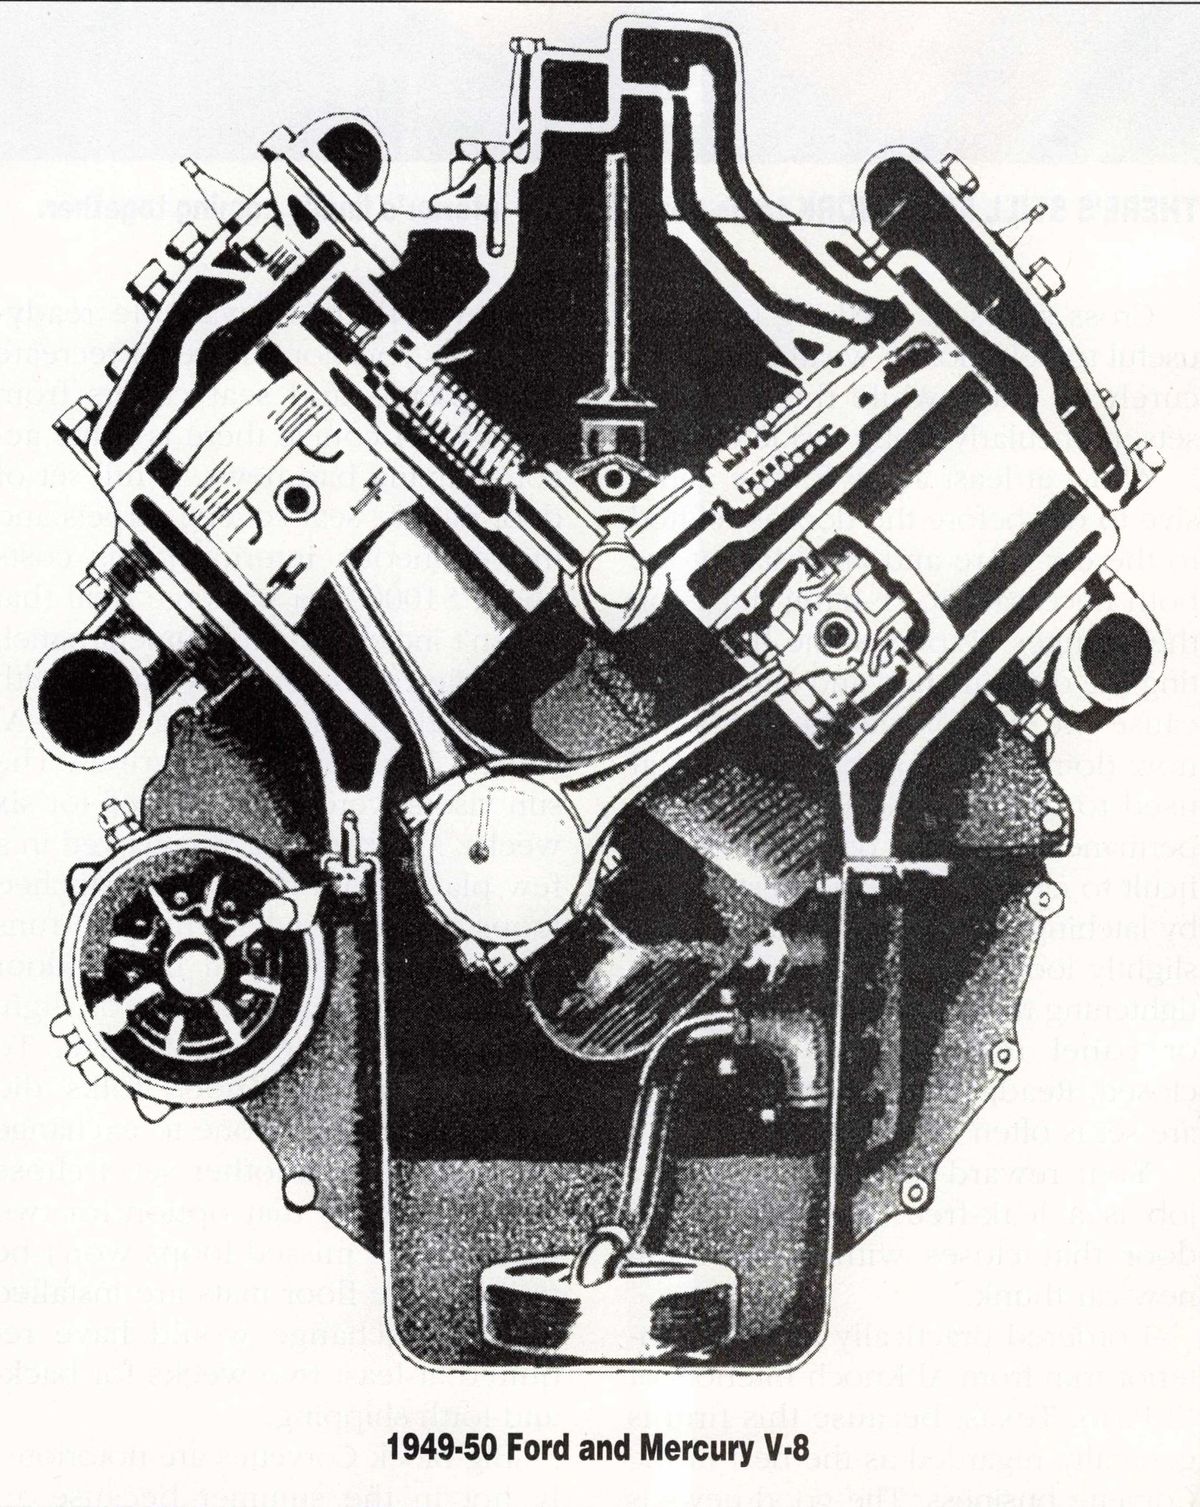
The name flathead refers to the head design and valve arrangement on the engine. Most of you are familiar with an overhead valve engine, with rockers and valves under a valve cover on top the engine. This design is called valve-in-head. The flathead has its valves in the block next to the piston, and only a simple flat cylinder head with part of the combustion chamber cast into the engine side. This is a valve-in-block, or a side-valve engine — usually called a flathead because the top of the head is almost flat, only broken by cooling fins running lengthwise.
The design makes use of a large hemispherical dome over the valve and piston area. The spark plug is centered in the top of the chamber. This design was made for a low compression ratio, but cams with considerable lobe lift (for the era) could be used in the stock 1950s engines. The early Ford flatheads had a roof on the combustion chamber that limited valve lift to about .360-inch for street use or about .400 with racing heads.
The post-war flatheads, with the advantages of more modern engineering advances, rank above the pre-war flatheads and are the subject of this report. These engines are essentially interchangeable in Fords and Mercurys from 1948 through 1953.
Keeping it Cool
The biggest single enemy of the flathead was, and is, heat. Cooling the engine, and preventing blown head gaskets have often been challenging. Modern technology and better head-gasket materials have gone a long way towards solving the tendency to overheat. First and foremost in stopping the overheating is proper block preparation during rebuild. In the early days of the flathead, Ford wasn’t too particular about getting all the sand out of the block casting, causing some sand to stick in places where heat transfer is marginal at best. When you get the block back from the machine shop, be sure to remove all sand in the water jackets. This entails poking a rod in all the small places where normally no one looks. An aid to removing sand is to have the block steam-cleaned before it goes to a shop. A commercial steam-cleaner will have enough force to remove most of the 40-plus years of gunk, crud and sand. Afterwards, take the engine home, take a strong flashlight, or droplight and perform a meticulous examination.
There are some new high-tech, thermo-cleaning methods that involve placing the block in a jig, then baking in a de-greaser at 350 degrees for 15 to 20 minutes (550 degrees for 20 minutes if the block is really grungy). After the old grease and oil have smoked off, the engine, still above 200 degrees, gets placed in an airless blaster where stainless-steel shot gets rumbled through the block as it is rotated. This cleans all the surface rust and internal scale. Finally, the block goes into a shaker where any extraneous material falls out while the block is allowed to cool to room temperature. This method is currently the best way to remove all the scale and rust from any engine block.
Prior to bringing a block in for cleaning, the head studs, oil galley plugs and anything else attached to the engine must be removed. After parts return from the cleaners or the machine shop, they will have to be thoroughly inspected for residue like grinding compound in the crank galleys.
Water Pump Choice
If you are installing a 1949-53 engine in a 1948 and earlier vehicle, and if reliability ranks higher than authenticity in your book, then the best water pump to install is the 1949-53 8RT truck pump. It’s a single-belt, wide-pulley design that has the correct motor mounts to replace the earlier 59AB unit. These are sealed-bearing pumps and do away with the need for the oilers on the straight-bushing water pumps. The same _ sealed pumps should be used on all postwar Ford and Mercury passenger car engine rebuilds. With a good rebuilt pump, you should have no overheating problems.

Full-Flow Oil Filtration
Another concern for flathead owners is dirty oil and the resultant high surface-wear on bearings and cylinder walls. Ford flatheads never had an oil filtration system. Beginning with the 1949 8BA engine, Ford installed a filter with a small oil line leading to it and a gravity-fed return line. The pressure-side was taken off the top engine boss, then fed into the bottom of the block on the 8BA (1949) and newer engines. Oil pressure was controlled by a non-adjustable oil-pressure relief valve in the oil pump body.
Ford called this oil filtration system a “partial-flow filter.” It did clean some of the oil, some of the time. When tearing down an older engine for the first time (any engine, not just flathead Fords), it is surprising how much sludge is present. Every space that doesn’t move is coated, sometimes up to %-inch thick. Because the only oil you could run back then was non-detergent 30 or 40 weight, if you ran a pan-full of high-detergent oil through the block, the sludge would break loose creating major problems. Ford actually designed a truck oil pan in the late ’40s with a clean-out that allowed the mechanic to reach inside the pan and wipe out accumulated sludge.
The solution to the oil problem is to install a full-flow oil filter kit (Motor City Flatheads 13624 Stowell Road, Dundee, MI 48131; 313/5293363) along with a 1950, or later, oil pump with angled-tooth helical gears instead of the earlier straight-tooth, spur-gear models. Motor City supplies its own Melling short-body oil pump with its kits. Oil pressure should be in the 55 psi range at 2800 rpm while using the same 20-50 detergent multi-grade oil you use in the family sedan.
The engine has to be out of the car for the oil filter/oil pump installation, so it can be done right along with a major rebuild. One caution during the rebuild. Make sure all the valvetrain parts are in place before bolting on the pan, because if you drop a spring or keeper, the pan will have to come off to retrieve it.
Crank and Block Inspection
Before spending any money to buy a block, be sure to pull the oil pan and check visually for cracks. Check the main-bearing webs, between the valves and down in the valve seats. I once owned a 1950 Mercury with a block so badly cracked that from the side it looked like a spider web. That didn’t stop the engine from running, but it did use more water than normal. My friends and I put a brick on the accelerator pedal one afternoon during my demented teen years, just to see when the engine would blow. After about 15 minutes of listening to the engine running wide open, we went over and took the brick off of the pedal. I think the head design and a two-barrel carb prevented the engine from revving up high enough to do any harm. The Merc was driven, engine cracks and all, throughout the summer and was finally sold for $25 to another teenaged-disaster in-waiting who tried to move a tree with it one night.
Usually there is no need for an align bore of the main bearings as long as the original caps are on the block. If you change to aftermarket steel caps or ones from another engine, the block will have to be bored to make the crank run straight.
The flathead was internally balanced at the factory, but when rods, pistons, or any other rotating weights are changed it does need to be rebalanced. The machine shop will need the rods, pistons, crank, flywheel, bearings and rings, but not the front pulley.
Most of you will be rebuilding a stock engine, so extra stress on the rotating parts isn’t much of a concern. Many engine builders think the engine shouldn’t be modified past a certain threshold because the crank only runs in three main bearings. The center bearing does get its fair share of stress, however there’s no reason to go to an aftermarket cap support on a street engine. On a 286-cubic-inch, hot engine — yes, it's worth it.

People sometimes get the front and center main caps mixed up. The easiest way to tell the difference is the center cap has the bolt holes in the center, while the front cap has the holes to the front. The factory didn’t mark the caps when new, but it wouldn’t be a bad idea to do it when you tear the engine down. Early blocks used main cap studs, however the 8-BA uses bolts. Take note that the front bolts are full-shouldered and not designed for a washer. The others take washers.
Spark Plug Recommendation
For years the standard plug for the flathead has been the Champion H10. The flathead is prone to detonation mostly due to the combustion chamber design. The flame front has to climb out of a hole and crawl across the piston top. This makes plug choice critical. My sources at Motor City Flatheads believe the Motorcraft AL-7 plug does a better job stopping detonation, and is a better choice than the H-10.
Advice on Pistons and Rods
During an original engine rebuild, pistons should always be changed. Changes in metallurgy during the past 40 years warrant new pistons. Ford originally used a long-skirt, three-ring piston (two compression, one oil) during the early days, but it went to a four-ring piston (extra oil ring) in the late ’30s. This was done in an attempt to control oil consumption due to the different rates of expansion of the piston.
Today piston expansion can be much more closely controlled by computer-aided design and modern materials. Motor City Flatheads has three-ring pistons with an undercut beneath the oil ring to help separate heat expansion from the top of the piston. Undercutting, or machining a slot in the piston skirt, lets the crown expand a little more than the skirt, keeping heat away from the crankcase.
The rods are more than strong enough to handle a motor up to 200 horsepower if a few precautions are taken. They are made of vanadium steel with a lot of chrome in the mix. This rod will actually bend before it breaks. The rod studs are integral with the rods, making it doubly important that they not be nicked when installed. I favor installing new rod nuts of at least 180,000 psi tensile strength whenever the engine comes down. Some rods have oiler holes on the big end, squirting oil onto the cam. This is a lesson learned from some of the builders of modern turbocharged engines, only they point the spray at the underside of the piston for cooling.

Most of the 1950-53 8BA rods have holes (some were drilled while others weren't depending on the model run), but all of them have the boss on the rod. It’s relatively simple to drill a .070-inch hole in the rod and bearing to gain extra oil flow and cooling to the cam.
Vital Valvetrain Info
Don’t get confused by some old manuals that refer to the valve lifters as “push rods.” The flathead motor doesn’t have to move as much mass around in the valvetrain to open the valves, but it still needs lifters. However, the lifter is a thin-wall casting, much lighter than an overhead valve (Ohv) lifter. Because the valve and spring are in line with the lifter, rocker arms, pushrods or heavy-duty valve springs aren’t necessary. Seat pressures for a factory engine are in the 36-to-40-psi range — hardly enough to hold an Ohv in the guide. Today’s engines have to deal with unleaded fuels, and certain parts, like valve guides and seats, are hardened to take the extra force that wasn’t there when the lead in the
fuel-was acting as a buffer between the valve and seat. Engine builders today install valve seats that are much harder than the surrounding cast iron block. Your flatmotor may have seats only on the exhaust, or no seats at all. If the engine hasn’t been opened for the past 20 years or 50,000 miles, it’s a good idea to replace the valves, lifters and springs during the rebuild. Valves cost about $10, springs less, and a set of lifters (16) can be had for about $120. Not a lot of money to spend when you remember you’re replacing parts that have already run more than 40 years in most cases.
Camshaft Technology
With all the current cam technology available to engine builders, only the most die-hard detailer will be running a stock cam in a flathead. Today an engine can be tailored for most any use through careful cam selection. New cams have radically changed ramps that require stiffer springs to keep the lifter from parting company with the lobe at higher rpm. Slightly modified street engines do fine with 80 pounds of spring pressure, about double stock. Back when the air was
clean and sex was dirty, and flatheads powered most street rods, a major cam war raged among grinders. Everybody had a favorite grind, changing with each new issue of Hot Rod. However, it seems that Isky stayed on top of the heap with its “400 Jr.” If you have a good one, use it. Otherwise stick with stock, or use one of the aftermarket cams available from a multitude of grinders.
A new cam doesn’t have to be a radical cam, but it can do wonders for waking up the engine. The camshaft diameter of one inch restricts maximum lobe lift anyway, so while an Ohv motor of 270 cubic inches might work well with a lobe lift of .400; the flatmotor’s valves would hit the head with the same lift. In a warmed-over engine, lobe lift of .300-inch to .350-inch is maximum. Mild overlap and duration will make for an even-running, strong, low-end motor, which is what you want 90 percent of the time anyway. The flathead does its best work below 4000 rpm and there’s no reason to stick anything in a stock Ford other than an engine that runs smoother than a Timex and will outlive the pink bunny.


