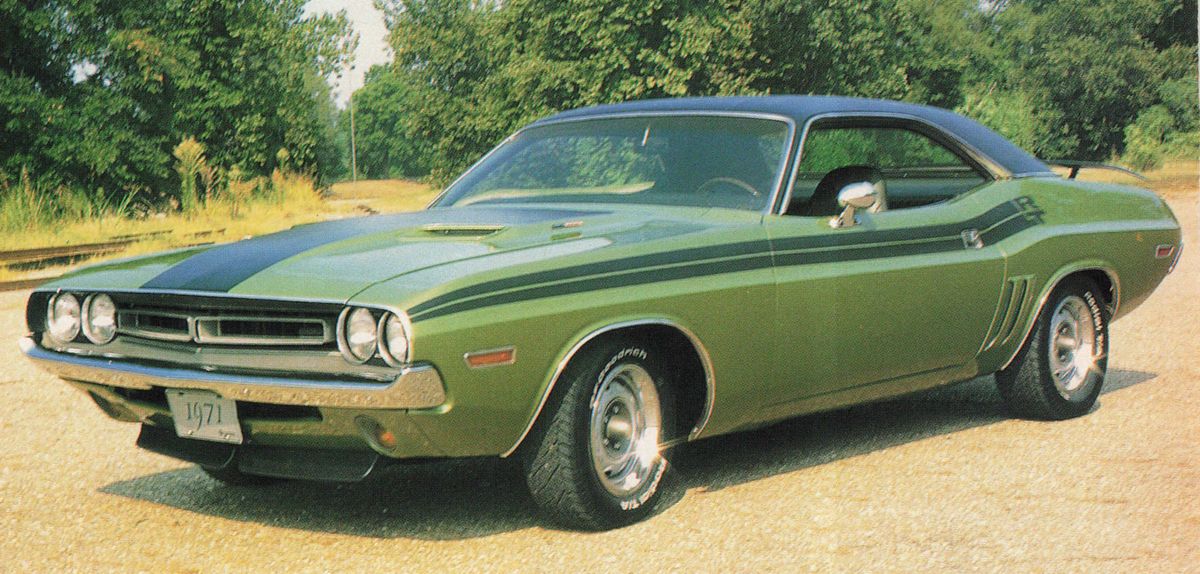
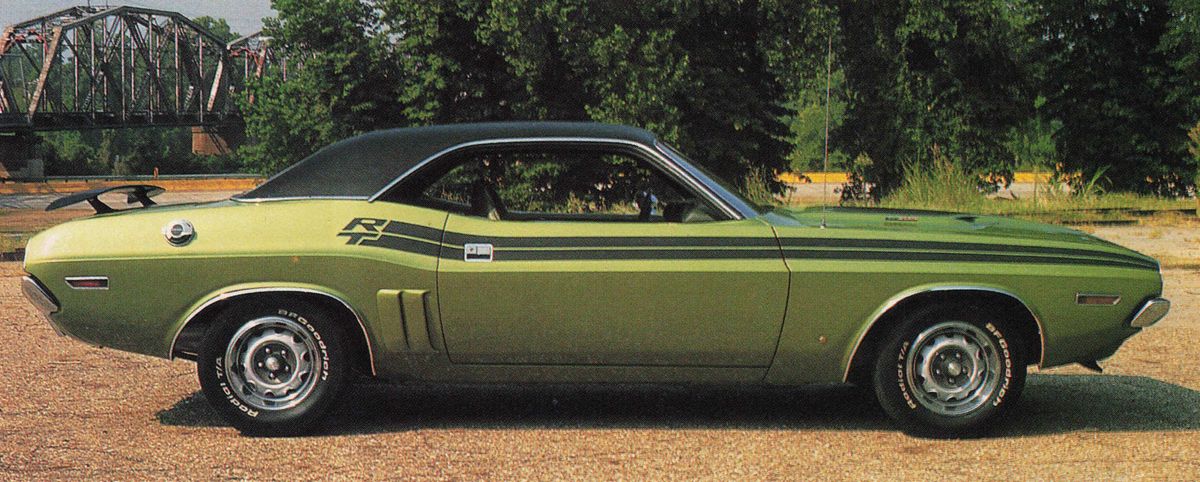
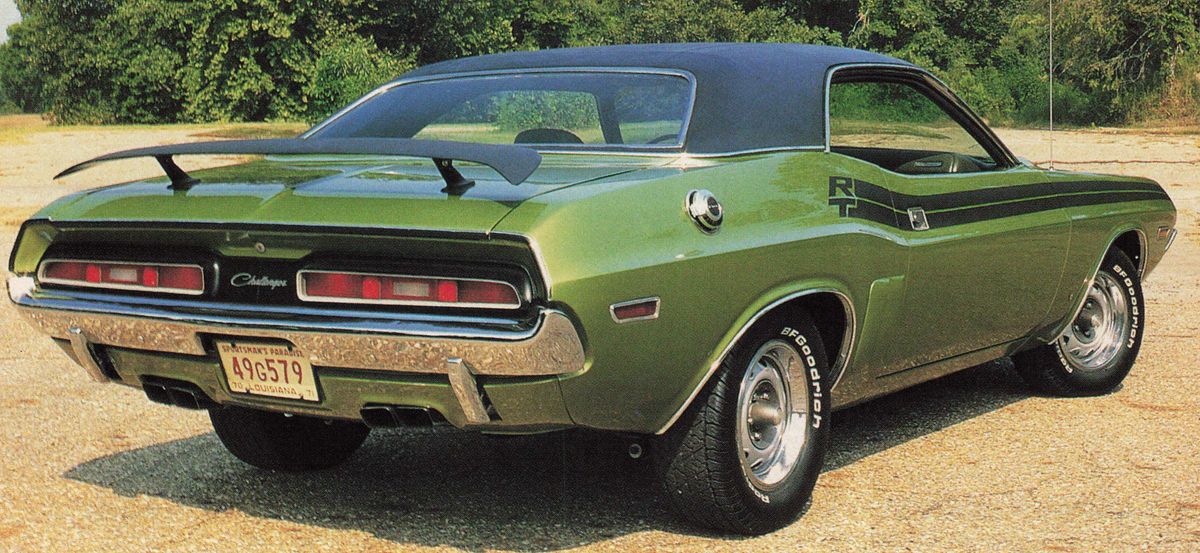
1971 Dodge Challenger R/T
Sitting in a fellow “car .club member’s yard with a mis matched set of wheels, two may-pop tires, faded original paint and shredded interior, the ’71 Dodge Challenger R/T was a welcome sight after searching nearly a year for a true big-block-powered Mopar ponycar.
“It'll be an easy restoration, honey,” I told my fiancee, who fell for it and even married mea year later.
That was in 1989 and six years later, the Dodge R/T pictured here finally was finished. My marriage survived the restoration, my checkbook barely did, and I’m still not so sure about myself. But one fact is for certain: I learned a lot of lessons building this car, some Ill make sure to remember and some I may choose to forget.
What started as a $3200 purchase one spring day in 1989, later became a story all-too familiar with those who dabble in the restoration hobby: The project went a little more in depth than initially planned.
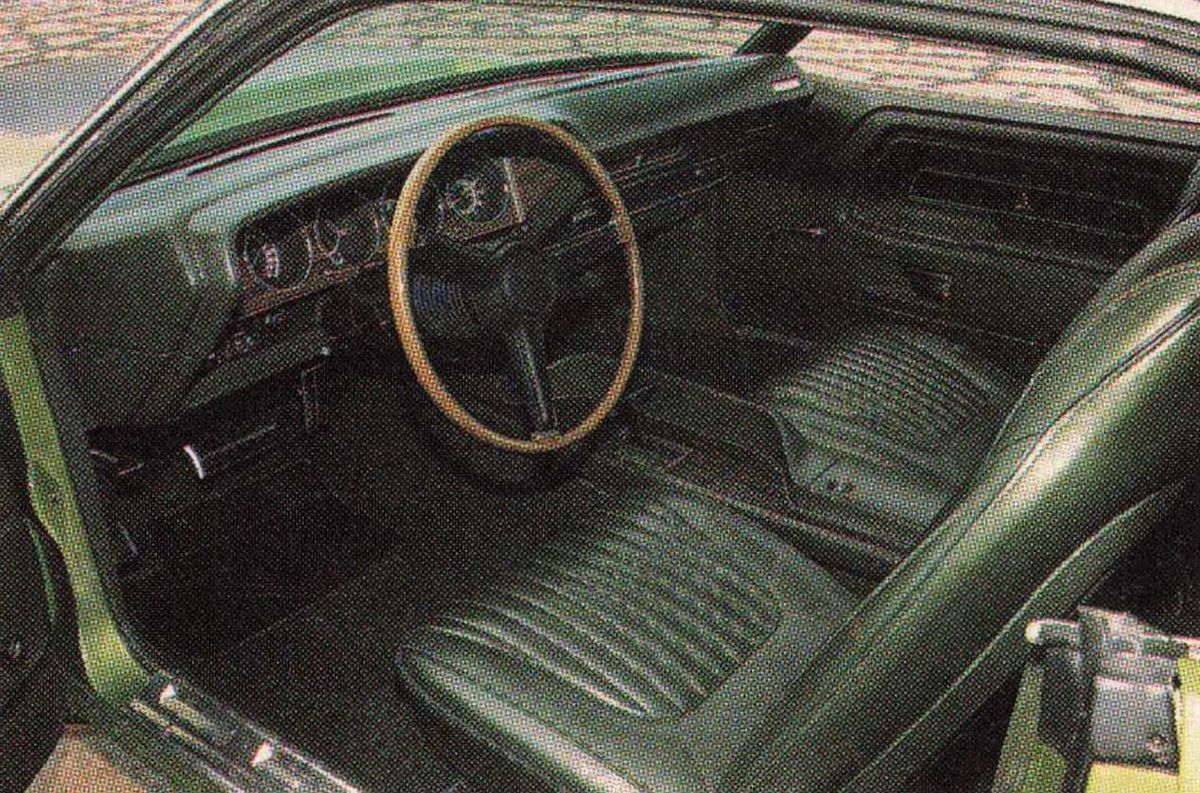
It began when the reality of my purchase set in during my first true inspection of the car. Although every number and code matched on the drivetrain except for the alternator, the engine compartment was covered in grime from numerous oil leaks and lack of cleaning. Both front bucket seats looked like a rat had turned them into an afternoon snack. Louisiana’s sweltering summers had left the dash pad with Grand Canyon-sized cracks. The headliner was droopy and the carpet was coming apart at a frantic rate.
Body wise, the 66,000-original mile R/T appeared to be in good shape, although the school teacher who had bought the car new apparently had a passion for collecting door dings — 42 in all. And the car appeared to have all of its original paint still in place, although it was faded and worn through to primer in some areas. But there was one big catch: The center of the trunk had major rust problems caused by some . leaks around the vinyl top.
I didn’t realize the vinyl top was a problem until it started to bubble a few months after the purchase. Fearing the worst, I took the car to a local trim shop to see what could be done. After stripping the material, we found rust holes along the rear window frame and along the front edge of the windshield. Some were the size of a pencil tip, some the size of a dime. The sheetmetal on the roof was coated with surface rust. Apparently, a trim shop had rushed the installation of a new vinyl top years earlier and decided not to fix a minor rust problem.
The remedy came as my first big expense. After the trim shop removed the headliner, the rusty sections were cut away. In its place, went new sheetmetal fabricated for the car. As for the rear window frame, an aftermarket replacement piece was fitted, trimmed and installed. Once the metal-was in place, the roof was sanded to a shiny, rust-free surface. Then it was treated with several coats of primer. Finally, a new vinyl top was installed. The out-of-pocket expense for taking care of this problem came to $800.
Fifty miles later, the aging 727 automatic transmission began slipping out of drive and into second and then back into drive again. After pulling the transmission pan, tightening the adjustment on the bands and replacing the filter and fluid, the slipping continued. A few miles later, the 383 Magnum engine began to smoke. Faced with fears of fixing one problem after another, I decided restoration was the better choice.
The Plan
Like many people who jump into a restoration, I expected to keep this refurbishing basic. I didn’t want to overwhelm myself. With affordability in mind, I made originality and drivability my priorities. For instance, I purchased a $120 set of Monroe gas shocks and painted them black like the originals instead of spending $400 for an NOS Mopar set. I also purchased modern radial, white-letter tires for $300 instead of an NOS set for $800. I figured the savings would allow me to restore the car without going financially upside down. I couldn't afford the highest degree of authenticity nor would I want to drive a car that was restored to that level of excellence. In my eyes, this Challenger would still look correct without being cost prohibitive.
My overall plan boiled down to this: I would remove as much of the trim, drivetrain and mechanicals as possible, then send the rolling body to the paint shop, then reassemble the painted shell with new or refurbished parts. I also decided to set aside the original, numbers-matching engine and transmission and instead rebuild a spare 440-cubic-inch Magnum engine and a spare 727 automatic transmission. Once installed, both would look like the original drivetrain, but more importantly, if I ever decided to take the car to a muscle-car drag race shoot-out, I would not risk damaging the original components.
The Restoration Begins
I found the Challenger to be nearly original. This is based on the car having its original paint, original interior, correct motor and transmission and the exhaust manifolds still had their factory seal without gaskets. Knowing this helped me to figure Out what was correct and what wasn't before the restoration began. For example, the torsion bars were still wearing the original silver markings to indicate they were for a big-block car. The rear-end housing had several assembly-line markings scribbled on it that were hidden under 15 years of road grime. To ensure I would be able to reproduce these markings, photos were taken of details, paint marks and anything else that might be questionable to a judge at a Mopar-only type event or an antique car show.
To begin the tear-down, the original 383-cubic-inch Magnum engine was removed first with the slipping transmission still attached. After obtaining a paint bid from the body shop that had previously painted my Dodge Charger, I decided to reduce body shop labor charges by disassembling the car myself. I pulled the seats, door panels, weather stripping and console from the interior. Then I removed both bumpers, the front and rear valances, the headlights, the wiring harnesses to the engine compartment and trunk, the side marker lights, the grille, the wheel well moldings, taillights and the exterior trim around the vinyl top.
As each piece was removed, the small pieces were placed into a plastic bag and labeled. The large pieces were tagged and labeled. Bolts and brackets were marked and placed in individual bags attached to each component. The engine and transmission remained assembled until I decided how I wanted both rebuilt.
After the car was stripped to a rolling chassis with only the carpet, dash and headliner still in place, I took stock of the condition of the individual pieces. The wheel-well chrome moldings were dinged beyond repair. The chrome trim around the front of the hood and around the rear quarter were pitted and had to be replaced. Two of the four side-marker lights were broken and the chrome on the others was pitted beyond repair. The original emblems were too faded and pitted to reuse. On the plus side, all of the original glass would remain with the car. The grille and taillights and all their trim pieces were near perfect and only needed a good cleaning with hot, soapy water. The wiring harness didn’t have a single splice in it.
The disassembled car was loaded onto a trailer and sent to Barry Barton, owner of Car Excellence, a paint and body shop in Keithville, Louisiana. I told him: “Take your time and do it right.”
Paint and Body
The first order of business was to fix the damaged trunk. Because the gas tank and fuel lines were removed before the car was sent to the paint shop, a cutting torch was used to remove the center section of the trunk.
A replacement piece, cut from a parts car, was welded in place. The piece was barely big enough to replace the section that was cut out. Had it been an inch shorter in any direction, the piece would have been useless. Restorers who opt for replacement sheetmetal from parts cars should always make sure there is enough to work with. Another alternative is to replace the piece with new reproduction sheetmetal, which has since become available from companies such as Year One or Sherman body parts. The right- and left-hand trunk floors from Year One, for example, are available for about $240 with the fuel tank braces that also would need to be attached.
Moving to the front of the car, openings in the firewall for the wiring harness, heater blower motor and body plugs were taped closed. This minimized the amount of sand getting into the car during the sandblasting of the engine compartment. After being sand-blasted, a self-etching primer coat was applied followed by four coats of PPG enamel in the factory color.
I didn’t.do this but now I know to remove all accessories such as the power brake booster, steering box and brake lines before painting. Although they were removed later and rebuilt or replaced, having the entire compartment sprayed without any accessories avoids the risks of missing hard-to-reach places with a spray gun.

After dealing with the engine compartment, the doors were removed to ease access to the door jambs and to repair the numerous parking lot dings. Several small doses of body filler followed by sanding and re-sanding fixed the minor dents. This was also an opportunity to remove and repair the sagging door hinges. A door hinge rebuilding kit, available from almost any parts source for about $15, was used to fix the existing hinges. To install, the old pins are pressed out, the hinges are drilled to fit the bushings that are included in the kit, and the new hinges are pressed into place.
Other than the door dings, no other body work was required. After the original paint and primer was stripped, the body was resealed with self-etching primer. Now with only the final coats of paint needed, it was time for me to intervene with a change in plans for the undercarriage.
The Undercarriage
Although my original plan was to drive this car, I decided that detailing the undercarriage would help the car pick up points in shows. Cars with unibody construction are typically primed and then painted in body color on both the topside of the car and then sprayed throughout the underbelly. Many Mopar restorations are done with the entire underbelly painted body color. I decided this was the best route to take for simplicity and overall appearance.
To get the car prepared, I picked it up from the paint shop and trailered it home. Once there, it was placed on jack stands about two feet off of the ground. The brake lines (which I failed to remove on the initial disassembly) and the emergency brake cables were then removed. However, the rear end and front suspension were left intact to allow me to move the car back to the paint shop.
To prepare the undercarriage, I sprayed the car’s underbelly with a mixture of common liquid cleaner and water. The process removed the initial coat of grime, but plenty more was still clinging to the car. I went back at it with a four-inch wire-brush wheel attached to an electric drill. This was a time-consuming method, but it allowed me to clean every nook and cranny, remove primer and take the entire underbelly back to shiny metal. In the process I often wished for a rotisserie so that I wouldn't have to lay on my back for days eating dirt.
It took nearly 40 hours, but the Challenger now had a clean undercarriage and was returned to the paint shop. At the shop, it was hoisted and placed on a pair of custom-built, five-foot-tall sawhorses. This allowed the painter to walk under the car. It also provided an opportune time to unbolt the rear end housing and leaf springs so I could take them home for detailing.
After being wiped down and metal prepped, the underbelly was sprayed with three coats of primer, then a PPG Base Coat/Clear Coat enamel in the factory green shade. The coat looked slick, glossy and durable.
The wheel-well areas were originally undercoated (extensively) at the factory. Bringing them back to like-new condition required a good hosing down with water, scraping away all the dirt with a wire brush, and respraying the undercoating with a black semi-flat paint. This was done after the entire painting process was completed.
Before the car was put back on the ground, the rear end and springs had to be reinstalled. I had stripped the rear end housing to bare metal, primed it and then painted it in a semi-flat-black paint to match the Original finish.
Because the leaf springs had started to sag, giving the car a lopsided appearance, I had them re-arched. The springs were then sanded, primed and repainted with a cast-iron gray paint to give them a factory looking natural finish. While some restorers may not paint the springs, I did this to keep a fresh appearance and to allow me to drive the car and keep the restoration looking clean. The springs were then reinstalled with new bushings because the original set appeared brittle and cracked. The spring hangers and U-bolts, however, were simply cleaned and also repainted in the natural gray paint. To finish the process, the original rear end with the attached gears — a front-loading unit — was cleaned and repainted in natural finish gray and then marked with several orange and white paint dabs that copied the original markings I had photographed.
Finally, gas shocks were repainted in a semi-black finish to approximate the original units. New stainless steel brake lines were used because they won't rust. I believe they will help the restoration maintain a fresh appearance longer than the original-type lines.
With the undercarriage completed, the body was finally ready for its repaint. After being lowered to the ground, the engine compartment, underbelly, windows and vinyl top were covered in masking paper and taped off to prevent overspray. After one final wiping down, the original Amber Sherwood Metallic Green was resprayed onto the body, door jambs and trunk. The doors were sprayed separately while off of the car.
To finish the job, pieces such as the front and rear valence panels, trunk lid, hood scoop inserts and hood hinges were sprayed. Finally, the hood was shot initially in a matte black finish and then masked off around the hood bulge stripe for the final base coat/clear coats of green. The doors were then reinstalled and aligned to the body and the individual painted components were wrapped in blankets for transport home. They would not be re-installed on the car until the engine and suspension components were back in place.
The Mechanicals
The front suspension, which had until now been untouched, was going to need attention. It made sense to pull the suspension parts, install a rebuild kit and clean and paint the pieces.
To save time and to be able to separately work on components inside my garage, the torsion bars’ retaining clips were removed, followed by the bolts holding the upper control arms to the body, and finally the four large bolts connecting the K-frame to the body. With this done, the entire front suspension was lowered on a floor jack from underneath the car.
The components were disassembled and cleaned with a degreaser before a stripper was applied to bring the metal back to its original finish. After new bushings and ball joints were installed, the K-frame was repainted semi-flat black and the torsion bars were painted gloss black like original. Model car paints were used to reproduce the factory’s markings on the bars. With all of this done, the suspension was put back together as one complete unit and gently lifted back under the car and bolted up. The finishing touch was reapplying the factory’s inspection marks to the individual components.
With the suspension back in, the Challenger was ready to receive its new engine. With the original drivetrain tucked safely. away in my garage, a rebuilt "73 model 440 Magnum engine was prepared with a stock rebuild bored .30-over, 9:1 forged pistons, and a larger-than-stock Mopar Performance camshaft. It was mated to a rebuilt 727 automatic transmission with a stock rebuilt Hemi torque converter to provide bottom-end power. Detailing for both was provided by Mopar Performance’s Hemi Orange paint applied in thin coats over a four-day period and by Eastwood's cast-aluminum finish paint for the transmission.
Because the engine compartment is painted in the body color, dropping an engine back in — especially with the transmission attached — is a nerve-racking experience. My suggestion? Cover the firewall with plenty of thick blankets and call a group of buddies to help. Then go very slowly. The other option is to bolt the motor to the K-frame, lift the body over both, and lower the body over the engine and transmission. That’s how the factory did it, but it’s not easy if you don’t have the equipment.
Final Assembly
With the engine, transmission and suspension reinstalled, the final assembly began. Within weeks, the Challenger received its wheel-well moldings, rechromed bumpers, grille, headlight bezels, taillights, and side marker lights. Everything in the engine compartment was reassembled. The underside still had a few challenges. An NOS gas tank was an expense I dodged by treating my dent-free original with Eastwood’s gas tank paint. The exhaust system was treated with Eastwood’s high heat gray and painted before installation. Pieces of the exhaust system that couldn’t be found as NOS were bought from Year One, bolted together and installed. The fit was nearly perfect.

Finally, the original 14-inch Rally wheels were stripped, repainted and mounted to BF Goodrich T/A Radial tires. With new center caps and stainless steel trim rings in place, the car finally began to look finished.
With the spoilers, flip-up gas cap, hood and other trim pieces finally installed, the car only lacked one major item to make it appear complete: The longitudinal R/T stripes. Using a video that accurately described the location of the original stripes from a variety of points, Robert Stachowicz reapplied the decals to the exact locations over a four-hour period. Because of the $180 price for a pair of stripes, I recommend letting a professional take care of this part of the restoration. I learned this after ruining one set.
Time to Show
With the Challenger finally looking like a car again, it was rolled out of the garage and onto the car trailer to begin competing with other musclecars in the South. And in the meantime, those few items that I didn’t replace during the restoration have gradually been changed in favor of better pieces as time and money has allowed. Among them: A beautifully restored windshield wiper motor from Jerry Schmidt of Concourse Creations in Florida, NOS deck lid chrome and items scoured from swap meets.
Since completion, the Challenger has won two best of shows, two best restored antique awards, numerous best Mopar E-body and other judge’s awards. Plus, just watching the looks of people when they see the mirrors placed beneath the undercarriage and watching them crawl around to look at the suspension, are worth all those nights of cleaning grease from under my fingernails.
What’s Next?
Because of the painted undercarriage, the Challenger has seen only limited driving time. Most of its time going to shows has been aboard its trailer and behind my truck. But now with only 20 miles showing on the restoration and enough trophies to keep me happy for a long time, it’s time to start driving the car. To make driving a better experience, a Mopar Performance electronic igni tion kit will soon be added, along with a new Edelbrock carburetor and 15-inch T/A Radial tires on a set of original 15x7-inch Mopar Rallye wheels. These modifications and the car’s air conditioning should make it one fun driver on the way to local car cruise nights.
Worth the Wait?
I’m 30 years old and it’s been nearly seven years since I first fell in love with that green Challenger. Buying and restoring one of my dream cars has cost about $15,000 and taken several years of on-again, off-again work. Had I instead saved my pennies, I could probably have paid cash for an already restored 340 Six Pack Challenger Trans Am or even a decent 440 Six Pack car, but I probably wouldn’t feel nearly as proud of my work. And it’s always a rewarding experience to step into the garage, pull the cover off the green R/T and finally run my hands over a slice of musclecar pie.
The final cost, was it worth restoring?
When the restoration of my 71 Challenger R/T began, the initial restoration cost estimate was $10,000, including the purchase price of the car, about $3200.
That figure was surpassed about two-thirds of the way into the project. With the budget blown, the only option was to hang on for the restoration ride and complete the car. The total cost was $15,600.

Major costs incurred during the restoration included $3800 for paint and body work and all materials, $1200 for the engine and transmission rebuild, $1200 for the exhaust system, $600 for wheels and trim, tires and lug nuts, $1500 for the interior, $400 for replacement suspension components, and the rest in miscellaneous parts and services.
Some of the best buys made during the restoration include a $60 mint-condition dash pad sold by a fellow car club member, $200 for a restored windshield wiper motor from Concourse Creations and $150 for a correct battery from the Antique Battery Co.
Because the original goal in this restoration was to make the car look factory correct with the exception of the modern radial tires, the restoration cost grew quickly. Correctly dated spark plug wires, correct PCV valves, battery cables, muffler hangers and other parts are several times higher in price than generic parts-store pieces. The finished product, however, is much nicer and worth the extra cost.
Was it worth it? In today’s market, 1971 Challenger R/Ts in restored condition fetch $10,000 to $14,000 for 383- and 340-powered cars. The 440 Six Pack cars in similar condition are usually $15,000 to $22,000, and 426 Hemi cars are typically near $30,000 or more. Because of this, someone wanting to get into a quality car without a lot of hassle may do some careful shopping and find a nicely restored car for less than the price of buying and then restoring one. The only hitch: The self-pride in restoring your own vehicle won't be there. It’s all just a question of time, money and priorities.


