1969 Mustang Mach 1
Background on the 1969 Mustang Mach 1
In 1969 Ford performed a major facelift on the Musoe While retaining the same wheelbase, it was longer, lower, and more muscular than its predecessors. Three body styles were offered: hardtop, convertible, and a fastback, which Ford called a SportsRoof. - Ford offered several highly identifiable optional performance packages for the Mustang. The Mach 1 was the most popular, accounting for nearly 25 percent of all Mustangs sold in 1969.
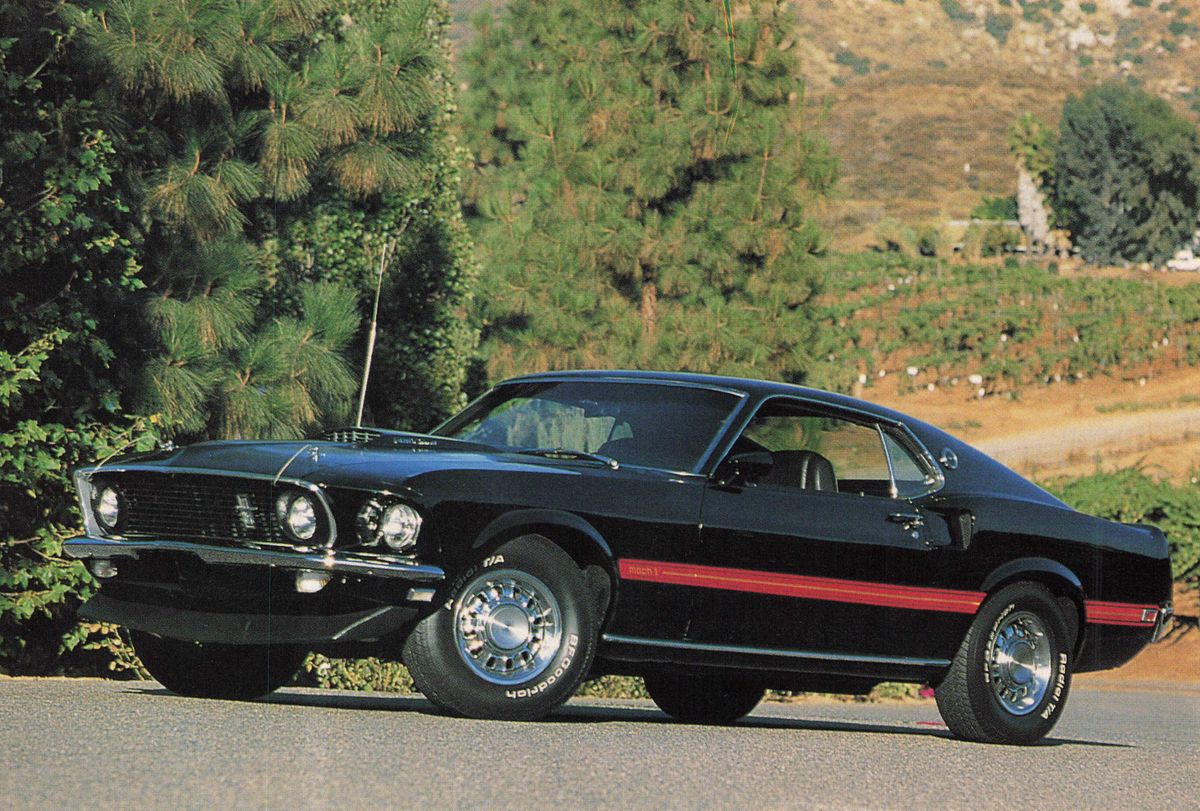
The Mach 1 was only offered in the SportsRoof body style. The sleek body was accentuated by a flat black hood with a non-functional hood scoop. The back of the scoop had integral turn signal indicators and on the sides were small chrome emblems denoting engine size. The hood had NASCAR-style hood pins, tethered by plastic-coated wires. Racing stripes started just behind the front wheels and ran down the sides to the rear bumper. Another set of stripes crossed the rear of the spoiler and wrapped around the taillights. The stripes came in three color combinations, (black/gold, red/gold and white/gold), depending on the body color.
The Mach 1 was available with three V-8 engine options with various levels of horsepower. The base engine was a 351-cubic-inch engine with a two-barrel carburetor rated at 250 bhp. Addition of a four-barrel carburetor boosted the 351’s horsepower to 290. The 351 was backed by a standard three speed manual transmission with a floor shift. An automatic and four speed manual were available. The mid-range engine for the Mach 1was the 390-cubic inch engine equipped with a four-barrel carburetor, rated at 320 bhp. At the top end of the power spectrum was the 428C] (Cobra Jet), rated very conservatively al 335 horsepower. The 428CJ was also available with an optional functional Ram-Air hood scoop.
The 390 and 428 engines were only available with a four-speed manual or an automatic transmission. All engines, except the base two-barrel 351, were equipped with dual exhausts, tipped with chrome quad outlets.
The suspension had heavy duty springs and shocks and a wide range of limited-slip differential ratios were available. Mach 1s equipped with a 428CJ had staggered rear shocks to suppress wheel hop on hard acceleration. Front disc brakes were available as an option. All Mach 1s were fitted with chrome styled steel wheels and E70-14 white sidewall tires. Two optional tires were available, an F70-14 wide-oval bias belted tire with raised white letters and an FR70-14 radial performance tire.
The Mach 1’s high-back bucket seats were covered with Comfortweave knit vinyl. Woodgrain appliques were used on the door trim panels, console and instrument panel. The Mach 1 featured a special carpet with red floor mats sewn in and a special sound deadening and insulation package that added 55 pounds.
Martin L. Schorr summed up the Mach 1 in the February 1969 issue of High Performance Cars when he wrote, It is a goer and a locker. And thats what its really all about. Right?”
The restoration story
"We don't find cars, they find us,” said Pam Bodrie when asked how she and her husband, Marc, came upon their Raven Black 1969 Mustang Mach 1. They were on a car club outing with a group of friends and stopped in a gift shop in Idyllwild, California. A lady working in the shop noticed the car club jackets they were wear ing and struck up a conversation. Her husband had a 1969 Mustang Mach 1 he wanted to sell.
The Bodries met with the 70year-old owner who showed them his fully-optioned ’69 Mach 1. It had 160,000 miles on the clock, but was well taken care of, and what’s more important, 99 percent complete. It had some damage to the quarter panel from an incident with tire chains and the 428C] (Cobra Jet) engine was running very sour. The owner’s mechanic said the engine was just old and wouldn’t run any better.

Emotion and instinct took over. Marc and Pam have always loved the 69 Mach 1 body style and Marc wanted to know if a 428CJ was as powerful as claimed. Marc also had confidence in his ability to tune and rebuild engines. The fact the car was 99 percent complete sealed the deal.
Even though the engine had been tuned recently, Marc wanted to go through it himself. The engine compartment on a Mach 1 with a fully optioned 428 is as crowded as a can of sardines. Access to the spark plugs is limited. Many Mustang owners cut holes in the inner fenders and spring towers to allow access to the plugs. Marc said this solution would have been totally unacceptable on such a nice car. Marc could break the plugs loose with a wrench, but his hands were too big to back out the plugs from their confined space. Pam’s tiny hands came to the rescue. She was able to re move and replace the plugs. While inspecting the old plugs Marc found two were broken. He completed the tune-up with new points and a carburetor adjustment, and his road report is that the 428CJ “lives up to its reputation."

Finding a 25-year-old musclecar that hasn’t been modified in some way is rare. Marc and Pam’s Mach 1 has been a wealth of information for fellow Mustang enthusiasts. One friend measured the black-out hood and side stripes. Another friend took the engine’s air-reactor tubes off and carefully documented their design. The air-reactor tubes have been obsoleted by Ford and are almost impossible to find. Marc’s friend is now building reproduction parts from those measurements. The Bodrie’s Mach 1 had the original exhaust system still in place. The owner of a local muffler shop removed the exhaust system and ran it through a machine that digitized each bend. The output was a tape from which he can manufacture exact reproduction systems.
After two years and 20,000 miles, Marc decided to tear down and rebuild the Mach 1’s 428CJ engine. With the exception of a few oil leaks, it was still running well, but with the odometer at 180,000, it was time for a detailed examination. Marc had no qualms about tearing apart the 428C). “l’ve been working on cars since I was. old enough to get in the way,” he recalls. As a little boy he passed wrenches to his dad who raced cars. As an adult he gained experience by rebuilding engines for himself, a few friends, and for family members.
Prior to removing the engine, Marc photographed everything in the engine compartment. With the abundance of accessories and emission equipment, he wanted to be sure he could put everything back where it belonged.
Marc began by removing a few of the engine accessories. When he removed the engine and transmission as one unit, he was faced with an unexpected problem. The front end rose almost two inches, preventing the engine’s oil pan from clearing the radiator support. The engine couldn’t be lifted higher, so air was let out of the front tires, reducing the car’s height by more than two inches.
With the engine on the garage floor, Marc separated it from the transmission. The engine was then mounted on a stand and the remaining accessories removed. All the fasteners were bagged and tagged, so the reassembly would be smooth. Marc removed the heads and intake manifold. He rolled the engine over and removed the oil pan. What he saw looked like an advertisement for an oil company. “Everything was exceptionally clean and had a golden glow from the oil,” he recalls.

Next Marc tore the engine down to the bare block. When he inspected the crankshaft he found only one journal with a small scratch. The rest of the crank was in excellent shape. He checked the cylinder bores and found the taper to be within spec. Regular maintenance by the original owner was paying large dividends. Marc sent the crank, block, and heads to a local engine shop for machine work. The block was honed and deburred and new cam bearings installed. The valves were ground and the crankshaft turned .010. Marc also sent the transmission, which was working fine, to a local Ford dealer to be freshened up.
Marc had two obstacles to overcome. The original pistons and cam were no longer available from Ford. NOS pistons were an option, but Marc felt the prices asked were excessive. Instead, he bought a set of TRW pistons that would give him the’ correct “compression ratio (10.6:1). The search for the cam was more difficult. NOS cams were available, but they were very expensive. Aftermarket cams were available at a very reasonable price, but the specs were not the same. “They were either hotter or milder,” he recalls, “I wanted the same profile.” Marc contacted Crower Cams in nearby Chula Vista, California. He gave them the factory specifications, and they custom-ground a cam. The cost of the custom grind was more than an aftermarket cam, but much less than an NOS cam. Marc obtained a new oil pump and bearing set from the Ford parts counter.
While the block and heads were at the machine shop and the transmission was being rebuilt, Marc had a chance to detail the engine compartment. All engine compartment wiring and components that could be disconnected, were removed. Marc stripped the engine compartment of its paint. He began using a chemical stripper, but the fumes and toxic cleanup added an extra burden. So instead he used a combination of wire wheel and sanding to strip the engine compartment of old paint and surface rust.
Once the engine compartment was stripped and primed, Marc and Pam decided that although Mach 1 engine compartments were painted flat black at the factory gloss black would clean up much easier and add a bit of sparkle to the engine compartment.
The air conditioning compressor was swapped for a rebuilt Ford unit. The alternator was disassembled, bead-blasted, and re-assembled with new bearings. Although Marc does not have a bead blaster or bearing press in his garage, he swapped volunteer time on a school fund-raising car show event for after-hours shop time.

With all machine work on the engine completed and all necessary parts on hand to do the assembly, it took two nights to fully assemble the engine.
“I used factory assembly manuals for the specs and build-up sequence,” he said. “Everything went back together beautifully.”
The next big job was to shoehorn the massive engine back into the restored engine compartment. Heavy paper and tape covered the engine compartment sides and firewall to prevent them from being scratched by the engine. To simplify the process, Marc installed the trans mission first. Only the components that could not be installed after the engine was in place were installed on the engine prior to dropping it in. With the help of a friend, the slow and painstaking process began.
Once the engine was in, Marc crawled under and connected the torque converter. Installation of the engine accessories went smoothly. Prior to firing up the engine, Marc primed the oil pump and pressurized the engine. This is done with an electric drill fitted with an attachment to spin the oil pump drive. Marc also cranked the engine over for a couple of seconds to be sure the starter would engage and power would be applied to the system. The carb was filled with gas to allow the engine to fire off instantly. Marc ran it for 20 minutes at 2000 rpm to break in the cam.
Marc admits to making two mistakes during the engine rebuild process. He wishes he had rebuilt the power steering pump when it was off. It was working so well he decided to only detail it. The pump soon began to seep oil out of the shaft. “A simple rebuild kit is all it would have taken,” he sighed. He also should have painted the exhaust manifolds after bead-blasting. “They looked great for a while.
Then we had a rainy spring and they were covered with rust. I wish I had painted them with a high-temp paint.” The engine rebuild and engine compartment detailing took nine months of weekend work to complete.
Following the engine work, Marc took the Mach 1 back to the muffler shop that digitized his exhaust system. A new 22-inch aluminized system was installed and he was ready for the next step — the interior.
The instrument panel pad and the carpet were the only two interior items that needed to be replaced. The instrument panel pad was available from Ford and the carpet was reproduction. The interior was completed over two weekends.

The first weekend the instrument panel was tackled. The original owner had hung quite a few aftermarket gauges under the instrument panel, including an altimeter. Marc and Pam decided to remove the gauges because they detracted from the original look of the interior, and made entry and exit difficult from the driver’s seat.
Two aftermarket gauges were added to the console, housed in a Ford/Shelby accessory panel. The entire instrument panel was disassembled. Pam used a thinned solution of toothpaste and water to polish the plastic gauge faces. She then used a mild detergent solution to wash the instrument panel, using a toothbrush in the tight areas.
Some of the interior chromed plastic parts could have been replaced. “They're not perfect,” Marc admits, “but we couldn’t justify the extra expense.”
The seats were taken out and the carpet removed. Under the old carpet they found an original buildsheet. Marc installed a reproduction carpet which has the sewn-in red floor mats, like the original.
The final steps in the restoration were body work, paint, and stripes. When he started to stockpile parts in 1990, many Mustang components were available from the Ford parts counter. Marc bought a new set of front fenders. Marc also ordered a new front bumper, door handles, and the MUSTANG letters for the deck lid. Shortly thereafter Ford stopped supplying many of these parts. The new rear bumper Marc wanted was no longer available, so he re-chromed the original.

Marc enlisted the help of his friend Doug Tunin to help with the body work. They decided to work on the car one quarter at a time. When satisfied with each section, they’d move on to the next. The doors had 20 years’ worth of parking lot dings and the quarter panels were damaged from tire chains. Doug was experienced in body work and concentrated his efforts on the quarter panels. Marc’s job was to strip the body using muscle power and a dual-action sander. A sand blaster was only used to remove the paint on the cowl vent area. Two other areas Doug worked on were the A-pillar seam and the C-pillar seam (commonly called the sail-panel). Both of these areas, especially the sail-panel, are notoriously wavy on factory Mustangs. The sail-panel is an area checked by Mustang restorers as an indication of how well the body work was done.
The body work took seven months of weekends to complete. All body work and priming was done in Marc’s driveway. He papered and taped the engine compartment to prevent dust and overspray from contaminating his detailed engine. Occasionally he would clear the masking materials out of the engine compartment and fire up the engine to keep the seals lubricated.
When the body work was completed and ready for paint, Marc lightly mounted the taillights in the back and drove two miles to a local paint shop. He struck a deal to have the car painted for $125. All of the prep work was done, everything was masked, and Marc delivered all the necessary materials, including 1% gallons of Raven Black Delstar acrylic enamel.

When the paint was dry, it was color-sanded and then buffed with a wheel. The final polishing was done by hand. The last things to do were the body stripes and the black-out hood.
Marc had taken measurements of the hood’s black-out panel prior to stripping the paint. The area on the hood was carefully marked out and masked. It was lightly wet-sanded and delivered to the painter. When the painter opened the can of flat black he questioned whether it was correct. He had painted the hood of another Mach 1 and remembered the paint, while in the can, had a Blue cast to it.” They decided to shoot the hood and hope for the best. At first it looked flat enough, but the more it dried, the more glossy it became. The only solution was to repaint.
The finishing touches in the restoration of the Bodrie’s Mustang was the application of the trademark Mach 1 body stripes, which had been removed prior to painting. When Marc started to look for the red/gold stripes, like those originally on his car, they were not available in reproduction form. Other color combination body stripes were available, but Marc and Pam wanted the original red/gold. He purchased a partial set of NOS red/gold through a classified ad and shortly thereafter reproductions became available in red/gold.
When Marc documented the hood’s black-out panel, he also took careful measurements of the body stripes. Marc laid out the pattern edges with /%-inch masking tape. 3M reflective stripes have a contact adhesive on the back — there is no second chance when applying them. Marc used a trick that gave him a little flexibility in an otherwise inflexible application. First, he wet the surface of the car with a 1 percent solution of detergent in water. This small amount of detergent holds a thin layer of water on the paint. This gave Marc 30 seconds to reposition the stripes after application. Once satisfied with the location of the stripes, Marc used a squeegee to press the water from beneath the stripes, allowing them to permanently bond to the paint.


